Photo Pencils

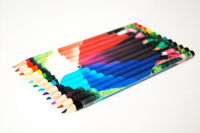
A lovely little gift could be the photo pencils with your own photo.
I really like the idea, it is similar to the paper pen decoration, but this time with your own photos and for a couple of pencils.
Furthermore it must be nice to decorate the recycled magazine rollups that I presented yesterday instead of pencils by glueing the clippings of your own photo on the paper rolls :)


Links:
Make Your Own Photo Pencils

Here at unikatissima:
Paper Pen Decoration
Recycled Magazine Rollups

A Mailable Mosaic

unikatissima Mailable Mosaic

An advent calendar doesn’t always have to be a lot of filled boxes, why not simply mailing a card a day?
It is more exciting for the recipient if the cards put together form a poster.
Photojojo shows how to make a poster with 24 cards from a photo. I think that you can also use a self-designed Christmas card for an advent calendar.
And on the back you can write a nice, amusing or inspiring aphorism (apart from the address ;-)).


Links:
Bei Photojojo: How to Turn a Photo into a Mailable Mosaic

Google search result for ‘aphorism’
Google search result for ‘aphorismus’

Here at unikatissima: Boxes not only for the advent calendar

Taking Photos from Jewelry

Taking Photos from Jewelry

If you want to take a professional looking photo from jewelry or other little items, you can get problems with reflections, shadows and the automatic flash.
I found several pages with tutorials on how to avoid those problems and take really good photos without spending a lot of money.
On the photo I tried it with an old lamp shade and natural light, but it didn’t work so well.

Links:
Taking good shots of jewelry
The original site doesn’t exist any more and is now available through webarchive: Digital Photography
This was the first tutorial I ever found on this subject – and it is very good. Take also a look at Connie Fox’s jewelry – and appreciate the soft reflections and shadows on the photos ;-)

At the following tutorial I found the idea brilliant to put the pendant onto glass to create a distance between the item and the background
How to take good photos of jewelry and other small objects

Articles about Jewelry Photography

At instructables.com (with explaining photos):
Budget photographic lighting “tent”
Do It Yourself Photography Light Box for Under $40
Super Simple Light Tent
Inexpensive Light Studio for Photographers

Crazy Quilt Photo Frame

Crazy Quilt Photo Frame

Once I wanted to make a photo frame for a friend. There are so many ways to do this, but then I got an idea I still find great ;-))


Crazy Quilt Photo Frame I used a simple glass frame as seen on the second photo that I already had at home and glued a kind of Paper Crazy Quilt with two windows for the photos onto the glass.
I used flower photos from an ad as paper and the only embroidery stitches I used where the zigzag stitches, because I wanted it to be simple.


Links:
Here at unikatissima:
Paper Crazy Quilt

Photo Stamps

Photo Stamps

I already presented links on eraser carving, but perhaps you want to go a step further and make stamps from your own photos?
I found a tutorial on how to prepare your photos for carving stamps.
The preparation of the photos is similar to the tutorial on making your own digital stamps (and while we’re at it why not making stencils from your own photos? ;-))
On the picture you see a stamp template I made from a photo from a magazine.
Not yet cut, first I must find a big eraser ;-)


Links:
Prepping Photos for Carving
Carving 101

art-e-zine: a cornucopia for artists
Make your own digital stamps
Stencil Art

Here at unikatissima:
Eraser Stamps

Plaster Photo Holder

Plaster Photo Holder

I saw this Tealight Photo Holder. I found the idea stunning, but I didn’t like the look of it: for me it looks like a cut-open tealight ;-)
But then an idea stroke: How easy to make this from plaster!
On the photo you see my plaster photo holder in action ;-)


And here is how I did it:

Plaster Photo Holder
img 1: Take a toilet paper tube and cut in rings about 4-5 cm height (appr. 1.5 – 2 inches). I did this with the sharp knife on the photo.
 

Plaster Photo Holder
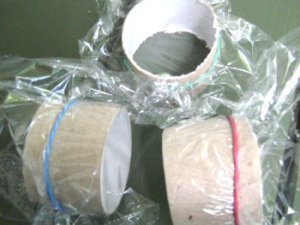
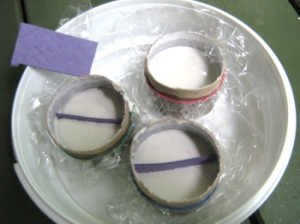
img 2: Wrap foil around, but let one side open. Fix the foil with elastic.
 

Plaster Photo Holder
img 3: Fill the forms with plaster to a height of about 2,5 cm (about 1 inch). When full, insert a previously cut piece of cardboard as separator.

Let harden (about an hour).


Plaster Photo Holder
img 4: When the plaster went hard, but everything is still wet, tear apart the cardboard tube and break the ‘plaster coin’ where the separator cardboard stuck.


Plaster Photo Holder Plaster Photo Holder
img 5: Rub the cardboard rests away.
If your photoholder piece is uneven, now is the moment to fix it: Simply scratch away what you don’t like with the back of an old knife.

img 6: You can embellish them in so many ways.
I painted them immediately with watercolours, but you can also wait until thoroughly dry.
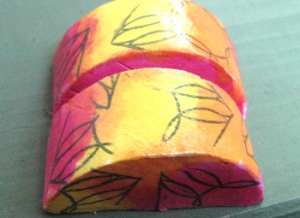
 

Plaster Photo Holder
img 7: When dried I stamped them and varnished them with medium gel.
Have fun!


Links:
Tealight Photo Holder
via Photojojo
Jacob’s Ladder

Jacobs Ladder

Once a friend gave me a couple of photos of her grandchild to make something special with them.
I thought about it and then remembered the Jacob’s Ladder (the children’s toy).
A little research in internet showed me, that there are tutorials but they all refer to the wood-and-ribbon version (for links see below the Links).
So I figured myself out how to do it with photos.
On the animated picture you can see that it worked.
I wrote a tutorial to download (PDF, appr. 230 KB).
You may used it as you wish, but if you do, please give credit.

Addendum: Later I found several paper Jacob’s ladders, I added the links below.


Links:
Make a Jacob’s Ladder from your photos (PDF, ~230 KB)

Tutorials on how to make a Jacob’s Ladder from wood and ribbons:

instructables: A Traditional Jacob’s Ladder

Jacob’s Ladder (English)
Jacob’s Ladder (German)

Tutorials for Paper Jacob’s ladders:
Invisible Jacob’s Ladder Technique Class (English)
Jacob’s Ladder Christmas Card & Gift Card Holder (English)
Mini-Scrapbook – Jacob’s Ladder (English)
Jacob’s Ladder Tutorial (English)

Cardboard Weaving Frame

Cardboard Weaving Frame

Once I wanted to create a picture frame with a woven border. I simply made a cardboard loom with an opening where I wanted to put the picture.
Cardboard Loom It worked out well, but I didn’t really like it when finished ;-)
I wanted to share anyway.
The sketch shows how to wrap the yarn.
If you want to see it better, enlarge the picture by clicking on it.
If you want to know how to weave on a cardboard loom, see the Links below.


Links:
Tutorial on how to weave with a cardboard loom

Droste Effects

Droste Effects

While surfing I found one day images with a so-called Droste effect (examples at flickr).
I was thrilled!
And I wanted to do that too ;-))
At flickr I found the Droste Effect Tutorial where Josh Sommers explaines about everything.
One important hint: Read everything *thoroughly*.
I didn’t and spend a lot of time searching where my problems came from although everything was explained somewhere ;-)
More explanations can be found at Escher’s Droste Print Gallery and their discussions.
Here I took one of my photos and played around with the Droste effect. It was so much fun!


Links:
Wikipedia: Droste Effect

flickr
Droste Effect Tutorial
Escher’s Droste Print Gallery: more explanations
Escher’s Droste Print Gallery Discussions: more explanations