Folded Paper Strips of Equal Width

Folded Paper Strips of Equal Width

Sometimes you need folded paper strips of the same width, when weaving paper baskets e.g., making a magazine purse or perhaps when making accordion folds.
Making those strips can be a time-consuming and frustrating experience – but it can be very fast and easy as well: Once I read somewhere (unfortunately I don’t remember where exactly) that you only have to roll your paper sheet over a dowel and then flat the paper roll.
Easy peasy, isn’t it? ;-)


Folded Paper Strips of Equal Width 
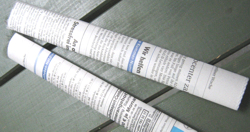
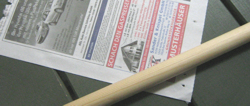
You need your sheet of paper and a dowel.
I used here one of my giant knitting needles.


Folded Paper Strips of Equal Width 
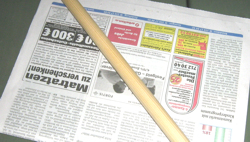
Roll your sheet of paper on the dowel.


Folded Paper Strips of Equal Width 
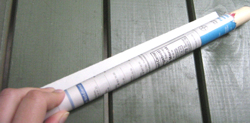
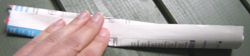
Pull the dowel out of the roll and flatten the paper roll.


Folded Paper Strips of Equal Width 
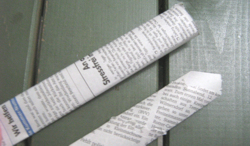
This way you get paper strips which are of the same width over the whole length.
Once I made a bowl like these magazine bowls. I preferred the ends of my paper strips to be thinner then the center, so that everything is about the same width everywhere.


Folded Paper Strips of Equal Width Roll your sheet of paper diagonally on the dowel.


Folded Paper Strips of Equal Width 
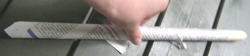
The paper roll gets longer, but the ends are thinner than the center.
You can now overlap the strips and create a strong bowl.


Links:
Paper woven basket

At craftster.org:
Magazine purse
Magazine bowls

Google image search result for ‘magazine bowl’

Paperweaving Plus

Paperweaving Plus

Although I like it, I always considered paper weaving a bit dull. Then I saw Paperweaving Plus (scroll down until ‘Paperweaving Plus’) and found the results fascinating.
I liked especially the not-only-paper-weave which I have to try as soon as possible.


Links:
Paperweaving Plus (scroll down until ‘Paperweaving Plus’)

Weave paper stripes into a sheet of paper (English) (With explaining pictuers)

If you also think, that paper weaving is a little dull, take a look at the flickr results for ‘paper weaving’

Crazy Daisies II

Crazy Daisies Scarf

I continued to play around with the Crazy Daisies. It is so much fun and I’m working on a Crazy Daisy Scarf. On the photo you see my scarf.


Crazy Daisies II 
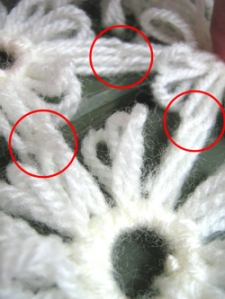
One thing I found out is that I love the little flowers much more without any edging. Therefore I’m joining them while working.
I’m measuring the yarn and wind the daisy. In doing so I’m pulling the thread immediately through the loops of the previous daisies using a blunt tapestry needle.
It takes a little longer, but this way I don’t have to assemble later and avoid the problem of hiding the ends.


Crazy Daisies II The other thing I played around with is another cardboard loom. In my first Crazy Daisy entry I used a cardboard version of the ice-cream-lid-loom.
Later I found other daisy looms and created my cardboard version of it. It works very well.


Crazy Daisies II
My cardboard loom consists of 2 cardboard disks. I taped them together and put 12 pins between both disks. I can then wind a daisy and when finished I pull the pins out. For the next daisy I put the pins back in my cardboard loom.
Note: I found out, that the disks must be very tightly taped, otherwise the pins fall out.
I always use the same pin holes and this way the tape won’t be damaged. I used my well taped cardboard loom over and over and don’t have any problems with the pins.
This way I can make my loom on the spur of the moment in the shape and size I need at the moment. I also tried a square one and the square daisies looked also nice.


Links:
unikatissima’s Crazy Daisies

Butterfly Loom

Butterfly Loom

At the website of Knitting-and.com where I found the Crazy Daisies I also found the Butterfly Loom.
As always I didn’t want to buy something without knowing if I will use it ever again and cut my butterfly loom in different sizes from cardboard as you can see on the photo.
It worked out very well, but although I’m always coming back to different kinds of weave I think I’d never be patient enough to actually create something with this technique. It’s a pity.
;-)


Links:
Knitting-and.com: Butterfly Loom

via Knitting-and.com at The Butterfly Loom:
Patterns for the Butterfly Loom
Joining Butterfly Loom Motifs

You can also find a description, faq’s and a gallery of items made with their Butterfly Loom

Here at unikatissima:
Crazy Daisies

Ganutell

Ganutell

Via craftster.org I found another craft, I’ve never heard about: Ganutell.
It makes me think of my Starburst card ;-)
Originally they made flowers with this technique, but it looks great as earrings as seen at this craftster discussion thread.
I have to face it: it is another technique on my (long, long) what-I-really-have-to-try-list ;-))


Links:
Ganutell

Discussion thread at craftster.org: How to make these ‘woven’ earrings?

Here at unikatissima:
Starburst Card

Clothespin bobbins

Clothespin bobbins

Once I found a really good idea on how to make inexpensive bobbins from clothespins.
Later I found more very good ideas at Gabriela Marková’s Kumihimo blog, all entries labelled with ‘Equipment’.
You can use those bobbins very good when making you own Kumihimo cord.

Links:
Learn Intarsia Knitting (the clothespin bobbins are mentioned there)

At Gabriela Marková’s Kumihimo blog:
All entries labelled with ‘Equipment’ (English)

Kumihimo Edo Yatsu

Kumihimo Edo Yatsu

I found recently the blog of Gabriela Marková. I’m very glad about, because her (German) book ‘Kumihimo – Flechtkunst aus Japan’ ‘Kumihimo – Flechtkunst aus Japan’ was such a help for me to learn Kumihimo.
In this book she describes not only different braids, but she always encourages the reader to play around, to try new braids, colour combinations and so forth.
It really was the right book for me ;-)
On the photo you see one of my braids, and I’m almost sure, that it is a Edo Yatsu braid ;-)
If you want to give the Edo Yatsu braid a try, check Gabriela Marková’s blog entry.

Links:
Kumihimo blog of Gabriela Marková
Kumihimo Edo Yatsu braid

The link isn’t available no more.
Gabriela Marková’s German book ‘Kumihimo – Flechtkunst aus Japan’ (English)
At Amazon.de:
Gabriela Marková’s German book ‘Kumihimo – Flechtkunst aus Japan’

Kumihimo here at : unikatissima :
Kumihimo beads here at : unikatissima :

Beaded Dragon Strap

Beaded Dragon Strap

Today I’d like to present a beautiful Peyote strap with saw teeth, Sally’s Dragon Strap.
To work a Peyote strap is ‘easy’ (for tutorials see links below), but following this pattern is more difficult and figuring out how to add those saw teeth is great ;-)

Links:
Beaded Dragon Strap

About.com: Beadwork: A website with lots of tutorials about beadwork
Odd Count Flat Peyote Tutorial

Perlenhobby.de: A website with lots of (german) tutorials about beadwork:
click on ‘Anleitungen’ in the sidebar left and there select ‘Flaches Peyote mit ungerader Perlenanzahl’

Loom Woven Bead Bracelet

Loom Woven Bead Bracelet

When working with beads I also wanted to try loom weaving – just to see, how it works ;-)
On the photo you can see both sides of my self-woven bracelet with a self-designed pattern. It was very easy and I like the simple elegance of the pattern.
Because I created the bracelet for me, I didn’t need a closure, I can simply slip the bracelet over my hand.


Links:
Make your own bead loom (with explaining pictures)

Tutorial on Bead Loom Weaving
Another tutorial on Bead Loom Weaving

Two very good pictures (in English text): select in the left sidebar ‘Woven Beadwork’ and scroll down
Two very good pictures (in German text): select in the left sidebar ‘Gewebtes’ and scroll down

Tips to bead weaving (German) at Perlenhobby.de: click on ‘Tipps + Tricks’ in the sidebar left and select there ‘Tipps zum Perlenweben’

Kumihimo Beads

Kumihimo Beads - Kumihimo Perlen

This Thursday’s 2nd challenge Beaded Beauties gave me the opportunity to do something I wanted to do for a long time: making Kumihimo beads.
Kumihimo is a Japanese technique to braid beautiful cords, but then: what do I do with the cord? It’s way too beautiful (and too labour-intensive! ;-)) to be used as a shoelace for instance.
I thought that it would make wonderful beads, but usually the braids are finished by wrapping some string around the braid and such beads would be much too long.


Kumihimo Beads - Kumihimo Perlen 
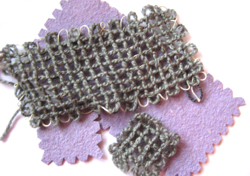
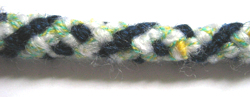
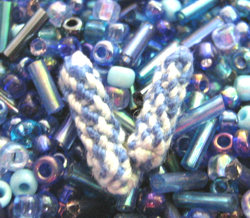
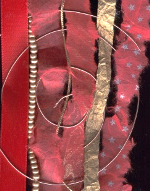
Therefore I figured out how to make my own Kumihimo beads.
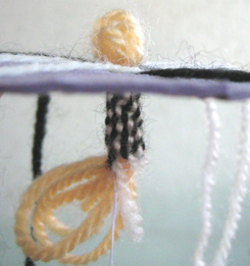
The technique is far from perfect and I hope that you will try it and give suggestions to enhance the technique.

On the first two photos you see Kumihimo beads I made, the blue ones with cotton thread and the black and white ones with acrylic yarn.
All beads were made with 4 light and 4 dark coloured yarns, but I changed the initial positions on my cardboard Kumihimo disk.
You see at the surrounding seed beads how tiny my Kumihimo beads are.


Kumihimo Beads - Kumihimo Perlen What to do:
Make your Kumihimo cord. I worked about 20 rounds.
When finished, pull all threads into the bead.

And that’s where the problem lies:
If you make the Kumihimo cord ‘the normal way’ you won’t have enough place into the bead to pull all 16 threads in (8 threads at each side of the bead).
I tried different techniques to ‘reserve’ a place for the thick bunch of threads. The best one I found was making a bundle of 8 threads of the same gauge and using it as ‘filler’, that means, working around them (see third photo).


Kumihimo Beads - Kumihimo Perlen 
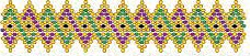
The Kumihimo beads are from fabric and can be stitched however you want. On this photo I surrounded my Kumihimo bead by seed beads and made a kind of Freeform Peyote Pendant.


Links:
This Thursday’s 2nd challenge Beaded Beauties

unikatissima’s Kumihimo How-to
unikatissima’s Freeform Peyote How-to