
Sometimes I get furious, e.g. when everything goes wrong: the glue doesn’t glue, the fibers entangle and the paper always slips.
Then I’m in need for a rage ball and I think that those could be suitable ;-)
Links:
Balloon Balls
…compilation of tutorials
Sometimes I get furious, e.g. when everything goes wrong: the glue doesn’t glue, the fibers entangle and the paper always slips.
Then I’m in need for a rage ball and I think that those could be suitable ;-)
Links:
Balloon Balls

Once I found a really good idea on how to make inexpensive bobbins from clothespins.
Later I found more very good ideas at Gabriela Marková’s Kumihimo blog, all entries labelled with ‘Equipment’.
You can use those bobbins very good when making you own Kumihimo cord.
Links:
Learn Intarsia Knitting (the clothespin bobbins are mentioned there)
At Gabriela Marková’s Kumihimo blog:
All entries labelled with ‘Equipment’ (English)

If you want to take a professional looking photo from jewelry or other little items, you can get problems with reflections, shadows and the automatic flash.
I found several pages with tutorials on how to avoid those problems and take really good photos without spending a lot of money.
On the photo I tried it with an old lamp shade and natural light, but it didn’t work so well.
Links:
Taking good shots of jewelry
The original site doesn’t exist any more and is now available through webarchive: Digital Photography
This was the first tutorial I ever found on this subject – and it is very good. Take also a look at Connie Fox’s jewelry – and appreciate the soft reflections and shadows on the photos ;-)
At the following tutorial I found the idea brilliant to put the pendant onto glass to create a distance between the item and the background
How to take good photos of jewelry and other small objects
Articles about Jewelry Photography
At instructables.com (with explaining photos):
Budget photographic lighting “tent”
Do It Yourself Photography Light Box for Under $40
Super Simple Light Tent
Inexpensive Light Studio for Photographers

I knew about those moldable foam stamps, but I never realized how versatile they are and what great stamps you can make from them. You can even combine them into stunning collages.
I’m speechless again ;-))
On the photo you see my attempt at stamping a clothespins pattern. Because I don’t have no moldable stamp, I used my kneaded eraser. I think this is a great background for a card.

Ok, until Christmas it’s still some time (although I’m always surprised when the time comes ;-)), but I thought that those stamped cookies must also be great at picnics.
They are high on my very long what-I-really-must-try-list ;-))
Links:
Stamped Cookies

Embellishing rocks seems to be quite popular. Some people paint them, some people embroider them, some people felt them, some people wrap them in lace, some people wrap them in polymer clay, some people crochet them and some people bead them.
And if you want them to be fragrant, check back the previous mentioned Fragrant Rocks.
I never did anything with rocks, because I’m living on sandy ground ;-)
But all those rocks rock ;-)
Links:
Painted rocks (via CraftZine)
Embroidered rocks
Felted rocks
Lace wrapped rocks (via CraftZine)
Polymer clay covered rocks
Crocheted rocks
Beaded rocks
At unikatissima’s:
Fragrant Rocks
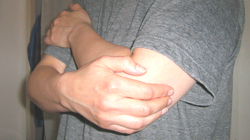
Many crafters, crocheters, knitters and so forth know this: We’re working happily for hours, but when we (have to? ;-)) finish, we feel pain: in the neck, in the shoulders, in the elbow, in the wrists and perhaps in the hips.
Once I read an article from a crocheter, where she said, that she had to work the whole day long (about 10 hours a day if I remember right). She then discussed different ointments that she had tried over the time.
I must say that I was shocked: Such pain is a real drawback on life quality, but there must be a way without drugs and pharmaceuticals.
Later I got those pains myself and I had to figure out, what I want to do against.
After a certain research about RSI (see also links below) I found a way which sounds way too easy and trivial, but which works for me.
And which is one of the most difficult things to do for me, too ;-))
I just take my kitchen timer and set the clock to 15 minutes.
Every 15 minutes, when the alarm goes, I go up from my chair, stretch thoroughly, sit back again and continue (this takes me less than 10 seconds!).
That is the easy part.
The difficult part is for me to really do it!
And not to say: ‘Just this little row and then…’
Often I forget to set the timer to the next 15 minutes as well.
And it is always a disruption. If I’m crocheting, I have to put he hook and the yarn besides. If I’m sitting at my computer, I have to take my hands from the keyboard (although not my thoughts from the subject!).
I don’t like to be disrupted!
But if I follow my line, I can crochet for hours without any pain at all (I tried it).
Just give it a try if you have problems and tell me then, how it works for you.
I consider making a 30-days-trial from it.
This is a way to approach changes in your behaviour. Sometimes one wants to change something, but it doesn’t work. With the 30-days-trial you give yourself a time to test your new behaviour and then to decide: ‘Yes, that’s it.’ or ‘No, I made a mistake by thinking, that I want this.’
I did another 30-days-trial which helped me to change a habit, but it took me three 30-days-trials until I was sure ;-)
Links:
30 Days To Success
About RSI:
I found the website RSIRescue.com- Repetitive Strain Injury. They have lots of material, hints and tips and help for those who suffer from pain from repetitive strain, not only from the computer keyboard.
First check ‘Our Theory in a Nutshell’ in the left navigational bar. Although they’re talking about ‘How Computer Users Get RSI’ I know from my own experience that the problems of crocheters are similar.
Check also ‘Resources’ in the left navigational bar and then ‘Educational RSI Brochure’, where everything is explained very shortly.
Best, if you check all pages ;-))
It helped me a lot to understand where my problems come from and gave me an idea how to prevent further pain.

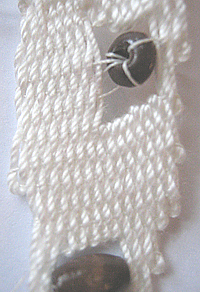
When working with beads I also wanted to try loom weaving – just to see, how it works ;-)
On the photo you can see both sides of my self-woven bracelet with a self-designed pattern. It was very easy and I like the simple elegance of the pattern.
Because I created the bracelet for me, I didn’t need a closure, I can simply slip the bracelet over my hand.
Links:
Make your own bead loom (with explaining pictures)
Tutorial on Bead Loom Weaving
Another tutorial on Bead Loom Weaving
Another tutorial on Bead Loom Weaving
Two very good pictures (in English text): select in the left sidebar ‘Woven Beadwork’ and scroll down
Two very good pictures (in German text): select in the left sidebar ‘Gewebtes’ and scroll down
Tips to bead weaving (German) at Perlenhobby.de: click on ‘Tipps + Tricks’ in the sidebar left and select there ‘Tipps zum Perlenweben’
Once a found an instruction on how to work an african necklace using needle weaving (also called ‘pin weaving’). It’s a weaving technique that allows to easily create strange shaped fabrics and to incorporate beads into.
Stunning!
I played around with this technique and thought that it could as well be used for little bags, for bracelets and so forth.
Unfortunately it’s a technique that requires a lot patience – which I don’t have. ;-)
I’d love to hear what you think about!
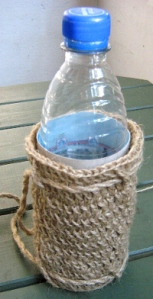
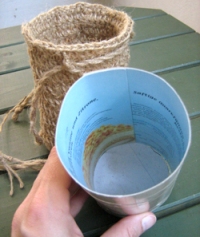
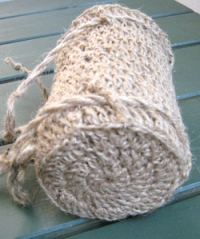
One day my friend asked me, if I have an idea how best to attach his water bottle to his bicycle. I promised him to make him a bottle holder and that’s it: It consists of a cardboard cylinder with bottom and a wrap crocheted from simple package string. I made two cords from the same package string to tie it somewhere to the bicycle.
And that’s how to do it:
The inner cardboard container and the outer crocheted container.
Links:
If a bicycle bottle holder isn’t enough for you, try the Bicycle Handlebar Bag.
Making Any Sized Crochet Circles (English)
Häkeln lernen: Runden und Spiralen (German)
How to make Twisted Cord (English)
Kordel drehen (German)