Serendipity Collage

Serendipity Collage

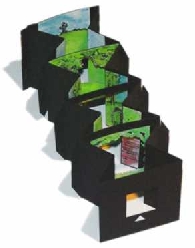
Create a lot of similar but not equal little squares to be used in card making, inchies* ‘production’ and other paper arts.
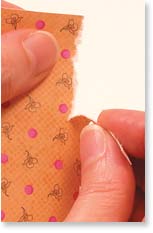
Take matching papers, tear them in pieces and glue them on a sheet of paper. If you like to, stamp it, paint it (to blend them a little) or doodle on it.
Then cut the embellished sheet in squares.

* What is an inchie? An Inchie is a 1″ square of art. I’ve seen them (in internet) made from paper, then embellished in innumerable ways or even sewn from fabric, also embellished in uncountable ways (see links beneath).


Links:
Once I have found lots of instructions on how to make Serendipity Squares, but I can’t find them back ;-(
Therefore I link here results of the Google image search for ‘Serendipity square Collage’:
Stamped Serendipity Squares (English) by ScrapFriends

Serendipity Technique Tutorial (English) by Art Without Anxiety

Serendipity Technique Tutorial (German) (select ‘Serendipity) by Anja`s Artefaktotum

Amendment (29. April 2008)
I found back my links and here are the missing ones:

Serendipity Squares (English)
Serendipity Do! (English)

Serendipity Squares Scrapbook Layouts: Search for ‘Serendipity Squares’

Serendipity (German)

Inchies – Inchies
Google image search for ‘what are inchies’
Google image search for ‘what is inchie’
Flickr search for ‘inchies’

Crochet Chamsa

Crochet Chamsa

I always liked the Chamsa (English Wikipedia entry for ‘Chamsa’) because it seems to me to be a sign of peace and friendship.

One day I crocheted a Chamsa to use it on a card.
Have fun with my original crochet pattern (and if you use it, please give credit).

First you work three rounds, then you continue in rows.

(Instructions on how to crochet with a magic ring and how to crochet the double treble crochet: see Links beneath)

Click picture to enlarge
Crochet Chamsa

Links:
Crochet Chamsa pattern

English Wikipedia entry for ‘Chamsa’
German Wikipedia entry for ‘Hamsa’

Magic ring
(Google results)
The Magic Adjustable Ring: A Better Way to Begin Crochet in the Round (English): very good illustrated instruction
Häkeln lernen: Der Fadenring (German)

Double Treble Crochet
(Google results)
Tutorial Double Treble Crochet (English): very good illustrated instruction
Tutorial Double Treble Crochet (German)

Starburst Card

Starburst Card

I love many of the string art patterns, but I would never make them, because I find them on the other side quite old fashioned.
Although the I thought that I could use the pattern to create a card.
I pricked the holes of the Starburst pattern Starburst pattern (template here template here) from The Art of Thread Design The Art of Thread Design into my cardboard and measured the length of thread. About 8m (about 26 feet ;-)). Then I started to weave the thread through the holes. I hadn’t finished the first two stitches when my thread became a firm knot. Totally entangled. Absolutely un-detangable.

Therefore I had to try something else with new thread.
I thought (what I should have done beforehand ;-)) that in string art they use pegs (nails) to fix the thread at the predefined points. Then I realised that I could have a kind of pegs too: if I weave the thread over and under the holes (from hole 1 to hole 2, 2 to 3, 3 to 4 etc) and back, I get a coloured frame where the holes are, I get pegs, because one thread goes from the front side to the back side and vice verso (see picture).

Starburst Card-Thread weaving
Click to enlarge

Now I could wrap the thread around my self-made pegs just in the same way they are doing it in string art around the nails.

I enjoyed working on the Starburst pattern, but at one end it is very narrow and I only could use two layers in place of three.


Links:
The Art of Thread Design

Starburst pattern instructions
Starburst pattern template

The original site doesn’t exist any more and is now available through webarchive:
The Art of Thread Design

Starburst pattern instructions
Starburst pattern template

Faux Leather Background

Faux Leather Background

I decorated the self-made candle holder on the photo with the Faux Leather Background technique and found it great. This technique can as well be used when making cards.
On the net I found different tutorials on how to make Faux Leather Backgrounds using the masking tape technique. One of them is the tutorial on the Faux Leather Masking Tape Background Technique by Trish Bayley.
A very good german tutorial can be found at artefaktotum at ‘Techniken’ – click ‘Faux leather’ there.


Links:
Trish Bayley: an Art Blog with among other things an interesting technique zone
Faux Leather Background Technique

artefaktotum: The website of an dedicated stamper, with great tutorials (in German)
artefaktotum’s techniques overview (see ‘Faux leather’ there)

Tearing Paper

Tearing Paper

Working with paper sometimes consists in tearing it. But mostly you want it to be torn in a particular way and not crooked ;-)
Creative Paper Crafts gives lots of tips, tricks and ideas, one of them being a how-to on tearing paper.
I tried this technique several times and it always worked out exactly the way I wanted.
Thats what I call a good instruction ;-))


Links:
Creative Paper Crafts: a website where I can surf for hours! ;-))
Tearing Paper

Folded Roses

Folded Roses

Working with paper is always fun to me. Therefore I check everything that shows me how to fold, glue or colour papers.
This time it was an instruction on folding roses instruction on folding roses I took delight in. They look nearly real!


Links:
ParchCraft Australia: a website with lots of project ideas, instructions and patterns
Folded Roses
Tutorial moved to: Folded Roses
Note: If you can’t open it, try the webarchive version