Oil Lamp

unikatissima Oil Lamp

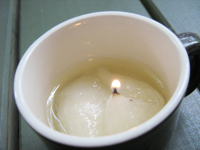
On the photo you see an oil lamp from an espresso cup, plain, cheap cooking oil and cotton. On the page with the instruction there are more but I always wanted to try this one.


And I learned a lot:

  • The tip of the cotton must peep out a good piece and be well twisted, otherwise the flame is too small (as you can see on the photo).
  • If the cotton is soaked it is quite difficult to bring it to burn (but be always careful anyhow!).
  • My ‘Espresso lamp’ burned about seven hours (!).
  • It hardly smelled.
 

unikatissima Oil Lamp
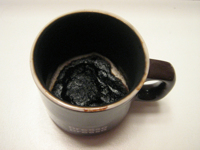
But: I always have to keep an eye on it: At the end when the oil was nearly burned the cotton began to burn and the cup was very, very hot and totally sooted.
Fortunately it didn’t break.

Part of the soot was ‘only smudgy’ and I could wipe it away, but part of it was kind of burned in and it took me the time of a whole motion picture (and lots of force!) to get the cup clean again.

Anyhow I will do this again because it is reasonably priced and beautiful.
Perhaps I will drip some drops of essential oil into, but first I must find out what puts off midges ;-)


Links:
Oil Lamp (Make Lamps–Not Vinaigrette)

Water Balloon Luminaries

candletech Water Balloon Luminaries

Aren’t those beautiful?
When finding the instruction on how to make water balloon luminaries I was thrilled.
It looks so easy (I haven’t tested it yet) and it’s worth to read the comments, too, to get the experience and more ideas:

  • several comments tell about their experience with this technique: some had problems with popping balloons while dipping them into the wax and hot wax got everywhere, so it seems that one has to be very careful;
  • somebody said that they saw poured sand at the bottom to prevent overheating/melting, somebody else suggested to put some water in the luminary for the same reason;
  • I’ve seen mentioned somewhere to cast some plaster of paris on the bottom for the same reason;
  • as Carol said for the geometric cut paper table lamp you can use battery operated tea lights;
  • suggestions were given to put something between the layers, like leaves and somebody else told their erperience with this;
  • I’ve seen somewhere that somebody glued (somehow?) the top layer of paper napkins on such wax luminaries;
  • someone wanted to make parts of the luminary opaque which didn’t work, but somebody else suggested to use different coloured wax for the layers with a dark colour as outer layer and then carefully carve out a pattern through the outer layers;
  • one comment even suggests to do a similar technique with chocolate syrup in place of wax to get chocolate bowls (hmmm! ;-));
  • and somebody gave a tip on what to use if you don’t have a double boiler.

I’m not quite sure if I want to play around with this, but the temptation is strong ;-))


Links:
Water Balloon Luminaries

Wine Glass Candle Lampshades

unikatissima Glass Candle Lampshade

I found the instruction on how to make wine glass candle lampshades neat, but I don’t have to rely on pre-made templates any more, because I know how to construct a cone ;-))
That’s exactly what I’ve done, additionally I didn’t use no wine glass but a water glass.


unikatissima Glass Candle Lampshade 
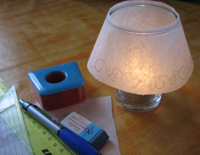
Admittedly a wine glass would look better, because the tea light is hidden then.
Or I should cover the lower part of the water glass.
Or I should make the cone higher (and I can ;-)).

I made my lampshade from sandwich paper which is actually too fine and doesn’t hold the shape (in the instruction they are using vellum). To improve this I taped some clear tape against the paper from the inside.
But it didn’t help very much.


unikatissima Glass Candle Lampshade 
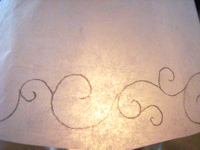
Before I cut the lampshade I embellished it with some flourishes – looks cute, doesn’t it?


This is my cone calculation (shortened version):
Desired data:
Height H = 6 cm
Upper radius Rt = 3 cm
Lower radius Rb = 5 cm

Calculation:
PQ = Rt * H / (Rb – Rt) = 9
QT = 3
PT = sqrt(81 + 9) = 9,5
PR = 15
RS = 5
PS = sqrt(225 + 25) = 15,8

That is:
Outer radius = 15,8 cm
Inner radius = 9,5 cm

a = 360 * (1 – ((2 * Pi * Rb) / (2 * Pi * PS))) = 360 * (1 – (31,4 / 94,8) ˜ 241°

Great, isn’t it? ;-)

As you can also see on the topmost photo, another advantage of self-calculation is that the upper rim of the lampshade barely protrude over the rim of the glass and therefore the danger of fire is reduced.
Anyhow: Always be careful!
;-)


Links:
Wine Glass Candle Lampshades

Here at unikatissima: Calculation of a cone on the basis of the desired height, desired upper and lower diameter

Fun Recycled Food Package Lights

unikatissima Recycled Food Package Lights

I found an instruction on how to make fun lights from ‘silly’ food packages.
I really like them and wanted to try them immediately.
Therefore I took a look at my kitchen and found the joghurt cup. I thought that the light should shine through and I began with pricking some ‘test holes’.
Looks interesting, doesn’t it?


unikatissima Recycled Food Package Lights 
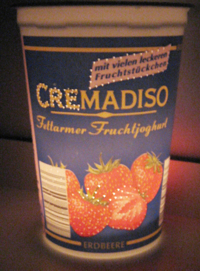
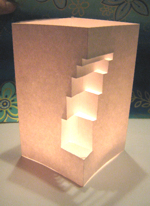
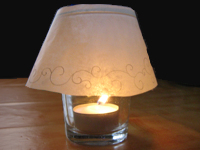
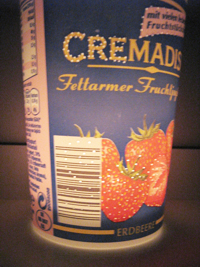
In fact I found the hole pattern around the lettering the most interesting.


unikatissima Recycled Food Package Lights What I also liked was that the lower holes made a nice light pattern.


Links:
Fidgety Fingers: Fun Recycled Food Package Lights
via Junk Mail Gems – DIY Christmas Gifts from Inhabitat

Geometric Cut Paper Table Lamp

unikatissima Geometric Cut Paper Table Lamp

I find the idea of the Geometric Cut Paper Table Lamp great: All those beautiful fractal pop-up cards continued ;-)

On the photo you see my version, made from plain printer paper and with a tealight in the middle.
Because the paper is rather light, I’m afraid that the lamp may fall and catch fire, although there is enough place for the tealight.
But anyhow, I find it beautiful ;-)


Links:
At instructables.com: Geometric Cut Paper Table Lamp

Here at unikatissima: Fractal Pop Up

Self-made Lamp

Self-made Lamp

This isn’t a real instruction but more of an inspiration. At Atelier Verena you can follow a class about recycling. At her website, Atelier Verena describes how to make your own recycled lamp (last item on page): glue two terracotta pots together, wrap them with fabric, use some fabric stiffener and paint it with acrylic colour.
I haven’t done it yet, but I think that you also can wrap the glued pots with paper mache or plaster of paris and do some kind of collage or decoupage or glueing interesting tissues an it and so forth.


Links:
Self-made Lamp (last item on page)

Paper Lampshade

Paper Lampshade

Yasutomo has interesting tutorials for different project ideas different project ideas different project ideas. I found this lampshade lampshade lampshade simply stunning!
My self-folded experiences looked also good. I wanted to use them as little gift boxes. It turned out that they were long but narrow cases for which I didn’t found any appropriate gift to put in ;-))


Links:
Yasutomo project ideas
Paper Lampshade
The original site doesn’t exist any more and is now available through webarchive:
Yasutomo project ideas
Paper Lampshade

Albert has pointed out that the archived page doesn’t show pictures (anymore?).
Fortunately Yasutomo has re-organized their website and the lampshade can be found there again:
Yasutomo project ideas
Paper Lampshade


The original site doesn’t exist any more and is now available through webarchive:
Paper Lampshade