Although I don’t sew I can’t resist looking for interesting posts.
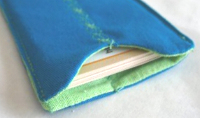
The tutorial on how to sew a business card holder is one of those – in my humble opinion ;-)
Have fun sewing ;-)
Links:
Business Card Holder
…compilation of tutorials
Although I don’t sew I can’t resist looking for interesting posts.
The tutorial on how to sew a business card holder is one of those – in my humble opinion ;-)
Have fun sewing ;-)
Links:
Business Card Holder

I mentioned previously crocheted buttons, beaded beads, paper beads and fabric beads.
Another way to make your own buttons and/or beads is knotting fabric.
On the photo you see my first attempt on this technique: I admit that I still have to work on it ;-))
It is tiny (about 0,5 cm / 0.2 inches) and was made from a very light fabric that frayed heavily. I thought that this could look interesting, instead it looks unfinished.
Back to the drawing board ;-)
Links:
Knotted Fabric Buttons and Beads
At unikatissima’s:
Crocheted buttons
Beaded beads
Paper beads
Fabric beads
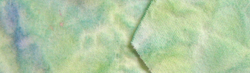
As I found the tutorial on how to dye fabric with acryl colours I was thrilled, because I think that this way I can colour my fabric just the way I want.
I tried it immediately, but I have to work on it some more (and I will! ;-))
In a second entry Debra showed what she did with the paper towels she used to clean her workspace: isn’t it stunning?
Links:
Hand-dyed Fabric Trims
Dyed Paper Towels for Paper and Fabric Arts

I like yoyo’s, but only recently I tried to make one. And I find it cute.
It is made from shiny polyester fabric and embellished with a little crocheted flower and some embroidered beads (I hate to have polyester on my skin, but I like it for pins and the like, because it is so shiny).
Links:
Yoyo Projects (with explaining pictures)
How to make a Yoyo (with explaining pictures)
The links don’t work anymore, you can find the information here now:
Yoyo Projects (with explaining pictures)
How to make a Yoyo (with explaining pictures)

Rosie showed her beautiful carved stamps and mentioned that she wants to carve letters too.
I prefer to use letter stencils, because I can use them in such a flexible way.
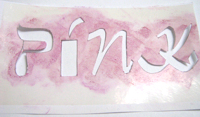
On the first photo you see a page from an artist book of mine yet to be finished. It has the theme ‘Colour’ and I stenciled the word ‘Pink’. On the other photo beneath you can see the stencil.
This is how I did it:
You’ll need:
What to do:
 The tape makes the paper not only sturdy, but also quite waterproof, so that you can use it several times with nearly every kind of colours. If necessary you can put tape on both sides of the paper prior to the cutting.
You can find a similar tutorial on instructables.com for making your own freezer paper and your own freezer paper stencil. I guess it is better for making bigger stencils, but I haven’t tried it.
Links:
Rosie’s carved stamps

One day I found a tutorial on flower pounding. It sounded strange to me and I was really surprised what people do to innocent flowers ;-) (we have already seen that people stitch flowers).
Anyhow, the results are stunning!
As you can see on the photo, mine aren’t: I pounded on tissue paper in place of fabric and did something wrong. But this experience showed me that I’m not the woman to wallop little flowers ;-))
Links:
Flower Pounding
Inspiration: Google image results for ‘Flower Pounding’
Here at unikatissima:
Stitched Flowers

Many of us have lots of beautiful stamps (some are self-carved, even from photos). Many have stamped not only on paper but also on fabric.
Nevertheless the idea of making stamped appliqués stroke me.
The tutorial is in German, but that is what she does in short:
Great, isn’t it?
Links:
Making Appliqués with Stamps (German)
Here at unikatissima:
Eraser Stamps
Photo Stamps
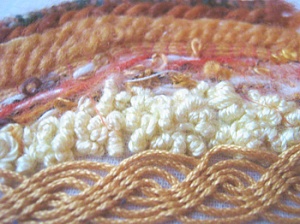
On the photo you see my idea of Freeform Embroidery which was highly inspired by ‘Rock Pool’ and ‘Laying It On The Line’.
I used a piece of old (but clean! ;-)) bedsheet as base. First I laid some worsted and funky yarns on it which I fixed with couching stitches (at the top of the photo). Then I stitched some french knots (light yellow on the photo). Below is my first attempt at ply-split braiding which I fixed with some couching stitches too.
It is one of my many UFOs (‘unfinished objects’), but one day I will come back to it ;-)
Links:
Inspirations: ‘Rock Pool’ / ‘Laying It On The Line’
English Embroidery Stitch Diagrams
Deutsche Stickstichbeschreibungen
Couching stitches (English)
Couching stitches (German)
French knots (English)
French knots (German)
Ply-split Braiding: a (very) short description and resources
PDF Ply-split tutorials by Peter Collingwood (scroll down)

Once I wanted to create a picture frame with a woven border. I simply made a cardboard loom with an opening where I wanted to put the picture.
 It worked out well, but I didn’t really like it when finished ;-)
I wanted to share anyway.
The sketch shows how to wrap the yarn.
If you want to see it better, enlarge the picture by clicking on it.
If you want to know how to weave on a cardboard loom, see the Links below.
Links:
Tutorial on how to weave with a cardboard loom
Tutorial on how to weave with a cardboard loom

While I was browsing through the projects of STITCH I found Precious Petals. They ‘glue’ the flowers on fabric and then embellish with decorative stitching.
A stunning idea which is still on my to-so list.
Links:
STITCH project: wonderful projects around stitching (how surprising ;-))