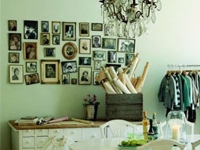
I never manage to hang picture frames exactly where I want to ;-)
Therefore I find this a great idea: the pictures are ‘pre-arranged’ on paper, the places for the nails marked and then you can easily drive the nails into the right places.
…compilation of tutorials
I never manage to hang picture frames exactly where I want to ;-)
Therefore I find this a great idea: the pictures are ‘pre-arranged’ on paper, the places for the nails marked and then you can easily drive the nails into the right places.
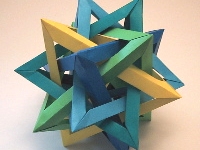
I found a linklist of Origami spheres linklist of Origami spheres (and, as you can see on the picture, of Origami stars, too ;-)), that I didn’t want to keep from you ;-))
Links:
Origami Spheres (Origami)
The original site doesn’t exist any more and is now available through webarchive:
Origami Spheres (Origami)
Instruction for the Origami shere on the picture (Five Intersecting Tetrahedra)
The assembly of the single components is shown very well in this video: Origami Five Intersecting Tetrahedra (complete assembly)
via: “Below is a video tutorial by Jonakashima:”
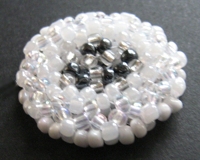
While surfing the internet I found this necklace and found it amazing.
I thought that it should be easy to made: you make the mdedaillons with flat round Peyote (see links below) just as for the bottom of the beaded bottle, but then you work the pattern back again.
This way you get a slightly thicker medaillon in place of a flat disk.
Unfortunately I’m not so good concerning colours and so I’m not really satisfied with my own medaillon (see photo).
Perhaps I should have printed and coloured in one of the graphs (see links below) to use this as template?!
One day I really will do this ;-)
Links:
Tutorials for flat round Peyote and graphs:
Flat Round Peyote Stitch Step by Step Tutorial (English) – tutorial
Flat Round Peyote Stitch – Beading Graph Paper (English) – graph
Hexagonal Flat Peyote Worked In Rounds (English) – tutorial and graph
Rundes Peyote mit variabler Perlenanzahl (German) – tutorial, click there on ‘Rund-Peyote’
Google search result for ‘flat round peyote’
Google image search result for ‘flat round peyote’
Here at unikatissima:
 Beaded Bottle
Peyote Variations
Wrap a Rock
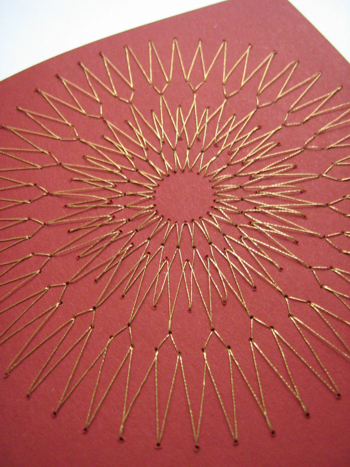
Recently I needed a card for a man which had to show the colours wine red and gold.
What is more I wanted it simple yet elegant and I think that it worked out ;-))
(Click the picture to get an enlarged view.)
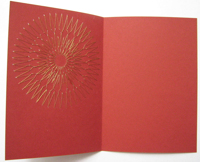 The pattern shows inside, too.
Because I didn’t like the writing to be directly on the wine red I put a crème coloured paper in.
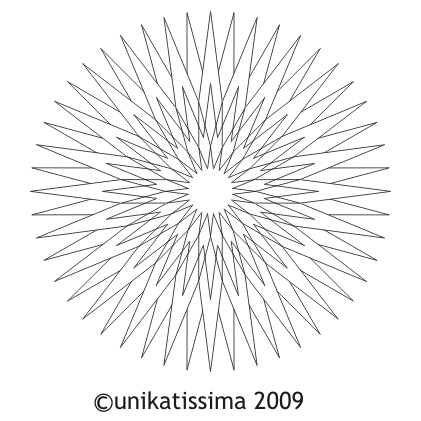 You can click the thumbnail of the template to download the enlarged template. The template is about 10 cm (appr. 4 inches), if you like to have a different size you will have to adapt the print size.
Simply lay the template on your card and prick all holes where you want to thread the yarn through (there are several possibilities, just try it).
Then weave in the thread.
Note: If you use an overlong thread you only get a thread tangle.
That’s why I worked in rings that I finished one by one.
You can find the technique that I used to thread the yarn through the hole in the entry Starburst Card.
I finished the ends of the threads on the backside as invisible as possible by laying them side by side and glueing them on.
In case that the backside of your card doesn’t look nice you can glue on a different coloured paper on both sides, that looks very good and conceals all imperfections.
Links:
Here at unikatissima:
Starburst Card: I show there how I weave the thread through the holes, here I did it the same way
Entries with the tags ‘paper’ and ’embroidery’

Recently I re-discoverd the website of Lisa Vollrath whose tutorials I always found really great.
When I saw her ‘A Simple Tabbed Pop-Up’ I wanted to try it immediately.
But then it started: No, I don’t want to make an Eiffelturm, but something else. But what? Somebody wrote something about sail boats in the comments.
Ok, good idea.
Ehm, the toner of my printer won’t suffice to print something.
Hmm, Lisa said that actually it doesn’t matter how large the tabs are…

Thus I took an A4 paper horizontally and my Xacto knife and startet to cut a sail boat and the sea.
I find my card for a try on the spur of the moment quite nice, but I haven’t decided yet what to put on the front side ;-)
Links:
At Go Make Something: A Simple Tabbed Pop-Up

While surfing I found Zentangles, which is nothing else than doodling.
But when I browsed the galleries I really, really wanted to try it, although I normally don’t feel at my ease with doodling.
My first attempt was ugly, because I tried to ‘create’ something. Then I took a little sheet of paper and started doodling without thinking about.
I was surprised at how beautiful it turned out ;-)
Links:
Zentangles

As mentioned before in the entry about paper beads, I once created an artist book.
Step Outside Your Box Saturdays posted this week a challenge about books and I thought it an opportunity to show my artist book ‘blickkontakt’ (which means ‘eye contact’).
I wanted ‘blickkontakt’ to give the viewer many surprises to discover and created therefore several windows and fold-outs.
The pages were created from cardboard and covered in hand-stained papers. Then I stamped, embroidered, tape transfered, sketched, scribbled and glued.
Enjoy the pictures
(Click thumbnails to see photos)
The cover with the round medaillon in its ‘pocket’. Along the spine I let hang the threads with the paper beads.
 Still the cover, but this time showing the backside of the round medaillon.
 Pages 1 & 2: You see the eye through a round window, the spirals are hand-embroidered, the little altered slide can be put into the lace pocket.
 Pages 3 & 4: The images are tape transfered, the flourishes are hand-embroidered.
 Pages 5 & 6: I stamped, wove paper, embroidered, crocheted. The dark circle is a free swinging altered bottle cap, the semicircle on the left upper side is a fold-out, where I glued a hand-beaded star.
(Unfortunately the tape transfers gleam so, that you can’t see their motif.)
 Pages 7 & 8: I cut two little round windows into the right page.
The raffia forms a little pocket, where I put a transparent tape transfer tag.
 Pages 9 & 10: Stamping, tape transfers, embroidered spirals, fold-outs, hand-stained crochet flower and hand-made bead fringe.
 The verso with tape transfers, stamps and a ringlet from a fake hairpiece.
I created more artist books, if you like to see them, take a look at Art.
Links:
If you want to create your own (Altered or Artist) Book, you may want to take a look at the following links (the list is far from complete!):
About Altered Books:
What is an altered book?
Definitions
At art-e-zine: Altered Book Workshop
Get Inspirations:
Gallery of Altered Book Artists
Google results of search for ‘Altered Book’
Google image results of search for ‘Altered Book’
Some of the used techniques:
Paper staining
Tea Staining Your Art Journal Pages
Tea Stain Paper
Image Transfer Techniques:
Easy Photo Transfers (different techniques)
Image Transfer
Packing Tape Image Transfers
Here at unikatissima:
Paper Beads