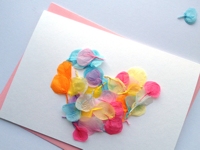
I find this card with petals from tissue paper really cute!
Links:
How-Tuesday: Petal Card
…compilation of tutorials
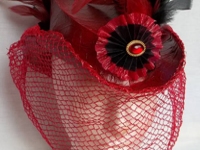
Isn’t this hat wonderful? And it’s built of only recycling material!
I don’t wear hats, but with this one I’m thinking it over ;-)
Links:
Recycled Riding Hat (A Little Red Riding Hat (upcycled from cardboard and tissue paper))

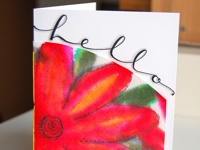
I really like this card, to white the background before writing on it makes a real difference (ok, a beautiful writing makes a difference, too ;-))!
I can greatly use my self coloured tissue papers for this ;-)
Links:
Coloured Background Card (inspiration monday)
Here at unikatissima:
Self Coloured Tissue Papers
I really like this card, which was made with a white coffee filter!
Thank you, Brigitte, for this link :)
Because my coffee filters are all brown and I don’t want to extra buy bleached coffee filters, I think that I will go back to my self coloured tissue papers ;-)
Links:
Coffee Filter Card (inspiration monday)
Here at unikatissima:
Self Coloured Tissue Papers
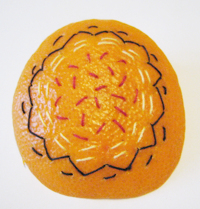
This time it’s no ‘real’ instruction but an inspiration: Embellished Grapefruits Embellished Grapefruits. (Click there for the actual pieces on the thumbnails and see e.g. Two Pods Two Pods.)
Because I’m always impatient I preferred to use a piece from an orange – grapefruits are so big ;-)
While working I had a lot of fun.
I like the embroidery of orange peels nearly as much as embroidery on paper. The most uncommon thing I had to do was to give my needle a wash ;-))
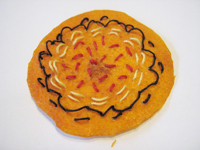 After the embroidery I put the orange peel between several layers of tissue paper in an old telephon book and let it dry ‘flat’.
Actually I had hoped that I can coat it with medium gel afterwards and wear as a pendant, but I don’t really like the ‘flat version’ of my orange peel.
 I find worst that the threads now stand up now like croquet wickets, I really don’t like this.
At the next opportunity I will see if I can make it better.
If it works I will perhaps embroider beads on, that should be interesting, perhaps Paisleys or simply Freeform.
Links:
Grapefruit – click there for the actual pieces on the thumbnails and see e.g. Two Pods
The original site doesn’t exist any more and is now available through webarchive:
Grapefruit – click there for the actual pieces on the thumbnails and see e.g. Two Pods
Embroidery stitch descriptions (English)
Embroidery stitch descriptions (German)
Here at unikatissima:
Paper Crazy Quilt
Freeform Bead Embroidery
Bead embroidered Paisleys

I love to imitate things, so I had to check immediately the tutorial on how to make faux silk for cards.
On the photo you see my results: I took one of my self carved eraser stamps, coloured it with a marker and stamped on tissue paper (the left flower). Then, just to see what happens, I stamped two more times. The photo isn’t so good, but the pale stamps look elegant. On the third I didn’t smooth the paper to allow for more crinkles.
I will use this technique more often.
Links:
Faux Silk
unikatissima’s Eraser Stamps how-to
unikatissima’s Stamping With Markers how-to
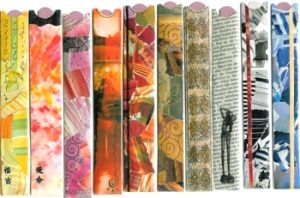
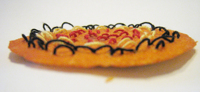
Once I found instructions on how to make a nail file envelope, which I embraced, because me too, I never have such a file when I need it and I don’t like to search ‘free’ nail files in the depths of my bag.
I’m not much of a stamper (although I would like to be ;-)), so I made them with my own with markers and a little moist coloured tissue papers, I collaged them from magazines and I made them from doodled coffee-dyed newspaper (see second photo).
 Because I own 5 cm wide clear packaging tape (a little less than 2 inches), I made the envelopes slender enough to cover them completely with the tape. This way they are sturdier and more robust in the depths of my bag ;-)
The nail file envelopes are a lot of fun to make and a very good giveaway at nearly everybody. Even men took them voluntarily! ;-)
Most fun for everybody is, when I present the whole range of my nail file envelopes and everybody can select their own.
Links:
Nail File Envelope

One day I found a tutorial on flower pounding. It sounded strange to me and I was really surprised what people do to innocent flowers ;-) (we have already seen that people stitch flowers).
Anyhow, the results are stunning!
As you can see on the photo, mine aren’t: I pounded on tissue paper in place of fabric and did something wrong. But this experience showed me that I’m not the woman to wallop little flowers ;-))
Links:
Flower Pounding
Inspiration: Google image results for ‘Flower Pounding’
Here at unikatissima:
Stitched Flowers

You can find many hints in internet on how to block knitted lace, I wanted to show you how I did.

This way both rods are pulled apart and the shawl is blocked.
But the technique isn’t perfect: I’d have needed rods for the short sides of the shawl, too, that should have been attached to the long rods, but I didn’t have the time.
That’s why the short sides of my Advent calendar shawl are slightly worn out, but it’s not soo bad.

In a similar way you can do this with a triangle shawl: I threaded the same aluminium rods then above (1) through the holes I’ve knitted at the edge.
Then I added an S-hook with the weight in the last hole to really drag the points down.
I soaked everything in water and placed it on the ground.
The weight of the water drags down the center so that I didn’t need any weight there and it didn’t wear out as much as the rectangular shawl.
By the way, I covered the ground with a plastic cover because I didn’t want to wade through puddles ;-)
To see how others block their lace, simply search for blocking knit lace or stricken (spitze OR ajour OR lochmuster) spannen in German (results not so good).
Links:
Google search result for ‘blocking knit lace’
Google search result for ‘stricken (spitze OR ajour OR lochmuster) spannen’
Here at unikatissima:
Advent calendar shawl
Note: After Christmas I will offer it in just one file ;-)
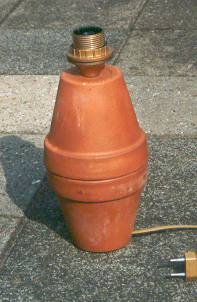
This isn’t a real instruction but more of an inspiration. At Atelier Verena you can follow a class about recycling. At her website, Atelier Verena describes how to make your own recycled lamp (last item on page): glue two terracotta pots together, wrap them with fabric, use some fabric stiffener and paint it with acrylic colour.
I haven’t done it yet, but I think that you also can wrap the glued pots with paper mache or plaster of paris and do some kind of collage or decoupage or glueing interesting tissues an it and so forth.