Paper Crazy Quilt

Paper Crazy Quilt

I love Crazy Quilts, because it is a kind of Freeform work, but I don’t like sewing. So I began to make my quilts on and with paper.
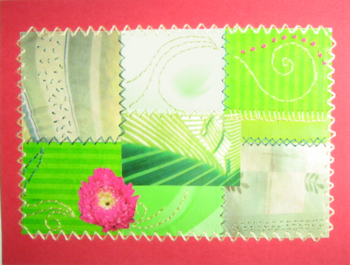
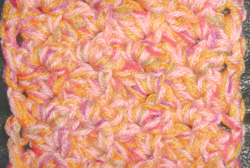
On the photo you see a card I made with this technique.
I didn’t only embroider the seams but I also used some fancy stitches like French Knots e.g. (the red dots on the photo) onto the surfaces.

To make your own Paper Crazy Quilt, find matching papers and cut them into pieces. On the photo I used rectangles, but the typical Crazy Quilt distribution is also beautiful (here you can find some lovely blocks here you can find some lovely blocks).
Glue the collage on thin paper and then begin embroidering (carefully!) as if it was a real Crazy Quilt (here is an online class for Crazy Quilts).
To finish you glue or embroider your Paper Crazy Quilt on cardboard.


Links:
Crazy Quilt blocks
Tutorial moved to: Crazy Quilt blocks

Online class for Crazy Quilts

English Embroidery Stitch Diagrams
Deutsche Stickstichbeschreibungen

French knots (Knötchenstiche) (English)
French knots (Knötchenstiche) (German)

Stitched Flowers

Stitched Flowers

While I was browsing through the projects of STITCH I found Precious Petals. They ‘glue’ the flowers on fabric and then embellish with decorative stitching.
A stunning idea which is still on my to-so list.


Links:

STITCH project: wonderful projects around stitching (how surprising ;-))


Simple Cro-Tat

Simple Cro-Tat

There is a technique called Cro-Tat, which is a technique between Crochet and Tatting: the item it is crocheted, but looks like tatted. For tutorials look beneath the Links.
I don’t have a straight steel crochet hook and so I figured out how to do this in another way.
It is a kind of clothesline crochet: I am crocheting a simple chain that I ‘decorate’ with single crochets.
I once wrote a (German) tutorial on how to make a Mother’s Day card with a Simple Cro-Tat Ornament. It is heavily illustrated ;-)
Anyhow: ‘Luftmasche’ is chain, ‘feste Masche’ is single crochet and ‘Kettmasche’ is slip stitch, the actual row is red, the previously worked rows are in black.


Links:
Tutorial on how to make a Mother’s Day card with a Simple Cro-Tat Ornament (German)
Tutorial on how to make another Simple Cro-Tat Ornament (German) (‘Zusammen häkeln’ means join)

Cro-Tat
Cro-Tat Instructions (English) The link isn’t available no more. Try instead to find an appropriate tutorial in this list of Cro-Tat Instructions.
Cro-Tat Instructions (German)

Here at unikatissima: Clothesline Crochet

Coloured Yarns

Coloured Yarns

I like to work little pieces where not much yarn is required and I like to use a different colour and colour shade with each piece.
Unfortunately I can’t afford to always buy the shades I like: on the one hand it is too expensive and on the other hand I don’t have enough place for such a big stash.
Therefore I like to work with four to six sewing yarns in similar shades and – if I am in the mood – one or two metallic sewing yarns. They don’t take so much place and I can get much more subtle shades by combining them then I ever could buy.
I put the chosen yarn in a dessert bowl, so that they don’t roll away and begin crocheting.
Coloured Yarns I worked the Crochet Chamsas I presented yesterday with this ‘technique’.


Links:
Here at unikatissima:
Crochet Chamsa

Starburst Card

Starburst Card

I love many of the string art patterns, but I would never make them, because I find them on the other side quite old fashioned.
Although the I thought that I could use the pattern to create a card.
I pricked the holes of the Starburst pattern Starburst pattern (template here template here) from The Art of Thread Design The Art of Thread Design into my cardboard and measured the length of thread. About 8m (about 26 feet ;-)). Then I started to weave the thread through the holes. I hadn’t finished the first two stitches when my thread became a firm knot. Totally entangled. Absolutely un-detangable.

Therefore I had to try something else with new thread.
I thought (what I should have done beforehand ;-)) that in string art they use pegs (nails) to fix the thread at the predefined points. Then I realised that I could have a kind of pegs too: if I weave the thread over and under the holes (from hole 1 to hole 2, 2 to 3, 3 to 4 etc) and back, I get a coloured frame where the holes are, I get pegs, because one thread goes from the front side to the back side and vice verso (see picture).

Starburst Card-Thread weaving
Click to enlarge

Now I could wrap the thread around my self-made pegs just in the same way they are doing it in string art around the nails.

I enjoyed working on the Starburst pattern, but at one end it is very narrow and I only could use two layers in place of three.


Links:
The Art of Thread Design

Starburst pattern instructions
Starburst pattern template

The original site doesn’t exist any more and is now available through webarchive:
The Art of Thread Design

Starburst pattern instructions
Starburst pattern template

Embroidery Crust

Surface Embroidery

The title is far from perfect ;-)
Better look at the original instruction on how to encrust calico with embroidery.
On the photo you see my first (and only) attempt at doing it, but I didn’t get far with it and created (another! ;-)) UFO (unfinished object).
But the real thing is soo beautiful!


Links:
Stitch with the Embroiderers’ Guild – A magazine for creative stitchers
Online projects from the Embroiderers’ Guild

Encrusting Calico

The Crazy Stitch

The Crazy Stitch

I found the Crazy Stitch mentioned in several crochet instructions. Therefore I wanted to know how to crochet it ;-)
At about.com:Crochet I found a good tutorial on how to crochet the Crazy Stitch (with explaining photos which I find always a great help).
On the photo I used the stitch to crochet a short scarf with a thick crochet hook and several yarns put together. It become very thick and thus a little stiff. Next time I’d use a little less yarns.


Links:
about.com:Crochet A website with lots of information about crochet
Instructions on how to crochet the Crazy Stitch

Tapestry Crochet

Tapestry Crochet

Finding these instructions on how to crochet with two colours was immediately trying it out ;-))
And it worked!
On the photo you can see my UFO (unfinished object) on this technique (yes, it is still unfinished, I only said that I tried it ;-))).


Links:
Tapestry crochet for right-handers
Tapestry crochet for left-handers (a service I have never seen before!)
More crochet instructions (also on tapestry crochet)

Cardboard Box Loom

Cardboard Box Loom

I really wanted to try weaving, but I was not keen on buying a loom without knowing if I like weaving.
After some surfing I found All Fiber Arts, a website with so many instructions about – yeah, all fiber arts ;-))
I will get back there later again writing about another subject.
But for today: The instruction on how to build a loom using a cardboard box and how to weave on it was a great help.
I tried it with remains from my yarn stash and wove a little piece of fabric. This little piece of fabric stayed an UFO (unfinished object) since then, because I find weaving not so much fun then I expected it to be ;-))
And so I didn’t bother to take a photo.
At any rate I’m grateful to All Fiber Arts, because they prevented me from buying something expensive that I didn’t really need. :-)


Links:
All Fiber Arts: A website with information, instructions and much more about everything concerning fiber arts
Instruction on how to build a loom using a cardboard box and how to weave on it

Crocheted Hats

I always wanted to crochet hats, not the beret-like but really hats (although I never ever wear hats ;-))
Then I found the Yarn Lover’s Room with so many interesting crochet and knitting patterns.
They also have a so-called Antique Room with crochet and knitting vintage patterns.
There I found eventually the Antique Hat Patterns.
I did not yet find time to crochet them (in fact, I don’t know what to do with them when I ever find time and finish them ;-))
But I loved to bookmark them – just in case!


Links:
Yarn Lover’s Room: The name says ist all
Crochet Patterns
Knitting Patterns

Antique Room: Vintage crochet and knitting patterns
Vintage crochet patterns
Vintage knitting patterns

Antique Hat Patterns