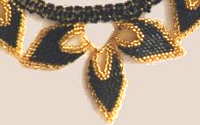
Aren’t they wonderful?
I couldn’t try the leaves yet but they are quite high on my Just-come-on-list.
Links:
Peyote Leaves
The original site doesn’t exist any more and is now available through webarchive: Peyote Leaves
…compilation of tutorials
Aren’t they wonderful?
I couldn’t try the leaves yet but they are quite high on my Just-come-on-list.
Links:
Peyote Leaves
The original site doesn’t exist any more and is now available through webarchive: Peyote Leaves
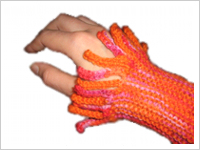
Once I saw the Worm Scarf and having read the instruction for the ‘worms’ I thought that you can knit great fringes this way.
I begun with wristwarmers and after having finished them they looked like the sea anemones called Actinia.
Then I was hooked and knitted an Actinia headband, an Actinia ring and an Actinia brooch (see pictures below).
It is soooo much fun ;-)
And for all this items I wrote a tutorial. You can find the link below at the links.
 This is the headband.
It is just possible that there are slightly too much fringes!?
;-)
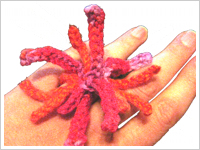 My Actinia ring – cute, isn’t it?
 That is the brooch. It looks great on my black overcoat.
 The Actinia wristwarmers and ring can easily be worn over woollen gloves if it’s really cold.
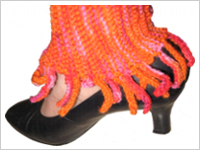 I haven’t done the Actinia anklewarmer yet, I made the picture with my not yet sewn wristwarmer.
Looks great, doesn’t it?
Links:
unikatissima’s Englisch tutorial for Actinia (PDF – ca. 400 KB)
(with explaining photos)
unikatissima’s German tutorial for Actinia (PDF – ca. 400 KB)
(with explaining photos)
There you find instructions on how to
 knit items with fringes,
add knitted fringes to finished items,
knit the wristwarmers,
knit the headband,
knit the ring,
knit the brooch and
knit an I-cord.
I also added ideas for more ways to befringe items.
I once tried to make such hollow pillow beads, but they collapsed. One day I will try it again, but I think I’ll better make filled beads, they seem to be easier ;-)
Links:
Hollow Beads:
clayfulmingles: Pillow Bead Lesson
Polymer Clay Polyzine: Pillow Beads by Carissa Nichols
Filled Beads:
Polymer Clay Central: Barb’s Pillowbeads
Fire Mountain Gems and Beads: Creating Pillow Beads – scroll down
Google image search result for ‘polymer clay pillow bead’
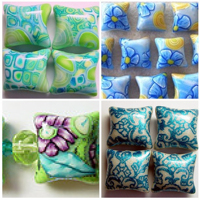
I made the mosaic with the Mosaic Maker of Big Huge Labs.
The images are:
First row:
Polymer clay Mokume Gane Pillow Beads by Beadazzle Me
Polymer Clay Pillow Beads * Winter Garden by Kellee’s Beaded and Clay…
Second row:
Polymer Clay Grape/Lime Pillow Beads by Beadazzle Me
Polymer Clay Teal Damask Pillow Beads by Beadazzle Me
flickr: search result for ‘pillow beads’
Here at unikatissima: entries with the tag ‘fimo’ – with some of them you can make beautiful pillow beads

Are you still looking for a quick but personal gift for a friend?
How about a beaded brooch?
She describes with good pictures how to create a brooch from wire and beads and a lucky charm.
It should be possibl to create pendants or earrings in the same way.
I already have the materials … ;-)
Links:
Get hooked: make your own beaded brooch
Here at unikatissima:
Instructions on how to make brooches:
Necktie Flower Brooch
Needle Felting Brooch
YoYo Pin
Freeform Bead Embroidery Brooch (the tutorial on how to freeform embroider here)
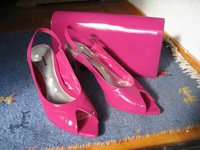
A great idea again: customize accessories to your clothes with spray paints.
This way you can make i.e. comfortable shoes for dancing matching your ball dress ;-)
Or follow the ideas of Buy Nothing Day and revamp a by now shabby handbag to match your newest coat.
You also could have coloured one of your boots in red and fill it with some sweets ;-))
Links:
Spraypainting Accessories
Here at unikatissima:
Tie Feathers Dress
Buy Nothing Day
I love recycling tutorials and therefore this tutorial on how to make aluminium can jewelry should hit the spot.
Additionally I really like the items, better than others.
But I haven’t bought aluminium cans for years and I don’t think that I will begin to buy them now just to make jewelry from the them ;-))
Links:
Aluminium Can Jewelry
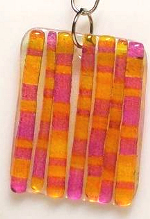
Some time ago I presented the DIY Shrinky Dinks, now I found at craftster the Faux Fused Glass.
Sheer lunacy!
She published the actual tutorial in her blog.
She uses the ‘real’ shrinky dinks, but it should work with the self-made as well?!
Links:
At craftster: Faux Fused Glass
Tutorial on how to make faux fused glass
Here at unikatissima: DIY Shrinky Dinks
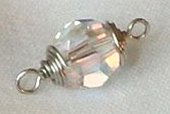
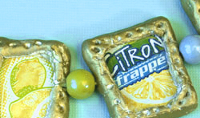
Sometimes I don’t want to simply string the beads but create some ‘ears’ on both sides like at the bead on the photo.
How to do this shows the bead wrapping technique tutorial where she does those ‘ears’.
Something else for my ever growing just-try-it-sometimes-list ;-)
Links:
Bead Wrapping Technique

I found at craftster a tutorial on how to make DIY Shrinky Dinks. I liked this (I don’t like to buy new materials, especially when I haven’t tried the technique yet).
Additionally I made a little research and found more (very similar) tutorials (see also Links below).
I really must try this, although I will wait until summer when I can easily ventilate the kitchen, because I’m always afraid of toxic gases.
Until then I can find out perhaps which of the odd plastic dishes I can use ;-)
Links:
At craftster: shrinky dinks made from old packaging!
At instructables: