Make Your Own Spacer Bars

unikatissima Spacer Bar

When stringing bead jewelry you sometimes need spacer bars to keep beads or strings of your jewelry items apart. You can buy them as a matter of course, but I like much better making the needed spacer bars myself.

On the photo you see a first attempt.
Both middle spirals are meant to pass strings of a necklace through, the outer spirals are ‘nothing but’ decoration.
Not bad for a start, isn’t? ;-))


Links:
Making Your Own Spacer Bars

Square ‘n’ Fair – Lacy Crochet Square Margarethe

Square 'n' Fair - Lacy Crochet Square Margarethe

I proudly present my first self designed
Square ‘n’ Fair – Lacy Crochet Square Margarethe (PDF ~705 KB)!

It is a PDF-File that contains the diagram for the crochet square Margarethe that I designed (it is my first! ;-)).
On the photo you see a big scarf I made with this pattern (but I haven’t blocked it yet – it will look much more beautiful then ;-))

I also included several matching diagrams in the PDF-file to this square (‘elements’): a rectangular half square, a triangular half square, a ‘squeezed square’ and two patterns for matching ‘ribbons’.
Additionally I have inserted several ideas on how to combine the different elements and project ideas about what to do with the elements.

Because different terms are used for the same stitches in British and American English, you can find photo and text descriptions of the used stitches in order to easily identify them (not meant as a tutorial).

Best try it yourself:
Use different materials, as e.g. thick wool yarns, middle acryl yarns ;-), fine cotton yarns, embroidery floss, raffia, package string, gift ribbon/gift curling ribbon, yarn made from plastic bags
Make different items, as e.g. sweaters, vests, tops, cardigans, scarves, shawls, headbands, hats, mittens, wristwarmers, skirts, purses, wallets, totes, scrunchies, collars, appliqués, insertions, book or journal covers, tablecloths, place mats, glass coasters, pillows, window or door decorations, bedthrows, ornaments for greeting cards …

If you want to make clothing, check again crochet patterns for/from square medaillons (you won’t need the medaillon patterns this time, but only the women clothing models ;-)) and the basic woman measurement charts for clothing patterns at the website of Jessica Tromp.


Links:
Square ‘n’ Fair – Lacy Crochet Square Margarethe (PDF ~705 KB)

Jessica Tromp:
Crochet patterns for/from square medaillons
Basic woman measurement charts for clothing patterns

At craftster: Curling Ribbon+Crochet Hook=Many Purses

At Marlo’s Crochet Corner: Cutting the plastic bag ‘yarn’

At Craft Chi: Doily Racerback

Here at unikatissima:
Plastic Bag Tote
Clothes From Crocheted Medaillons

Freeform CAL

unikatissima Freeform Crochet Along

A ‘Freeform CAL’ is a ‘Freeform Crochet along’, viz., everybody works following the same specification and see, how (different) the results can be.

And I liked this Freeform CAL especially, because I find it often difficult/exhausting to think of a new stitch every time while working freeform.


Here are some specifications:

  • “DC an amount of stitches equal to the number of letters in your full name”
  • “…please do a cluster for each pair of shoes you own” (therefore the photo ;-))
  • “Let’s play. Take a breath, how many times can you say the phrase ‘floppy fluffy puppies’ before you need to take another or you trip over your tongue? That many shell stitches please “

I find it great: this way you have a ‘pattern’ you can follow even when you work freeform and when you look at the pictures at the Freeform CAL thread you will see that every item looks different from the others.

I’m amazed!


Links:
Freeform CAL at craftster.org

Here at unikatissima: Freeform Needlework

Make your own Wire Jig

unikatissima Make your own Wire Jig

A Wire Jig is a kind of board with pins where you can wind the wire. It is used for making jewelry.

And now I know how to make my own wire jig.
As you can see on the photo I gathered the pins already, I only have to find a wooden plate ;-)

And when you gathered all the elements of the wire jig, you can begin to make beautiful wire jewelry.


Links:
Make your own Wire Jig
WigJig University of Making Jewelry with Wire and Beads

Special Shape Castings

unikatissima Special Shape Castings

I found a tutorial on easy plaster casting.
The point is mainly to create the mold of a star or the like from aluminium foil and to cast it with plaster.
Even if it is filed under ‘kids crafts’, I find the idea interesting.

I did it once, but I can’t find back my item ;-(

At that time I made a mold with a rounded bottom.
To fix it thoroughly (to prevent the plaster to ‘run away’) I put the aluminium foil mold into a layer of flour.
Sand would be as well.


Links:
Special Shape Castings

Weave a Ring

unikatissima Weave a Ring
As said before, I like to play around with weaving.
The other day I thought: Why not weave a ring?
I think that it worked out amazingly good ;-))


unikatissima Weave a Ring
Material:

  • Yarn
  • Needle
  • Finger replacement ;-)
    That is a roll of firmly rolled paper, it must be a little broader than your finger.
 

What to do:
unikatissima Weave a Ring
Wind the yarn around the finger replacement and knot.


unikatissima Weave a Ring
Then wind the next round, in doing so pass the yarn under itself.


unikatissima Weave a Ring
Repeat the last step as long as you reach the ring’s width.


unikatissima Weave a Ring
Now begin to weave: pass the yarn over and under the threads.


unikatissima Weave a Ring
And that’s how the rings can look.
You have now a ring that you can embellish, e.g. with buttons or beads.


This technique surely can be enhanced, but it is fun already :)
Have fun!

Plastic Straw Lantern

Plastic Straw Lantern from Ironed Straws

A long time ago I found a tutorial on how to make a lantern from plastic straws. I even tried it and it worked fine. But I gave the lanterns away without taking any photos ;-(

The instruction is in German with illustrating photos.


Here is a translation:
Material:

  • Plastic drinking straws
  • Parchment paper
  • Iron
  • An old wooden tray
  • Scissors
  • Double-sided tape
  • Tealight

That’s what you have to do:

  • Lay the parchment paper on your working space, perhaps lay even the old wooden tray underneath.
  • Lay the plastic straws neatly on the parchment paper and lay another layer of parchment paper on it.
  • Iron on highest setting, but without steam over the parchment paper on the plastic straws. The straws will melt.
  • If everything became flat, let the plastic cool down. You can hear that they cool because there is a cracking noise.
  • Carefully release the straws from the parchment paper.
  • Cut the ‘mat’ with the scissors in the form you want.
  • Fix the ends with the tape and put a tealight into.

What I learned when testing it:

  • Best iron in an well ventilated area, because there are (toxic?) vapours.
  • The ironed straws are very, very hot, so make sure to let them cool down thoroughly.
  • Never iron plastic directly, but put always some parchment paper between iron and plastic to protect the iron.
  • Make the lantern big enough, so that it can’t inflame from being to near the flame of the tealight.


Links:
Plastic Straw Lantern (German)
votive

Bead Intertwists

creadoo Perlenschlingen-Bead Intertwists

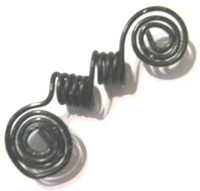
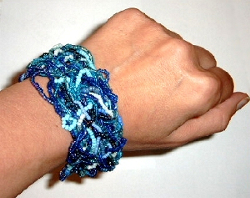
During my ‘beading time’ I wrote a (German) tutorial for bead intertwists as on the photo.


Here is the English translation:
Material:
for the bracelet:

  • selection of beads (here: various seed beads)
  • colour matching thread
  • needle

additional items:

  • pins
  • styrofoam or cork board
 

What to do:
unikatissima Bead Intertwists - Material
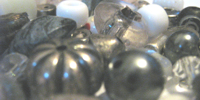
First make a selection of beads and place them at your disposal.

Tip: Uniform colouring connects visually; different forms, sizes and transparency makes it more vibrant.

In this example I used eleven different sorts of blue seed beads, some transparent, some with silver lining and some opaque.
More variety in sizes brings more vitality. The border between vitality and disquietness is to your liking.


unikatissima Bead Intertwists - step 1
Thread beads and make a frame of approximately the right size.

Connect the bead strings from time to time to the borders of the frame.


unikatissima Bead Intertwists - step 2
Weave more bead strings into the frame, connect them from time to time to other strings.

Tip: On the photo the inner bead strings are sometimes multi coloured.
During the work I found out, that this isn’t necessary and that one coloured strings mostly look better.


unikatissima Bead Intertwists - step 3
Continue to weave in bead strings: long strings, short strings, lengthwise, crosswise, over and under.

Tip: When the ‘fabric’ gets tighter it’s easier to work in the bead strings in sections.

On the photo I append about half a dozen white beads to a white string.

Pay attention to make a ‘fabric’ of consistent denseness.


unikatissima Bead Intertwists - step 4
When everything is finished attach any closure, e.g. a bead loop and a colour matching button.

I didn’t make any closure, because the item on the photo wasn’t meant to be a bracelet.


Notes:

  • If the bead strings are carefully woven the ‘fabric’ keeps quite good its form.
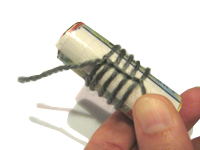
  • I used simple cotton thread for the example and wove in the ends with some glue. I could do it this way, because the item was intended to be glued onto a sturdy surface and there would be no strains to the threads.
  • At the beginning it can be difficult to keep the form. The styrofoam or cork board can be of great help when pinning the item to the board.

Have fun!


Links:
Bead Intertwists (Perlenschlingen) (German)