Bra Purse

Bra Purse

Once I found the Lah-Di-Dah Bra purse at craftster.org – what a funky idea!

Since then I always wanted to make a bra purse, but I don’t use no purses, because I always need backpacks. Imagine the bra! ;-))

But I collected links (see below) on how to make a bra purse anyhow – perhaps I’ll make a bra purse eventually ;-)


Links:
At craftster.org: Lah-Di-Dah Bra purse
For more entries search for “bra purse” at craftster.org

wrights.com: Bra Purse
Craftbits: Bra Purse
Bra Purse with zipper

Image results of Google search for ‘bra purse’

Nail File Envelope

Nail File Envelope

Once I found instructions on how to make a nail file envelope, which I embraced, because me too, I never have such a file when I need it and I don’t like to search ‘free’ nail files in the depths of my bag.

I’m not much of a stamper (although I would like to be ;-)), so I made them with my own with markers and a little moist coloured tissue papers, I collaged them from magazines and I made them from doodled coffee-dyed newspaper (see second photo).

Nail File Envelope 
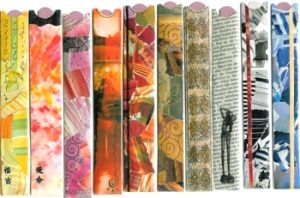
Because I own 5 cm wide clear packaging tape (a little less than 2 inches), I made the envelopes slender enough to cover them completely with the tape. This way they are sturdier and more robust in the depths of my bag ;-)
The nail file envelopes are a lot of fun to make and a very good giveaway at nearly everybody. Even men took them voluntarily! ;-)
Most fun for everybody is, when I present the whole range of my nail file envelopes and everybody can select their own.


Links:
Nail File Envelope

Crazy Daisies

Crazy Daisies - Wickelblumen

While searching for something else I found a lot of instructions and tips about Crazy Daisies and had to try them immediately ;-)

As you can see on the photo, my attempt on winding daisies on my own daisy loom worked out very well.
I cut the loom (the purple item on the photo) from thick cardboard. I think that the ice cream lid loom is better, because plastic won’t loose its shape so easily, but for just a couple flowers cardboard is fine.
At my first flowers I just made a very simple backstich center, but even so I find those little flowers stunning ;-)
The dark red flower is a daisy with an open center, but I made it in a different way: I didn’t wind the thread to the other side of my selfmade cardboard loom but to another notch (always the fourth notch in place of the sixth, I think. I didn’t write it down, because I don’t like it so much).
I’m planning to make something like the shrug with a lot of flowers and a simple crochet edging.
Eventually. ;-)


Links:
(all in English, but with explaining pictures and photos)
Instructions and tips about Crazy Daisies

For example:
Round ice cream lid daisy loom
Instructions on how to wind daisies
How to make a backstich center daisy
How to make a open center daisy
Simple crochet edging

Stole, Shrug, Handbag and Three Different Shapes on the Crazy Daisy Winder (from 1945)

Watercolor Button Garden

Watercolor Button Garden

Pink Paper Peppermints has a beautiful project: 31 Crafty Flowers.
I checked them all and I wanted to present one of them, although I haven’t tried it yet, because I dont’ have the right markers: the Watercolor Button Garden.
Aren’t they beautiful?
And be sure to check the other flowers too :)


Links:
Watercolor Button Garden

Tubular Bead Weave Tension

Tubular Bead Weave Tension

Once I begun to work a beaded amulet bag (which ended as an UFO ;-)). I worked it around a tube and could have done with the instructions on how to get the tension right.
But this wasn’t the main problem, the main problem was that I don’t know what to do with an amulet bag ;-))
I think that the technique to get a perfect tension for tubular weave can be used too for a Peyote ring, but then you must work in rounds, not in rows as the Peyote ring.
I had this idea with the ring just now, so that I haven’t tried it.


Links:
Tubular Bead Weave Tension
see also Suzanne’s Bead Lessons (English)

Instruction on tubular Peyote (German) at Perlenhobby.de: click on ‘Anleitungen’ in the sidebar left and there select ‘Schlauch-Peyote mit gerader Perlenanzahl’ or ‘Schlauch-Peyote mit ungerader Perlenanzahl’

Here at unikatissima:
Beaded Amulet Bag
Peyote Stitch Beaded Ring

Lacy Crochet Scarves From Edgings

Lacy Crochet Scarves From Edgings

I love to crochet lacy scarves, but I don’t like to always work the same pattern.
Therefore I was looking for some patterns for such lacy crochet scarves and didn’t find what I was searching for.
Then an idea stroke: What is a lacy crochet scarf but two edgings back-to-back?


Lacy Crochet Scarves From Edgings
On the first photo you see one of my scarves made from a handkerchief edging from a magazine I bought. I used acrylic yarn. The second one is from a towel edging from another book. And for the third I first crocheted a middle strip which I surrounded afterwards by a self designed edging.


Lacy Crochet Scarves From Edgings
Addendum: By the way, I found this idea so clever, that I entered this post to the This Thursday is all about… challenge 3 Clearly Clever ;-))
Therefore Tracey’s comment ;-)


Links:
Crocheted Edging Links
Crochet Pattern Central: Free Edging Crochet Pattern Links
crochet.about.comSearch results for ‘edging’

Repeating Patterns

Repeating Patterns

Once I found a tutorial on how to make your own repeating pattern and found it a revelation!
I tried it immediately ;-) and it worked perfect!
On the topmost picture you see my self-made repeating pattern, on the other pictures you see what I made from it.
The whole pattern was designed on my computer, but I’ve made another one on paper which was also a success.

By the way: this Papaya Shikai Maki was designed the same way ;-))

Repeating Patterns

Repeating Patterns

Repeating Patterns


Links:
Make your own Repeating Patterns (English) (with explaining pictures)

Papaya Shikai Maki

Kirigami Flower

Kirigami Flower

While browsing Origami links I found a tutorial on how to cut Kirigami flowers, a technique we used when we were children for cutting snowflakes.
I hadn’t realized that this technique is so widely usable and brings so beautiful results.
On the photo you see a flower I cut in very short time for a greeting card and suddenly I felt the urge to doodle on it ;-)
Every petal looks different now.
The photo is bad, but I hope that you can see what I am talking about.


Links:
Kirigami Flower

unikatissima’s entry about Zentangles