YoYo Pin

YoYo Pin

I like yoyo’s, but only recently I tried to make one. And I find it cute.
It is made from shiny polyester fabric and embellished with a little crocheted flower and some embroidered beads (I hate to have polyester on my skin, but I like it for pins and the like, because it is so shiny).


Links:
Yoyo Projects (with explaining pictures)
How to make a Yoyo (with explaining pictures)

The links don’t work anymore, you can find the information here now:
Yoyo Projects (with explaining pictures)
How to make a Yoyo (with explaining pictures)

Chopsticks into Hairsticks

Chopsticks into Hairsticks

When I saw the tutorial on how to make hairsticks from chopsticks I loved it!
What a great idea. And a beautiful project to practise the Peyote stitch ;-) (for links to learn Peyote see below).
I haven’t done it yet, because hairsticks never keep my hair (it’s too thin ;-( ).
But who knows? ;-)


Links:
Chopsticks into Hairsticks

About.com: Beadwork: A website with lots of tutorials about beadwork
Basic Beading Stitch Tutorials (English)

Perlenhobby.de: A website with lots of (german) tutorials about beadwork: click on
‘Anleitungen’ in the sidebar left and there select one of the Peyote tutorials

Bargello

Bargello

While working with polymer clay I found a tutorial on how-to make items with a Bargello-look.

Then I made a little research to know what Bargello is (links see below):
It seems, that the first ‘Bargello craft’ was embroidery, but then the quilters worked Bargello-looking quilts, the polymer clay people made those items with a Bargello-look and the stampers and cardmaking people use this technique on paper. And I made my Bargello digitally as you can see on the picture ;-)
What a versatile technique ;-)


Links:
Embroidery:
Wikipedia: English entry for ‘Bargello’

Defining Bargello

How-to make Bargello needlework:
Bargello Work
Bargello needlepoint

Quilting:
How To Make Bargello Quilt

Polymer Clay:
Tutorial on how-to make items with a Bargello-look
Bargello Swap
Tutorial on how to make a Bargello pattern as cane and as sheet

Stamped Paper:
Bargello (English) (with explaining pictures)

Pendant-to-be-embellished

Pendant to be embellished
One day I wanted to have a pendant-to-be-embellished and decided to create it myself.
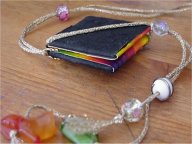
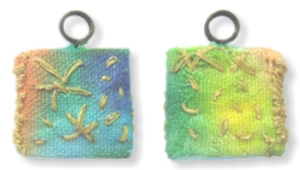
On the photo you see both sides of a charm of about 1,5 cm (appr. 0.6 inches) which I embellished with self-dyed fabric and some metallic yarn embroidery.
The embellishment isn’t quite what I dreamed of, but the core pendant worked well.

This is how I did it:
You need:

  • some cardboard (the thickness of the middle piece must be about the same as the wire)
  • some wire
  • glue

Pendant to be embellished 
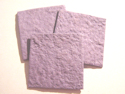
img 1: Cut 3 equal pieces of your cardboard.


Pendant to be embellished 
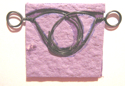
img 2: Wrap the wire round a dowel to form the eye. Then turn a couple of times to form the peg and then form a bigger eye which will be hidden in the pendant.
Note: I prefer the hidden part of the wire to be an eye because then the wire can’t be dragged out by accident.


Pendant to be embellished img 3: Take the cardboard piece which will sit in the middle and trace your hanger.


Pendant to be embellished img 4: Cut out the place you will need for the hanger.


Pendant to be embellished img 5: Glue the hanger and the middle cardboard pieces onto one outer cardboard piece.
Note: I glue on also the cardboard piece in the eye to prevent having a hollow.


Pendant to be embellished 
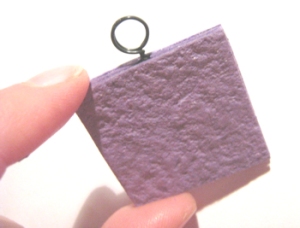
img 6: Glue the other outer cardboard piece onto. Your pendant-to-be-embellished is finished and you may begin with the embellishments.


Pendant to be embellished Pendant to be embellished
img 7 & 8: This is a solution for a 2-eyed pendant.


There are so many ways to embellish your self-made pendant (mini collages, painted, beaded, stamped etc), I’d love to see them.
Please feel free to comment here to show your trinkets.

Have fun!

Beaded Shank Button

Beaded Shank Button

Many pieces of jewelry like necklaces or bracelets need some kind of closure. Purses do, too, journals perhaps. Maybe you crochet an iPod cozy that should be closable.
You can use pre-made closures (which I mostly don’t like), but you can make a self-made shank button match just as you like.
For my bracelet bracelet *Little Black Dress* with the beaded spiral bead I made such a shank button and it worked out really fine.


Links:
Beaded Shank Button (Tubular Herringbone/Ndebele)

Here at unikatissima:
Beaded Spiral Beads

Coin Ring

Coin Ring

Browsing craftster I found one day the thread about coin rings.
Somewhere in the thread is also a link to a tutorial on how to make your own coin ring (with many explaining pictures).
I can’t image that I will ever do this, but I find it interesting enough to present it here.

Perhaps someone wants to make their weddings rings this way? ;-))


Links:
craftster: ‘coin rings! i’m an addict!!!’

Tutorial on how to make a coin ring

Freeform Peyote

Freeform Peyote

As I said before I really love freeform work.
Another wonderful freeform technique is Freeform Peyote.
To give you an idea of the variety of pieces of art, see those results of the Google image search ‘Freeform Peyote’.
Stunning, aren’t they?

First I had the problem that I really didn’t know where to begin.
Up until the day I found a tutorial on how to make a freeform peyote bracelet.
After I’ve seen how easy it is, I worked several pieces with this technique. The photo shows close-up of three of them.
If you like to see more of them, take a look at the judaica, many mezuzot are made in freeform peyote technique.


Links:
Tutorial on how to make a freeform peyote bracelet

Results of the Google image search ‘Freeform Peyote’

Peyote stitch:
About.com: Beadwork: A website with lots of tutorials about beadwork
Basic Beading Stitch Tutorials

Perlenhobby.de: A website with lots of (german) tutorials about beadwork: click on
‘Anleitungen’ in the sidebar left and there select one of the Peyote tutorials
Wikipedia: Mezuza (english)Mesusa (deutsch)

Wire Bracelet

Wire Bracelet

Inspired by the tutorial on how to make wire beads I created a wire bracelet (I couldn’t get enough of all this wrapping of wire ;-)).
I although didn’t use any special tool but a simple steel kebab skewer I found somewhere in my kitchen ;-)
Because my wire seemed quite boring to me, I strung some green seed beads on it but they are barely visible.


Links:
Jewelry Making Techniques by WigJig: a colossal website for Jewelry Making and Wire Design
Tutorial on how to make wire beads

Beaded Spiral Beads

Beaded Spiralbeads

I once found in internet photos from some spiral beads beaded from seed beads. Because I really liked them, I figured out how to bead spiralbeads.
The instruction is in German, but I drew explaining pictures that (I hope ;-)) say it all.
You begin in the middle. First you increase the circumference of the bead in the first 3 rows, then in rows 4 and 5 you work straight to create the sides of the bead and from row 6 on you decrease in the same way you increased before.
I then created the necklace *Summer, Sun and Spots* and the bracelet *Little Black Dress* with such spiral beads.
The beaded strings for the necklace where made in tubular peyote stitch (here an English instruction). After having finished them, I sewed them on.
The bracelet ‘strings’ where made in flat Herringbone weave (here an English instruction).


Links:
Beaded Spiral Beads (in German)

Spiral Beads Necklace *Summer, Sun and Spots* (in German)
Spiral Beads Bracelet *Little Black Dress* (in German)

More instructions on:
Tubular Peyote Stitch (English)
Tubular Peyote Stitch (German): click ‘Anleitungen’ in left navigation bar, select ‘Schlauch-Peyote’

Flat Herringbone/Ndebele Weave (English)
Flat Herringbone/Ndebele Weave (German): click ‘Anleitungen’ in left navigation bar, select ‘Flaches Ndebele’