Beaded Beads

Beaded Beads

Every beader wants to try a beaded bead sometime.
It isn’t easy to figure out by yourself how to do this, so I want to present several links which show how to bead different beads from beads.
Ehm… ;-))
The beaded beads on the photo were all woven by me around a bigger bead inside.

Links:
Janie’s Embellished Beads
Janie shows a basic bead and countless variations, one more beautiful than the next

About.com: Beadwork:
Bead a Beaded Bead

About.com: Jewelrymaking:
The beads here aren’t spheres, but cylinders, very good to learn the Peyote stitch (links below)
Beaded Bead
Beaded Bead Bracelet

Beaded Beads & Berries

Beaded Balls (French) (with explaining diagrams)

Beaded Ball & Loop Closure (English)


Peyote stitch:
About.com: Beadwork: A website with lots of tutorials about beadwork
Basic Beading Stitch Tutorials

Perlenhobby.de: A website with lots of (german) tutorials about beadwork: click on
‘Anleitungen’ in the sidebar left and there select one of the Peyote tutorials

Online Translators:
GoogleGoogle-Deutschland
YahooYahoo-Deutschland
Worldlingo

Beaded Dragon Strap

Beaded Dragon Strap

Today I’d like to present a beautiful Peyote strap with saw teeth, Sally’s Dragon Strap.
To work a Peyote strap is ‘easy’ (for tutorials see links below), but following this pattern is more difficult and figuring out how to add those saw teeth is great ;-)

Links:
Beaded Dragon Strap

About.com: Beadwork: A website with lots of tutorials about beadwork
Odd Count Flat Peyote Tutorial

Perlenhobby.de: A website with lots of (german) tutorials about beadwork:
click on ‘Anleitungen’ in the sidebar left and there select ‘Flaches Peyote mit ungerader Perlenanzahl’

Loom Woven Bead Bracelet

Loom Woven Bead Bracelet

When working with beads I also wanted to try loom weaving – just to see, how it works ;-)
On the photo you can see both sides of my self-woven bracelet with a self-designed pattern. It was very easy and I like the simple elegance of the pattern.
Because I created the bracelet for me, I didn’t need a closure, I can simply slip the bracelet over my hand.


Links:
Make your own bead loom (with explaining pictures)

Tutorial on Bead Loom Weaving
Another tutorial on Bead Loom Weaving

Two very good pictures (in English text): select in the left sidebar ‘Woven Beadwork’ and scroll down
Two very good pictures (in German text): select in the left sidebar ‘Gewebtes’ and scroll down

Tips to bead weaving (German) at Perlenhobby.de: click on ‘Tipps + Tricks’ in the sidebar left and select there ‘Tipps zum Perlenweben’

Kumihimo Beads

Kumihimo Beads - Kumihimo Perlen

This Thursday’s 2nd challenge Beaded Beauties gave me the opportunity to do something I wanted to do for a long time: making Kumihimo beads.
Kumihimo is a Japanese technique to braid beautiful cords, but then: what do I do with the cord? It’s way too beautiful (and too labour-intensive! ;-)) to be used as a shoelace for instance.
I thought that it would make wonderful beads, but usually the braids are finished by wrapping some string around the braid and such beads would be much too long.


Kumihimo Beads - Kumihimo Perlen Therefore I figured out how to make my own Kumihimo beads.
The technique is far from perfect and I hope that you will try it and give suggestions to enhance the technique.

On the first two photos you see Kumihimo beads I made, the blue ones with cotton thread and the black and white ones with acrylic yarn.
All beads were made with 4 light and 4 dark coloured yarns, but I changed the initial positions on my cardboard Kumihimo disk.
You see at the surrounding seed beads how tiny my Kumihimo beads are.


Kumihimo Beads - Kumihimo Perlen What to do:
Make your Kumihimo cord. I worked about 20 rounds.
When finished, pull all threads into the bead.

And that’s where the problem lies:
If you make the Kumihimo cord ‘the normal way’ you won’t have enough place into the bead to pull all 16 threads in (8 threads at each side of the bead).
I tried different techniques to ‘reserve’ a place for the thick bunch of threads. The best one I found was making a bundle of 8 threads of the same gauge and using it as ‘filler’, that means, working around them (see third photo).


Kumihimo Beads - Kumihimo Perlen 
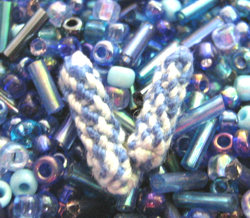
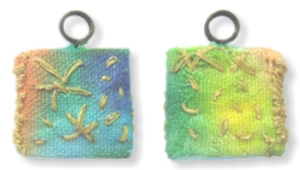
The Kumihimo beads are from fabric and can be stitched however you want. On this photo I surrounded my Kumihimo bead by seed beads and made a kind of Freeform Peyote Pendant.


Links:
This Thursday’s 2nd challenge Beaded Beauties

unikatissima’s Kumihimo How-to
unikatissima’s Freeform Peyote How-to


Beaded Rings and Headbands

Beaded Rings and Headbands

Beading is such a versatile technique and once I found some quick and simple projects: beaded rings and headbands.
The headbands are made in flat netting technique and as daisy chains, the rings are made in brick stitch, which isn’t difficult, too (the site provides links and diagrams who explain/show how to do the different stitches).

I like the flat netting technique, but beaded until now only small glass tubes (see photo).


Links:
Beaded Rings and Headbands (English) (with explaining diagrams)

African Needle Weaving Necklace

African Needleweaving

Once a found an instruction on how to work an african necklace using needle weaving (also called ‘pin weaving’). It’s a weaving technique that allows to easily create strange shaped fabrics and to incorporate beads into.
Stunning!
I played around with this technique and thought that it could as well be used for little bags, for bracelets and so forth.
Unfortunately it’s a technique that requires a lot patience – which I don’t have. ;-)
I’d love to hear what you think about!


Links:
African Needle Weaving Necklace

YoYo Pin

YoYo Pin

I like yoyo’s, but only recently I tried to make one. And I find it cute.
It is made from shiny polyester fabric and embellished with a little crocheted flower and some embroidered beads (I hate to have polyester on my skin, but I like it for pins and the like, because it is so shiny).


Links:
Yoyo Projects (with explaining pictures)
How to make a Yoyo (with explaining pictures)

The links don’t work anymore, you can find the information here now:
Yoyo Projects (with explaining pictures)
How to make a Yoyo (with explaining pictures)

Chopsticks into Hairsticks

Chopsticks into Hairsticks

When I saw the tutorial on how to make hairsticks from chopsticks I loved it!
What a great idea. And a beautiful project to practise the Peyote stitch ;-) (for links to learn Peyote see below).
I haven’t done it yet, because hairsticks never keep my hair (it’s too thin ;-( ).
But who knows? ;-)


Links:
Chopsticks into Hairsticks

About.com: Beadwork: A website with lots of tutorials about beadwork
Basic Beading Stitch Tutorials (English)

Perlenhobby.de: A website with lots of (german) tutorials about beadwork: click on
‘Anleitungen’ in the sidebar left and there select one of the Peyote tutorials

Bargello

Bargello

While working with polymer clay I found a tutorial on how-to make items with a Bargello-look.

Then I made a little research to know what Bargello is (links see below):
It seems, that the first ‘Bargello craft’ was embroidery, but then the quilters worked Bargello-looking quilts, the polymer clay people made those items with a Bargello-look and the stampers and cardmaking people use this technique on paper. And I made my Bargello digitally as you can see on the picture ;-)
What a versatile technique ;-)


Links:
Embroidery:
Wikipedia: English entry for ‘Bargello’

Defining Bargello

How-to make Bargello needlework:
Bargello Work
Bargello needlepoint

Quilting:
How To Make Bargello Quilt

Polymer Clay:
Tutorial on how-to make items with a Bargello-look
Bargello Swap
Tutorial on how to make a Bargello pattern as cane and as sheet

Stamped Paper:
Bargello (English) (with explaining pictures)

Pendant-to-be-embellished

Pendant to be embellished
One day I wanted to have a pendant-to-be-embellished and decided to create it myself.
On the photo you see both sides of a charm of about 1,5 cm (appr. 0.6 inches) which I embellished with self-dyed fabric and some metallic yarn embroidery.
The embellishment isn’t quite what I dreamed of, but the core pendant worked well.

This is how I did it:
You need:

  • some cardboard (the thickness of the middle piece must be about the same as the wire)
  • some wire
  • glue

Pendant to be embellished 
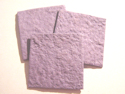
img 1: Cut 3 equal pieces of your cardboard.


Pendant to be embellished 
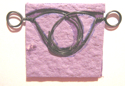
img 2: Wrap the wire round a dowel to form the eye. Then turn a couple of times to form the peg and then form a bigger eye which will be hidden in the pendant.
Note: I prefer the hidden part of the wire to be an eye because then the wire can’t be dragged out by accident.


Pendant to be embellished img 3: Take the cardboard piece which will sit in the middle and trace your hanger.


Pendant to be embellished img 4: Cut out the place you will need for the hanger.


Pendant to be embellished img 5: Glue the hanger and the middle cardboard pieces onto one outer cardboard piece.
Note: I glue on also the cardboard piece in the eye to prevent having a hollow.


Pendant to be embellished 
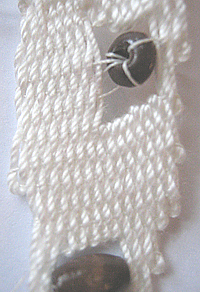
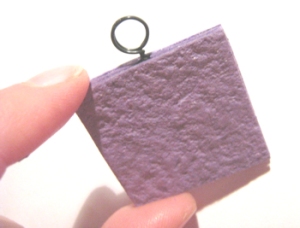
img 6: Glue the other outer cardboard piece onto. Your pendant-to-be-embellished is finished and you may begin with the embellishments.


Pendant to be embellished Pendant to be embellished
img 7 & 8: This is a solution for a 2-eyed pendant.


There are so many ways to embellish your self-made pendant (mini collages, painted, beaded, stamped etc), I’d love to see them.
Please feel free to comment here to show your trinkets.

Have fun!