Nail File Envelope

Nail File Envelope

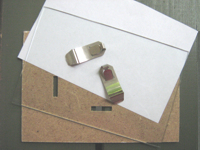
Once I found instructions on how to make a nail file envelope, which I embraced, because me too, I never have such a file when I need it and I don’t like to search ‘free’ nail files in the depths of my bag.

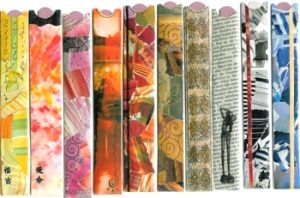
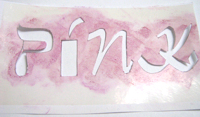
I’m not much of a stamper (although I would like to be ;-)), so I made them with my own with markers and a little moist coloured tissue papers, I collaged them from magazines and I made them from doodled coffee-dyed newspaper (see second photo).

Nail File Envelope Because I own 5 cm wide clear packaging tape (a little less than 2 inches), I made the envelopes slender enough to cover them completely with the tape. This way they are sturdier and more robust in the depths of my bag ;-)
The nail file envelopes are a lot of fun to make and a very good giveaway at nearly everybody. Even men took them voluntarily! ;-)
Most fun for everybody is, when I present the whole range of my nail file envelopes and everybody can select their own.


Links:
Nail File Envelope

Watercolor Button Garden

Watercolor Button Garden

Pink Paper Peppermints has a beautiful project: 31 Crafty Flowers.
I checked them all and I wanted to present one of them, although I haven’t tried it yet, because I dont’ have the right markers: the Watercolor Button Garden.
Aren’t they beautiful?
And be sure to check the other flowers too :)


Links:
Watercolor Button Garden

Kirigami Flower

Kirigami Flower

While browsing Origami links I found a tutorial on how to cut Kirigami flowers, a technique we used when we were children for cutting snowflakes.
I hadn’t realized that this technique is so widely usable and brings so beautiful results.
On the photo you see a flower I cut in very short time for a greeting card and suddenly I felt the urge to doodle on it ;-)
Every petal looks different now.
The photo is bad, but I hope that you can see what I am talking about.


Links:
Kirigami Flower

unikatissima’s entry about Zentangles

Pocket Graffiti Pen

Pocket Graffiti Pen

I found an ingenious way to make my own Airbrush tool.
I haven’t tried it yet, but I think of using it with the cut-out letters from my letter stencils.
(The picture is a mock-up, made digitally to show what I am aiming for.)


Links:
Pocket Graffiti Pen (with explaining photos)

Here at unikatissima:
Letter stencils

Crazy Quilt Photo Frame

Crazy Quilt Photo Frame

Once I wanted to make a photo frame for a friend. There are so many ways to do this, but then I got an idea I still find great ;-))


Crazy Quilt Photo Frame I used a simple glass frame as seen on the second photo that I already had at home and glued a kind of Paper Crazy Quilt with two windows for the photos onto the glass.
I used flower photos from an ad as paper and the only embroidery stitches I used where the zigzag stitches, because I wanted it to be simple.


Links:
Here at unikatissima:
Paper Crazy Quilt

Bargello

Bargello

While working with polymer clay I found a tutorial on how-to make items with a Bargello-look.

Then I made a little research to know what Bargello is (links see below):
It seems, that the first ‘Bargello craft’ was embroidery, but then the quilters worked Bargello-looking quilts, the polymer clay people made those items with a Bargello-look and the stampers and cardmaking people use this technique on paper. And I made my Bargello digitally as you can see on the picture ;-)
What a versatile technique ;-)


Links:
Embroidery:
Wikipedia: English entry for ‘Bargello’

Defining Bargello

How-to make Bargello needlework:
Bargello Work
Bargello needlepoint

Quilting:
How To Make Bargello Quilt

Polymer Clay:
Tutorial on how-to make items with a Bargello-look
Bargello Swap
Tutorial on how to make a Bargello pattern as cane and as sheet

Stamped Paper:
Bargello (English) (with explaining pictures)

Letter stencils

Letter stencils

Rosie showed her beautiful carved stamps and mentioned that she wants to carve letters too.
I prefer to use letter stencils, because I can use them in such a flexible way.
On the first photo you see a page from an artist book of mine yet to be finished. It has the theme ‘Colour’ and I stenciled the word ‘Pink’. On the other photo beneath you can see the stencil.

This is how I did it:
You’ll need:

  • Plain paper
  • Different fonts on your computer
  • Clear tape
  • Sharp knife, like an Xacto knife

What to do:

  1. Print the word you’re interested in in the requested size on paper.
    Note: You can use just one font, but I found different fonts for every letter more appealing.
    Note: Best are big fonts because they are easier to cut out.
  2. Put some clear tape on the print.
  3. Cut the letters carefully.
    Note: The tape makes the paper sturdier, so that the cutting is a little easier.
  4. Stencil your word wherever you want (paper, cardboard, fabric, glass, wood etc.).
    Note: I painted with a marker on the clear tape round the letters and smeared them with my fingers onto the paper.

Letter stencils The tape makes the paper not only sturdy, but also quite waterproof, so that you can use it several times with nearly every kind of colours. If necessary you can put tape on both sides of the paper prior to the cutting.

You can find a similar tutorial on instructables.com for making your own freezer paper and your own freezer paper stencil. I guess it is better for making bigger stencils, but I haven’t tried it.


Links:
Rosie’s carved stamps

Eraser Stamps Tutorials
Photo Stamps Tutorial

My Artist Book

Freezer paper and stencil tutorial

Photo Stamps

Photo Stamps

I already presented links on eraser carving, but perhaps you want to go a step further and make stamps from your own photos?
I found a tutorial on how to prepare your photos for carving stamps.
The preparation of the photos is similar to the tutorial on making your own digital stamps (and while we’re at it why not making stencils from your own photos? ;-))
On the picture you see a stamp template I made from a photo from a magazine.
Not yet cut, first I must find a big eraser ;-)


Links:
Prepping Photos for Carving
Carving 101

art-e-zine: a cornucopia for artists
Make your own digital stamps
Stencil Art

Here at unikatissima:
Eraser Stamps

Folded Spirals

Folded Spirals

As I saw this tutorial on how to make vellum spirals I was amazed: such beautiful paper spirals and so easy to make!
On the photo you see my spiral with changing directions.
It looks so frail against the light.

The tutorial is in German, but there are explaining pictures (you must look at the PDF file!).
What you have to do is basically:

  • Take a piece of vellum paper (I used some sandwich paper).
  • Cut a triangle from the vellum paper.
  • Cut a narrow, right-angled triangle from cardboard (best look at the explaining pictures).
  • Lay the cardboard triangle on the vellum paper triangle as described by the explaining pictures and fold the paper along the cardboard triangle. Then turn the vellum paper triangle and fold the paper again.
  • Continue as long as you like/as possible.

They suggest that you begin to experiment then:

  • try broader or narrower triangles for the paper
  • try broader or narrower triangles for the cardboard
  • use a narrow cardboard triangle for left folds and a broad for right folds
  • divide in halves every second fold after having finished etc.

I had a lot of fun and I hope so will you :-)

I intend to use those spirals in the future on cards, tags, in altered books and so forth.
I’d love to know about your experiments with folded spirals.


Links:
Tutorial on how to fold paper spirals:
(Download the PDF file)

Flexagons

Flexagon Flexagon Flexagon Flexagon

Flexagons a quite interesting things: a kind of card with four sides, and you can flip from one side to the other, back and forth.
But to better understand what Flexagons are, how they work and how you can make one for yourself take a look at the Flexagon page.
On the photos you see the four pages of my first (and up until now last) flexagon. (Click on thumbnails to see the photos.)
It doesn’t work so well, because it is to bulky:
I made them from cardboard to make them lasting longer, glued then cotton on to the cardboard, because I thought that fabric would bend better if you flip them over and over and then glued on the pieces of my hand-embroidered and tape-transfered collages on the appropriate places.
Next time I will see to it that they get slender.
But anyhow: I love my flexagon ;-))


Links:
Flexagons

And if you want to embroider your collages:
English Embroidery Stitch DiagramsDeutsche Stickstichbeschreibungen
(see also Paper Crazy Quilt)

If you want to know more about image transfers
Easy Photo Transfers (different techniques)
Image Transfer
Packing Tape Image Transfers
(see also Artist Book)

Here at unikatissima:
Paper Crazy Quilt
Artist Book