Photo Kaleidocycles

foldplay Photo Kaleidocycles

Once I had the Kaleidocycles book from M.C.Escher and I even folded some of the kaleidocycles, but then I never thought about it any more.
Until I found the page where you can let make kaleidocycles from your own potos.

If you want to see a kaleidocycle in action, look at the M.C.Escher Kaleidocycles the middle picture.
Or look at one of the videos in internet.
You can also read more about kaleidocycles or simply look at photos of them.

But best is making one yourself and to ‘spin round’ ;-))


Links:
Photo Kaleidocycles (Make your very own kaleidocycle)
via: Bastelei mit Fotos:

Kaleidocycles books from M.C.Escher at:
Amazon.com
Amazon.de

Animation at M.C.Escher Kaleidozyklen:
English page (middle picture)
German page (middle picture)

About kaleidocycles at Mathematische Basteleien:
English page
German page

Google image search result for ‘kaleidocycle’
Google video search result for ‘kaleidocycle’

Camera as Flowerpot

Photojojo Camera as Flowerpot

What a great idea to plant old cameras!
I still have some and old lenses, some of which are broken and I don’t need them anymore, but I can’t part with them.
Perhaps I shouldn’t and instead plant them.
Hm, on the other hand I have a brown thumb, it can therefore get difficult to plant them.
;-))


Links:
Resurrect a Broken Camera as a Flowerpot

Here at unikatissima:
Entries containing the words ‘brown’ and ‘thumb’

Fall Photo Tips

Photojojo Fall Photo Tips

As said before, fall has begun and perhaps you like to make some really beautiful photos.
Then the fall photo tips will be perfect for you.

They forgot though that you have to look out for ground squirrels if you want to make good photos ;-)
And possibly you can take even better pictures with a self-made fisheye lens.

And if you don’t know what to do with the photos, simply browse this blog and make you a DIY photo silhouette t-Shirt with beautifully photographed leaves, Kaleidoscope pictures that you can use on greeting cards, candle lit photo stands for a good ambience, photo pencils that one likes to put in a row, a mailable mosaic for good friends, a photo bookmark where the leave overlaps a little, a Crazy Quilt photo frame that you embroider beautifully, a photo stamp for card making, too, and if you only want to display the pictures, you can make a plaster photo holder or a Jacob’s Ladder for yourself.

And if you have done all this you will already need the tips ‘Photograph the Holidays’ again ;-))


Links:
12 Fantastic Fall Photo Tips – Our Extra-Crunchy Guide to Leaf Peeping

Here at unikatissima:
Making Good Photos
DIY Fisheye Lens
DIY Photo Silhouette T-Shirt
Kaleidoscope Pictures
Candle Lit Photo Stands
Photo Pencils
A Mailable Mosaic
Photo Bookmarks
Crazy Quilt Photo Frame
Photo Stamps
Plaster Photo Holder
Jacob’s Ladder
Photograph the Holidays

Making Good Photos

Guardian A squirrel who appeared

Recently I told that there were times when I didn’t know how to make good photos.
Now I learned that curious ground squirrels must be taken in regard when taking photos with delayed-action shutter release ;-)))


Links:
Photo enthusiasts go nuts for squirrel’s holiday snap
Wikipedia entry for ‘ground squirrel’

Here at unikatissima:
Taking Photos from Jewelry
Skinner Blend Beads Necklace

Skinner Blend Beads Necklace


unikatissima Skinner Blend Necklace

I made some nice necklaces from very narrow polymer clay beads where the bead colours are blended – and I wanted to present them now.


That’s what you do:

 
unikatissima Skinner Blend Necklace
First make a Skinner Blend (a ploymer clay slab with a colour blend).
I blended it from light green to blue.
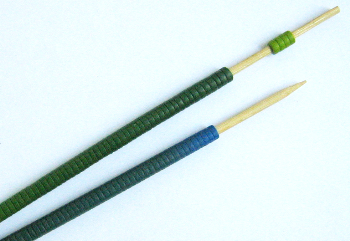
Cut the slab in stripes and wrap them around one or more kebab skewers – not too firm or you get problems taking them off, later.
Join the edges thoroughly and with care so that the beads won’t fall apart later.
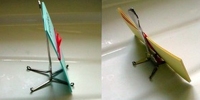
At the top of the photo you see a piece of light green polymer clay, that will become contrasting beads.

By the way: If you don’t have a pasta machine for the Skinner Blend (never use a pasta machine used for polymer clay for food again!) you can find hints on how you can manage without it via the links below.


unikatissima Skinner Blend Necklace
Cut the wrapped slab with a small knife down to the skewer at regular intervals, I made my future beads about 3 mm wide.


unikatissima Skinner Blend Necklace
Bake the polymer clay following the instructions and get the beads off the skewer(s) carefully.
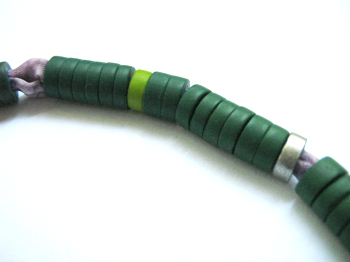
On this photo you see my light green contrasting bead that I put between the others to make it look more interesting and you see a silver bead where I don’t remember how I coloured it.
I think that I used silver coloured metallic powder that I bought for some Mica shift projects.


unikatissima Skinner Blend Necklace
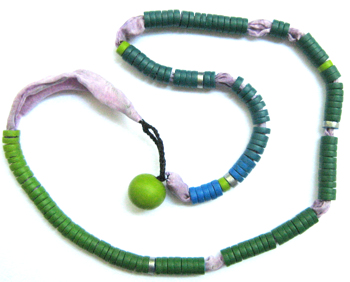
I threaded my beads on a self-dyed violet silk cord and made the clasp from a black braided band and a big, round light green bead.


unikatissima Skinner Blend Necklace
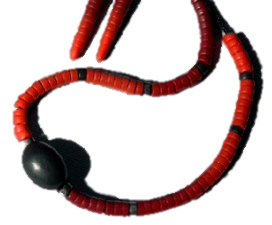
And that is a red necklace with Skinner Blend beads that I gave away – I’m sorry for the poor quality of the picture, when I took the photo at that time I didn’t know how to make good photos.
On both sides of the black central bead I let the colour blend go from light to dark red and loosened it up with narrow black beads.
The earrings are simply cones that I rounded at the top and that I carved slightly horizontally to make them match the necklace.


Links:
Skinner Blend

Don’t have a pasta machine?
Making A Jellyroll Cane Without A Pasta Machine
via: Glass Attic – Pasta machines – click on ‘No pasta machine?–other ways …guide rails’

Pasta Free Skinner Blend (Video)

Here at unikatissima:
Polymer Clay Mica Shift

Taking Photos from Jewelry
Poor Man Side Flash

Origami Photo Frame

unikatissima Origami Photo Frame

A dear friend sent me the link to an Origami instruction for a photo frame.
I’ve seen several before which didn’t really impressed me, but of course I took a look at the tutorial:
I’m amazed!

My friend wrote that you can put a postcard or a 10 x 15 cm photo in a frame made of a A4 paper sheet and that a 7 x 10 cm photo fits in a frame made from a A5 paper sheet.
I find best of all that you adjust the size of your photo frame exactly to your photo in one of the last steps and this way you can even make it fit a not-so-exacltly-cut 10 x 15 cm photo.
What is more the frame is easy to fold.

What more could you ask for? ;-)


unikatissima Origami Photo Frame Here I show the back of the frame.
When folding you create an (amazingly stiff) triangle that serves as frame stand.
Here you can (hopefully) see that the photo frame can only stand if the picture is in landscape format, a portrait formatted picture has to be hung at the wall or put into a photoholder.

First I thought about making the frame from patterned paper but then I found it a little bit silly because you can only see the four corners on the front side.


Links:
Origami Photo Frame (Picture Frame)

Here at unikatissima:
Plaster Photo Holder
more entries with the tag ‘photoholder’