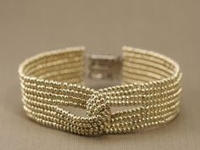
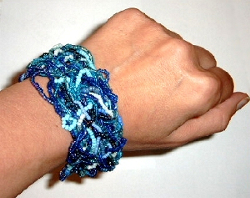
A very nice seed bead bracelet – just as the other seed bead bracelets :)
Links:
Seed Bead Bracelet (Free pattern for bracelet Santorini)
Here at unikatissima:
Entries containing the word ‘seed bead bracelet’
…compilation of tutorials
A very nice seed bead bracelet – just as the other seed bead bracelets :)
Links:
Seed Bead Bracelet (Free pattern for bracelet Santorini)
Here at unikatissima:
Entries containing the word ‘seed bead bracelet’

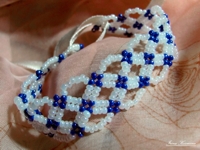
Cute, isn’t it? Three different seed bead bracelets give one :)
The previously presented seed bead bracelet looks completely different :)
Links:
Seed Bead Bracelets (DIY 3 Seed Bead Bracelets! How To Beginners Jewellery Making ¦ The Corner of Craft ) (video)
via: 3 Seed Bead Bracelets! by TheCornerofCraft
Here at unikatissima:
Seed Bead Bracelet

I like the seed bead bracelet :)
Links:
Seed Bead Bracelet (Turquoise Wrapped DIY Bracelet)
via: Turquoise Wrapped DIY Bracelet
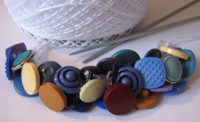
I found a great instruction on how to make a beaded I-cord.
She knits an I-cord where she works in previously stringed beads.
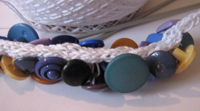 Because I only had seed beads I simply took some of my buttons and must say that I like the result, also.
My I-cord is a little bit uneven, because the heads of my buttons often got in my way, but I like it nevertheless ;-)
Links:
an anti pattern
During my ‘beading time’ I wrote a (German) tutorial for bead intertwists as on the photo.
Here is the English translation:
Material:
for the bracelet:
additional items:
What to do:

First make a selection of beads and place them at your disposal.
Tip: Uniform colouring connects visually; different forms, sizes and transparency makes it more vibrant.
In this example I used eleven different sorts of blue seed beads, some transparent, some with silver lining and some opaque.
More variety in sizes brings more vitality. The border between vitality and disquietness is to your liking.

Thread beads and make a frame of approximately the right size.
Connect the bead strings from time to time to the borders of the frame.

Weave more bead strings into the frame, connect them from time to time to other strings.
Tip: On the photo the inner bead strings are sometimes multi coloured.
During the work I found out, that this isn’t necessary and that one coloured strings mostly look better.

Continue to weave in bead strings: long strings, short strings, lengthwise, crosswise, over and under.
Tip: When the ‘fabric’ gets tighter it’s easier to work in the bead strings in sections.
On the photo I append about half a dozen white beads to a white string.
Pay attention to make a ‘fabric’ of consistent denseness.

When everything is finished attach any closure, e.g. a bead loop and a colour matching button.
I didn’t make any closure, because the item on the photo wasn’t meant to be a bracelet.
Notes:
Have fun!

Inspired by the tutorial on how to make wire beads I created a wire bracelet (I couldn’t get enough of all this wrapping of wire ;-)).
I although didn’t use any special tool but a simple steel kebab skewer I found somewhere in my kitchen ;-)
Because my wire seemed quite boring to me, I strung some green seed beads on it but they are barely visible.
Links:
Jewelry Making Techniques by WigJig: a colossal website for Jewelry Making and Wire Design
Tutorial on how to make wire beads

I once found in internet photos from some spiral beads beaded from seed beads. Because I really liked them, I figured out how to bead spiralbeads.
The instruction is in German, but I drew explaining pictures that (I hope ;-)) say it all.
You begin in the middle. First you increase the circumference of the bead in the first 3 rows, then in rows 4 and 5 you work straight to create the sides of the bead and from row 6 on you decrease in the same way you increased before.
I then created the necklace *Summer, Sun and Spots* and the bracelet *Little Black Dress* with such spiral beads.
The beaded strings for the necklace where made in tubular peyote stitch (here an English instruction). After having finished them, I sewed them on.
The bracelet ‘strings’ where made in flat Herringbone weave (here an English instruction).
Links:
Beaded Spiral Beads (in German)
Spiral Beads Necklace *Summer, Sun and Spots* (in German)
Spiral Beads Bracelet *Little Black Dress* (in German)
More instructions on:
Tubular Peyote Stitch (English)
Tubular Peyote Stitch (German): click ‘Anleitungen’ in left navigation bar, select ‘Schlauch-Peyote’
Flat Herringbone/Ndebele Weave (English)
Flat Herringbone/Ndebele Weave (German): click ‘Anleitungen’ in left navigation bar, select ‘Flaches Ndebele’
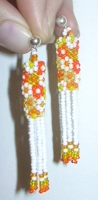
I find these earrings soo cute!
And they are great to practice the Peyote technique, just as the beads that I combined with my paper beads.
Now at last I can make matching earrings for my paper beads bracelet ;-))
Links:
Tubular Peyote Earrings (Orange, yellow, and white 70’s style Peyote tube seed bead earrings (phew!))
Here at unikatissima:
Making Paper Beads
Entries with the tag ‘Peyote’