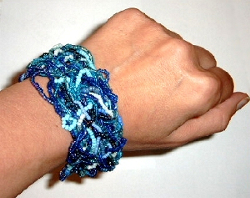
During my ‘beading time’ I wrote a (German) tutorial for bead intertwists as on the photo.
Here is the English translation:
Material:
for the bracelet:
- selection of beads (here: various seed beads)
- colour matching thread
- needle
additional items:
- pins
- styrofoam or cork board
What to do:

First make a selection of beads and place them at your disposal.
Tip: Uniform colouring connects visually; different forms, sizes and transparency makes it more vibrant.
In this example I used eleven different sorts of blue seed beads, some transparent, some with silver lining and some opaque.
More variety in sizes brings more vitality. The border between vitality and disquietness is to your liking.

Thread beads and make a frame of approximately the right size.
Connect the bead strings from time to time to the borders of the frame.

Weave more bead strings into the frame, connect them from time to time to other strings.
Tip: On the photo the inner bead strings are sometimes multi coloured.
During the work I found out, that this isn’t necessary and that one coloured strings mostly look better.

Continue to weave in bead strings: long strings, short strings, lengthwise, crosswise, over and under.
Tip: When the ‘fabric’ gets tighter it’s easier to work in the bead strings in sections.
On the photo I append about half a dozen white beads to a white string.
Pay attention to make a ‘fabric’ of consistent denseness.

When everything is finished attach any closure, e.g. a bead loop and a colour matching button.
I didn’t make any closure, because the item on the photo wasn’t meant to be a bracelet.
Notes:
- If the bead strings are carefully woven the ‘fabric’ keeps quite good its form.
- I used simple cotton thread for the example and wove in the ends with some glue. I could do it this way, because the item was intended to be glued onto a sturdy surface and there would be no strains to the threads.
- At the beginning it can be difficult to keep the form. The styrofoam or cork board can be of great help when pinning the item to the board.
Have fun!
