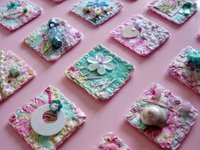
I have presented inchies before, these fabric inchies match them greatly :)
Links:
Fabric Inchies (More Inchies)
Here at unikatissima:
Entries containing the word ‘inchies’
…compilation of tutorials
I have presented inchies before, these fabric inchies match them greatly :)
Links:
Fabric Inchies (More Inchies)
Here at unikatissima:
Entries containing the word ‘inchies’
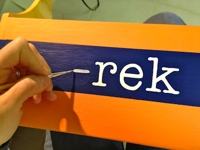
A nice idea: embellish things with painted letters :)
Links:
Painted Letters (“P” is for Personalize #2)
via: how to paint letters perfectly! so easy! why didn’t I think of that!?!
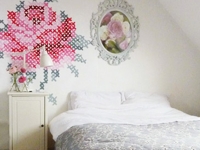
I find this cross stitch wall art amazing: simple and looks great :)
Links:
Cross Stitch Wall Art (Let’s Get Personal in the Netherlands with Eline Pellinkhof….)
via: Cross stitch mural!
via: Eline Pellinkhof
via: simple . . . yet very striking
A lot of furniture is embellished with leaves pattern here and I find that the ferniture looks totally beautiful :)
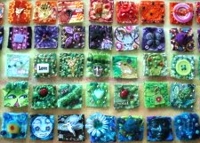
I told before how you can make matching, but not equal paper inchies*.
Here she shows how to make wondeful fabric inchies.
It must be a lot of fun.
* What is an inchie? An Inchie is a 1″ square of art. They are made from paper or fabric and then embellished in innumerable ways (see links below).
Links:
1″ fabric collage tutorial…
Google image search result for ‘inchies’
Flickr image search result for ‘inchies’
Here at unikatissima:
Serendipity Collage
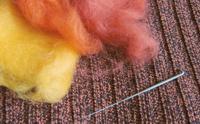
I presented before some tutorials and inspirations on the subject of ‘felting’, but it were mostly instructions on how to produce something from felt.
The tutorial on how to felt on self-knitted items is a little different: we take a sweater or bag or the like that we have knitted (ok, bought works also ;-)) and applique a felt decoration.
I surely will give it a try once!
Links:
Decorate Your Knitting with Needle Felting
Here at unikatissima: entries with the tag ‘felting’
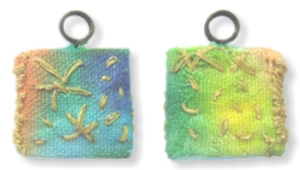
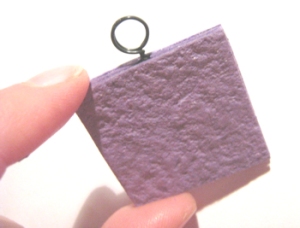
One day I wanted to have a pendant-to-be-embellished and decided to create it myself.
On the photo you see both sides of a charm of about 1,5 cm (appr. 0.6 inches) which I embellished with self-dyed fabric and some metallic yarn embroidery.
The embellishment isn’t quite what I dreamed of, but the core pendant worked well.
This is how I did it:
You need:
 img 1: Cut 3 equal pieces of your cardboard.
 img 2: Wrap the wire round a dowel to form the eye. Then turn a couple of times to form the peg and then form a bigger eye which will be hidden in the pendant.
Note: I prefer the hidden part of the wire to be an eye because then the wire can’t be dragged out by accident.
 img 3: Take the cardboard piece which will sit in the middle and trace your hanger.
 img 4: Cut out the place you will need for the hanger.
 img 5: Glue the hanger and the middle cardboard pieces onto one outer cardboard piece.
Note: I glue on also the cardboard piece in the eye to prevent having a hollow.
 img 6: Glue the other outer cardboard piece onto. Your pendant-to-be-embellished is finished and you may begin with the embellishments.
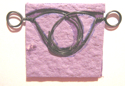

img 7 & 8: This is a solution for a 2-eyed pendant.
There are so many ways to embellish your self-made pendant (mini collages, painted, beaded, stamped etc), I’d love to see them.
Please feel free to comment here to show your trinkets.
Have fun!