I have presented a herbarium before, but this was in a notebook. The nature leaves wall art however decorates your wall :)
Links:
Nature Leaves Wall Art (How-To: Make a Herbarium)
Here at unikatissima:
Herbarium
…compilation of tutorials
I have presented a herbarium before, but this was in a notebook. The nature leaves wall art however decorates your wall :)
Links:
Nature Leaves Wall Art (How-To: Make a Herbarium)
Here at unikatissima:
Herbarium

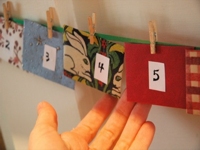
Yesterday I told you where to get couloring pages in an unkonventional way, I also like the idea of using colouring pages as index dividers for binders – organization becomes fun! :)
Links:
Colouring Pages as Index Dividers (Colorful Binder Organization)
via: Make beautiful coloring pages into dividers for binders and notebooks in just a few easy steps
Here at unikatissima:
Colouring Pages from Embroidery Designs
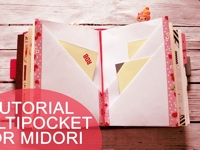
Midori travelers notebook seems to be an organizer with components which you assemble to your requirements.
And if you need a Midori multipocket insert you can make it now yourself.
Links:
Midori Multipocket Insert (tutorial_multipocket for midori or flexdori) (Italian and English)
via: Lucy wonderland: TUTORIAL multipocket for midori travelers notebook
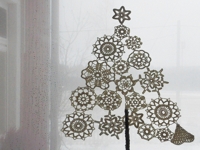
The crochet doily Christmas tree is made from crochet doilies which were starched with sugar water and sewn together: simple and most beautiful! :)
If you too want to make such a little tree for Advent you should possible start soon to crochet doilies :)
And if you don’t like a Christmas tree you can also sew together your doilies in other shapes, e.g. as snow man.
Links:
Crochet Doily Christmas Tree (kesanlapsi > notebook > projects > oi, joulupuu)
To see the Crochet Doily Christmas Tree project you must register at ravelry.
via: lace tree
Here at unikatissima:
Entries to do with crochet doilies
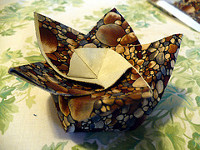
I presented entries about fabric origami before, I find it this time still more interesting because it’s a fabric origami box.
Links:
Fabric Origami Box (Bookcloth Box Tutorial)
Note: Larken pointed out that there is a folding diagram missing. At least I have found it: Frangipani Box Redux
Here at unikatissima:
Entries with the tags ‘fabric’ and ‘origami’
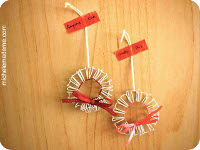
I can’t throw away anything – but as I see it, I don’t have to, because you can make something from everything, like little ornaments from the Spiral binding of a used notebook ;-))
Links:
Spiral Binding Wreath (Series 7 – Ornament-ED: Spiral Notebook Binding Wreaths)
Today I present an Advent calendar that you make from (self-made) envelopes.
I find it also nice and perfect for gift coupons.
Apart from that I have presented Advent calendars here at unikatissima before :))
Links:
Envelope Advent Calendar (Easy DIY advent calendar: 25 small folded paper envelopes)
Here at unikatissima:
Entries with the tag ‘Advent calendar’
This time I find the title absolutely convenient: I find this pop up really fantastic!
Note: The PDF links can’t be reached anymore, apparently amongst other things because of copyright infringements.
After all we have to buy the book ourselves :)
Links:
Descarga Gratis Libro Phantastische Papier (Kirigami) de Ramin Razani en Formato PDF Free Download – at the end you find links for the actual download of the file (German).
I downloaded the file here.

I discovered recently ‘knit weave’ (you can see pictures when following the links).
I like it! ;-)
Knit weave is mostly worked on knitting machines by laying a thread on the stitches. This thread is then trapped in the stitches and can be seen sometimes on the front side, sometimes on the back side of the item.
I found this interesting and thought that it should be possible to do this by hand.
I didn’t find very much (see links), therefore I’m reporting my own experience here.
Just a note: ‘knit weave’ can be translated in German by ‘Webstricken’, but when googling Webstricken you get quite different results: there are knitting needles where you can thread in an extra thread that will be worked in your item when knitting. But it looks different from ‘my’ knit weave.
That’s what you do:
In principle you carry an extra thread with you that will be laid on the front side and the back side of your work, alternately. That’s like weaving: the weft will be brought over and under.
I suggest not to let the extra thread lay on one side longer than four stitches. The float will get too long and your fingers can get caught.
Always check the extra thread tension to prevent it from hanging or contracting the knitted stitches.
You can see best what I’m talking about when checking the following examples:
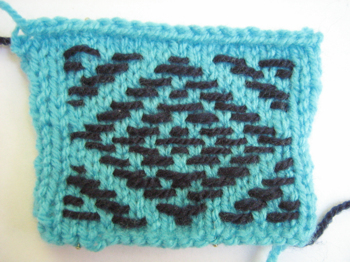
My first item.
I knitted the yellow item in a rib pattern two knit-two purl to prevent it from curling.
While knitting I carried a red thread that I always laid two stitches on the front side and two stitches on the back side of my work.
The back side looks similar.

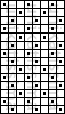 These are both patterns I used for my first item.
A filled square means: ‘lay the thread on the front side of your work’, an empty square means therefore ‘lay the thread on the back side of your work’.
(To download simply click on the image with the right mouse button and use something like ‘Save image as…’.)
My second item: This time I used kitchener stitch and I was pleasantly surprised to see that the item nearly don’t curl when knit woven.
Note: I’ve been told that this is not the kitchener stitch but the stockinette stitch.
In the end it doesn’t matter which stitch you use (to a certain point ;-)), but I see that I have still lots to learn about the English knitting vocabulary ;-)).
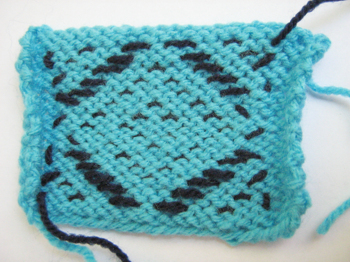
Here the back side: just as with multi-coloured knitting.
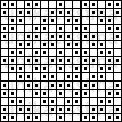 That is the diamond pattern I used for my second item.
(The download works in the same way as above.)
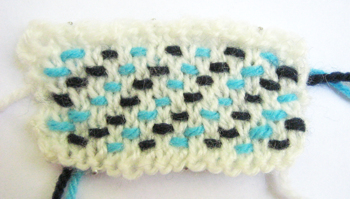
Then I wanted to know whether it works with two colours, too.
I think it does ;-))
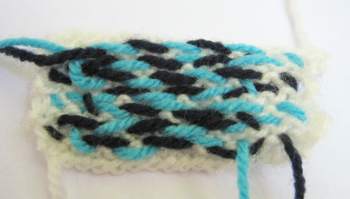
The item gets however quite thick because of the many yarns.
Besides I’m sure that you can make the whole thing much neater ;-)
 So, that is the two-colour pattern.
A square filled with a filled square (eehm…) means: ‘dark blue thread on the front side of the item’, a square filled with an empty square means: ‘light blue thread on the front side of the item’, an empty square means: ‘all extra threads on the back side of the item’.

In the end I just played around with an extra: I knitted the (hmpf!) square from outside to inside in kitchener stitch by knitting three stitches together in the corners in every second row.
I carried the gray extra thread that I laid on the front side every second row shifted for one stitch.
Unfortunately I blocked the square made from acrylic yarn too hot, that ‘s why I can’t get it square anymore ;-(

Here you can see the back side of the square.
The pattern is inverted and look also nice.
What I want to try next:
Links:
Short Description ‘Knit-woven Effects’
Photos of machine knit woven pieces (with lace knitting)
Photos of machine knit woven pieces
A short movie about the technique that she uses there to weave in fur yarn => look there for ‘Hand knit-weave technique’
Meine kleine Buchkritik – My little book review: Kathleen Kinder, ‘The technique of Knitweave’) (German and English): actually I refer to the pictures because the reviewed book is about machine knit weave
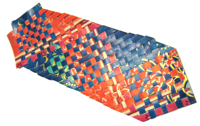
A long time ago I found a tutorial on how to make bookmarks with Ugandan Weaving, but the site doesn’t exist any more and I couldn’t find it in internet.
Therefore I wrote something myself.
That’s what you do:
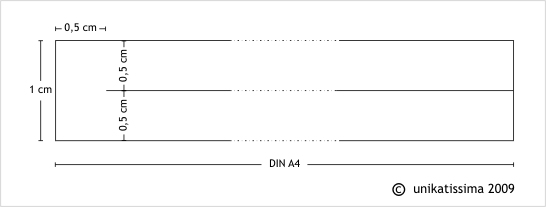 First of all you must cut the paper stripes.
Take two coloured DIN A4 sheets and cut them in stripes of 1 cm.
Slit them in the middle, but let at one side a little piece (0,5 cm) unslit so that the stripes don’t fall apart.
You can see this best on diagram 1 (click to enlarge).
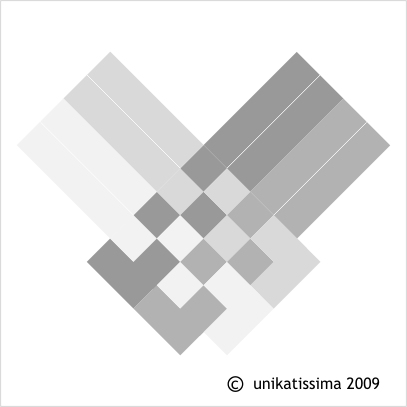 Then lay the stripes side by side and weave them as seen in diagram 2 (click to enlarge).
I sketched it as if there were 4 colours, that looks also nice.
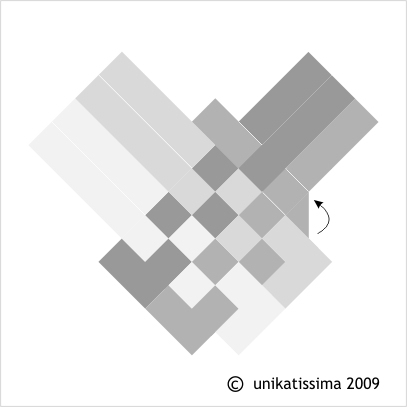 When all stripes are woven fold the outer stripes back and weave on (see diagram 3, click to enlarge).
Continue until you’re satisfied.
You can see on the photo on top that I haven’t read the instruction thoroughly: I didn’t take stripes of 1 cm but much broader ones, although I slit them every 0,5 cm, too.
The disadvantage is, that the stripes are pushed apart and therefore the beginning (left of picture) doesn’t look very nice (although I took the photo so that it’s not to be seen ;-)).
When you take the 1 cm stripes which are slit once this effect doesn’t occur.
I taped the ends together with clear tape.
And I made the coloured papers by glueing two Christmas gift wrap papers together :)
Links:
Original site where I found the tutorial for Ugandan Weaving. When I tried it, it didn’t exist any more.
The site has been saved by webarchive.org, but without the (important!) diagrams: site without diagrams (note: very long loading time).