Stitched Flowers

Stitched Flowers

While I was browsing through the projects of STITCH I found Precious Petals. They ‘glue’ the flowers on fabric and then embellish with decorative stitching.
A stunning idea which is still on my to-so list.


Links:

STITCH project: wonderful projects around stitching (how surprising ;-))


Simple Cro-Tat

Simple Cro-Tat

There is a technique called Cro-Tat, which is a technique between Crochet and Tatting: the item it is crocheted, but looks like tatted. For tutorials look beneath the Links.
I don’t have a straight steel crochet hook and so I figured out how to do this in another way.
It is a kind of clothesline crochet: I am crocheting a simple chain that I ‘decorate’ with single crochets.
I once wrote a (German) tutorial on how to make a Mother’s Day card with a Simple Cro-Tat Ornament. It is heavily illustrated ;-)
Anyhow: ‘Luftmasche’ is chain, ‘feste Masche’ is single crochet and ‘Kettmasche’ is slip stitch, the actual row is red, the previously worked rows are in black.


Links:
Tutorial on how to make a Mother’s Day card with a Simple Cro-Tat Ornament (German)
Tutorial on how to make another Simple Cro-Tat Ornament (German) (‘Zusammen häkeln’ means join)

Cro-Tat
Cro-Tat Instructions (English) The link isn’t available no more. Try instead to find an appropriate tutorial in this list of Cro-Tat Instructions.
Cro-Tat Instructions (German)

Here at unikatissima: Clothesline Crochet

Wire Bracelet

Wire Bracelet

Inspired by the tutorial on how to make wire beads I created a wire bracelet (I couldn’t get enough of all this wrapping of wire ;-)).
I although didn’t use any special tool but a simple steel kebab skewer I found somewhere in my kitchen ;-)
Because my wire seemed quite boring to me, I strung some green seed beads on it but they are barely visible.


Links:
Jewelry Making Techniques by WigJig: a colossal website for Jewelry Making and Wire Design
Tutorial on how to make wire beads

Serendipity Collage

Serendipity Collage

Create a lot of similar but not equal little squares to be used in card making, inchies* ‘production’ and other paper arts.
Take matching papers, tear them in pieces and glue them on a sheet of paper. If you like to, stamp it, paint it (to blend them a little) or doodle on it.
Then cut the embellished sheet in squares.

* What is an inchie? An Inchie is a 1″ square of art. I’ve seen them (in internet) made from paper, then embellished in innumerable ways or even sewn from fabric, also embellished in uncountable ways (see links beneath).


Links:
Once I have found lots of instructions on how to make Serendipity Squares, but I can’t find them back ;-(
Therefore I link here results of the Google image search for ‘Serendipity square Collage’:
Stamped Serendipity Squares (English) by ScrapFriends

Serendipity Technique Tutorial (English) by Art Without Anxiety

Serendipity Technique Tutorial (German) (select ‘Serendipity) by Anja`s Artefaktotum

Amendment (29. April 2008)
I found back my links and here are the missing ones:

Serendipity Squares (English)
Serendipity Do! (English)

Serendipity Squares Scrapbook Layouts: Search for ‘Serendipity Squares’

Serendipity (German)

Inchies – Inchies
Google image search for ‘what are inchies’
Google image search for ‘what is inchie’
Flickr search for ‘inchies’

Coloured Yarns

Coloured Yarns

I like to work little pieces where not much yarn is required and I like to use a different colour and colour shade with each piece.
Unfortunately I can’t afford to always buy the shades I like: on the one hand it is too expensive and on the other hand I don’t have enough place for such a big stash.
Therefore I like to work with four to six sewing yarns in similar shades and – if I am in the mood – one or two metallic sewing yarns. They don’t take so much place and I can get much more subtle shades by combining them then I ever could buy.
I put the chosen yarn in a dessert bowl, so that they don’t roll away and begin crocheting.
Coloured Yarns I worked the Crochet Chamsas I presented yesterday with this ‘technique’.


Links:
Here at unikatissima:
Crochet Chamsa

Crochet Chamsa

Crochet Chamsa

I always liked the Chamsa (English Wikipedia entry for ‘Chamsa’) because it seems to me to be a sign of peace and friendship.

One day I crocheted a Chamsa to use it on a card.
Have fun with my original crochet pattern (and if you use it, please give credit).

First you work three rounds, then you continue in rows.

(Instructions on how to crochet with a magic ring and how to crochet the double treble crochet: see Links beneath)

Click picture to enlarge
Crochet Chamsa

Links:
Crochet Chamsa pattern

English Wikipedia entry for ‘Chamsa’
German Wikipedia entry for ‘Hamsa’

Magic ring
(Google results)
The Magic Adjustable Ring: A Better Way to Begin Crochet in the Round (English): very good illustrated instruction
Häkeln lernen: Der Fadenring (German)

Double Treble Crochet
(Google results)
Tutorial Double Treble Crochet (English): very good illustrated instruction
Tutorial Double Treble Crochet (German)

Starburst Card

Starburst Card

I love many of the string art patterns, but I would never make them, because I find them on the other side quite old fashioned.
Although the I thought that I could use the pattern to create a card.
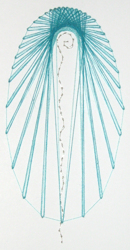
I pricked the holes of the Starburst pattern Starburst pattern (template here template here) from The Art of Thread Design The Art of Thread Design into my cardboard and measured the length of thread. About 8m (about 26 feet ;-)). Then I started to weave the thread through the holes. I hadn’t finished the first two stitches when my thread became a firm knot. Totally entangled. Absolutely un-detangable.

Therefore I had to try something else with new thread.
I thought (what I should have done beforehand ;-)) that in string art they use pegs (nails) to fix the thread at the predefined points. Then I realised that I could have a kind of pegs too: if I weave the thread over and under the holes (from hole 1 to hole 2, 2 to 3, 3 to 4 etc) and back, I get a coloured frame where the holes are, I get pegs, because one thread goes from the front side to the back side and vice verso (see picture).

Starburst Card-Thread weaving
Click to enlarge

Now I could wrap the thread around my self-made pegs just in the same way they are doing it in string art around the nails.

I enjoyed working on the Starburst pattern, but at one end it is very narrow and I only could use two layers in place of three.


Links:
The Art of Thread Design

Starburst pattern instructions
Starburst pattern template

The original site doesn’t exist any more and is now available through webarchive:
The Art of Thread Design

Starburst pattern instructions
Starburst pattern template

Translations of Crochet Terms

Translations of Crochet Terms

To read foreign-language crochet instructions one needs translations of the relevant terms.
I found a site with translations in several languages:
Crochet Terms in Six Languages (English, Spanish, Italian, French, German, Polish).
Happy crocheting! :-))


Links:
Crochet Terms in Six Languages (English, Spanish, Italian, French, German, Polish)

Embroidery Crust

Surface Embroidery

The title is far from perfect ;-)
Better look at the original instruction on how to encrust calico with embroidery.
On the photo you see my first (and only) attempt at doing it, but I didn’t get far with it and created (another! ;-)) UFO (unfinished object).
But the real thing is soo beautiful!


Links:
Stitch with the Embroiderers’ Guild – A magazine for creative stitchers
Online projects from the Embroiderers’ Guild

Encrusting Calico