Friendship Bracelet

Friendship Bracelet

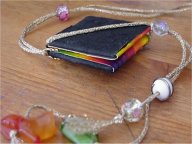
I once braid a Friendship Bracelet, but in just one colour. The ones at Heather’s Friendship Bracelets are so beautiful because of the different colour patterns she presents.

I haven’t done them yet, but they are on my to-do list (together with a gazillion of other things to try ;-))


Links:
Heather’s Friendship Bracelets
Note: even though there’s written something about a move I could stilll reach the links
Friendship Bracelet – first pattern of first set

Artist Book

Artist-Book

As mentioned before in the entry about paper beads, I once created an artist book.

Step Outside Your Box Saturdays posted this week a challenge about books and I thought it an opportunity to show my artist book ‘blickkontakt’ (which means ‘eye contact’).

I wanted ‘blickkontakt’ to give the viewer many surprises to discover and created therefore several windows and fold-outs.
The pages were created from cardboard and covered in hand-stained papers. Then I stamped, embroidered, tape transfered, sketched, scribbled and glued.


Enjoy the pictures
(Click thumbnails to see photos)

Artist-Book The cover with the round medaillon in its ‘pocket’. Along the spine I let hang the threads with the paper beads.


Artist-Book Still the cover, but this time showing the backside of the round medaillon.


Artist-Book Pages 1 & 2: You see the eye through a round window, the spirals are hand-embroidered, the little altered slide can be put into the lace pocket.


Artist-Book Pages 3 & 4: The images are tape transfered, the flourishes are hand-embroidered.


Artist-Book Pages 5 & 6: I stamped, wove paper, embroidered, crocheted. The dark circle is a free swinging altered bottle cap, the semicircle on the left upper side is a fold-out, where I glued a hand-beaded star.
(Unfortunately the tape transfers gleam so, that you can’t see their motif.)


Artist-Book Pages 7 & 8: I cut two little round windows into the right page.
The raffia forms a little pocket, where I put a transparent tape transfer tag.


Artist-Book Pages 9 & 10: Stamping, tape transfers, embroidered spirals, fold-outs, hand-stained crochet flower and hand-made bead fringe.


Artist-Book The verso with tape transfers, stamps and a ringlet from a fake hairpiece.


I created more artist books, if you like to see them, take a look at Art.


Links:
If you want to create your own (Altered or Artist) Book, you may want to take a look at the following links (the list is far from complete!):

About Altered Books:
What is an altered book?
Definitions

At art-e-zine: Altered Book Workshop

Get Inspirations:
Gallery of Altered Book Artists
Google results of search for ‘Altered Book’
Google image results of search for ‘Altered Book’

Some of the used techniques:
Paper staining
Tea Staining Your Art Journal Pages
Tea Stain Paper

Image Transfer Techniques:
Easy Photo Transfers (different techniques)
Image Transfer
Packing Tape Image Transfers

Here at unikatissima:
Paper Beads

Eraser Stamps

Eraser Stamps

There are lots of tutorials on how to make stamps from erasers (look at the Google search result for ‘eraser stamp’).
I want to present three of them:

Some hints & tips for eraser-carving
This site shows how beautiful those stamps can be and gives helpful hints.

Kneaded Eraser Stamps
Craft Chi always have ingenious ideas and tutorials and I like the kneaded eraser stamp because it is a technique to create stamps from everything with a textured surface.

Making and Using Stamps with Watercolor
I liked this one because I don’t stamp so often and so I don’t want to spent too much money on ink pads. Using watercolour makes it easy to use different colours nonetheless.

By the way: On the photo you see my first attempts on carving stamps from erasers and although they’re very simple I still like to use them from time to time.


Links:
Google search result for ‘eraser stamp’
Google Suchergebnisse für ‘Radiergummi Stempel’

Some hints & tips for eraser-carving
Craft Chi: Kneaded Eraser Stamps
Making and Using Stamps with Watercolor

Freeform Peyote

Freeform Peyote

As I said before I really love freeform work.
Another wonderful freeform technique is Freeform Peyote.
To give you an idea of the variety of pieces of art, see those results of the Google image search ‘Freeform Peyote’.
Stunning, aren’t they?

First I had the problem that I really didn’t know where to begin.
Up until the day I found a tutorial on how to make a freeform peyote bracelet.
After I’ve seen how easy it is, I worked several pieces with this technique. The photo shows close-up of three of them.
If you like to see more of them, take a look at the judaica, many mezuzot are made in freeform peyote technique.


Links:
Tutorial on how to make a freeform peyote bracelet

Results of the Google image search ‘Freeform Peyote’

Peyote stitch:
About.com: Beadwork: A website with lots of tutorials about beadwork
Basic Beading Stitch Tutorials

Perlenhobby.de: A website with lots of (german) tutorials about beadwork: click on
‘Anleitungen’ in the sidebar left and there select one of the Peyote tutorials
Wikipedia: Mezuza (english)Mesusa (deutsch)

Clothesline Crochet

Clothesline Crochet

I mentioned the clothesline crochet before when I described the Simple Cro-Tat.
But because I find clothesline crochet a handy technique when I want to work something stiff (for a little bowl e.g.) I wanted to present the tutorial on how to make clothesline crochet in the round with its own entry (tutorial see links below).
Priscilla Hewitt has also other clothesline crochet tutorials and tipps about what yarns and what clothesline to use (see links below).

On the photo you see my attempt on crocheting such a little bowl.
I used quite a thick string and crocheted with crochet cotton, which is rather thin.
Because I’m always working very loosely, I could never have created a bowl with this yarn.
The clothesline crochet technique made it possible.


Links:
Tutorial on how to make clothesline crochet in the round
Other clothesline crochet tutorials and tipps

Addendum of February 2009: The links above don’t work anymore, you can find the instructions for the clothesline crochet now as PDF (about 540 KB) at Priscilla’s Crochet – Free Pattern Index, check there for ‘Clothesline Crochet’.

Here at unikatissima:
Simple Cro-Tat

Faux Papyrus

Faux Papyrus

As I saw the title ‘Papyrus’ in connection with ‘crafting’ (English for ‘bricolage’) I was instantly interested.
And the technique is easy and convincing.
The tutorial is in French, but there are very good illustrating photos.


And this is, what you have to do:
Materials:

  • gauze or cheesecloth
  • wallpaper paste
  • some coffee for colouring
  • a soft brush
  • a sheet of plastic foil
  • some water

Prepare the wallpaper paste with some cold coffee, not to liquid and not to solid.
Put the gauze on the sheet of plastic foil and coat them with the paste.
Let dry on a flat surface.
Check the photos in the tutorial to better understand what to do.

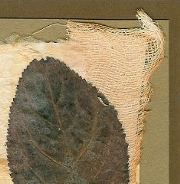
I used my piece of Faux Papyus on a card with a leaf and some other background papers.


Links:
Tutorial on how to make Faux Papyrus

Cardboard Weaving Frame

Cardboard Weaving Frame

Once I wanted to create a picture frame with a woven border. I simply made a cardboard loom with an opening where I wanted to put the picture.
Cardboard Loom It worked out well, but I didn’t really like it when finished ;-)
I wanted to share anyway.
The sketch shows how to wrap the yarn.
If you want to see it better, enlarge the picture by clicking on it.
If you want to know how to weave on a cardboard loom, see the Links below.


Links:
Tutorial on how to weave with a cardboard loom

Fractal Art

Fractal Art

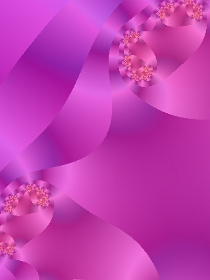
Once I saw some fractals in internet and – as always;-)) – I wanted to create something like this too.
Some researching resulted in finding the Fractal Explorer, a freeware fractal generator.
I created many fractals and everyone was absolutely beautiful.
As I saw them on my screen I was delighted. I then let them be printed as photos in 20 x 30 cm (about 51 x 76 inches) and was thrilled. And in the end, when they were glued to 40 x 60 cm watercolor paper (about 102 x 152 inches) I stood in awe.
Really! :-))

If you like to see my fractals take a look at art (Simply click on the thumbnails to get a (German) description. If you want to enlarge them further, click then on the image.)


Links:
Wikipedia: English entry for ‘fractal’

Fractal Explorer: a freeware fractal generator

Result of Google image search for ‘fractal’

Paper Crazy Quilt

Paper Crazy Quilt

I love Crazy Quilts, because it is a kind of Freeform work, but I don’t like sewing. So I began to make my quilts on and with paper.
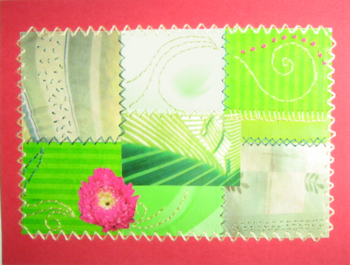
On the photo you see a card I made with this technique.
I didn’t only embroider the seams but I also used some fancy stitches like French Knots e.g. (the red dots on the photo) onto the surfaces.

To make your own Paper Crazy Quilt, find matching papers and cut them into pieces. On the photo I used rectangles, but the typical Crazy Quilt distribution is also beautiful (here you can find some lovely blocks here you can find some lovely blocks).
Glue the collage on thin paper and then begin embroidering (carefully!) as if it was a real Crazy Quilt (here is an online class for Crazy Quilts).
To finish you glue or embroider your Paper Crazy Quilt on cardboard.


Links:
Crazy Quilt blocks
Tutorial moved to: Crazy Quilt blocks

Online class for Crazy Quilts

English Embroidery Stitch Diagrams
Deutsche Stickstichbeschreibungen

French knots (Knötchenstiche) (English)
French knots (Knötchenstiche) (German)