Pendant-to-be-embellished

Pendant to be embellished
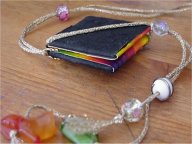
One day I wanted to have a pendant-to-be-embellished and decided to create it myself.
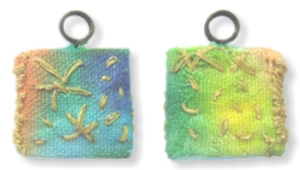
On the photo you see both sides of a charm of about 1,5 cm (appr. 0.6 inches) which I embellished with self-dyed fabric and some metallic yarn embroidery.
The embellishment isn’t quite what I dreamed of, but the core pendant worked well.

This is how I did it:
You need:

  • some cardboard (the thickness of the middle piece must be about the same as the wire)
  • some wire
  • glue

Pendant to be embellished img 1: Cut 3 equal pieces of your cardboard.


Pendant to be embellished img 2: Wrap the wire round a dowel to form the eye. Then turn a couple of times to form the peg and then form a bigger eye which will be hidden in the pendant.
Note: I prefer the hidden part of the wire to be an eye because then the wire can’t be dragged out by accident.


Pendant to be embellished img 3: Take the cardboard piece which will sit in the middle and trace your hanger.


Pendant to be embellished img 4: Cut out the place you will need for the hanger.


Pendant to be embellished img 5: Glue the hanger and the middle cardboard pieces onto one outer cardboard piece.
Note: I glue on also the cardboard piece in the eye to prevent having a hollow.
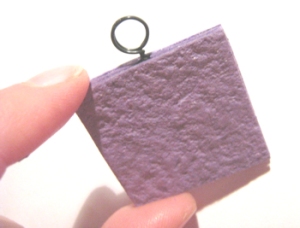
 

Pendant to be embellished img 6: Glue the other outer cardboard piece onto. Your pendant-to-be-embellished is finished and you may begin with the embellishments.


Pendant to be embellished Pendant to be embellished
img 7 & 8: This is a solution for a 2-eyed pendant.


There are so many ways to embellish your self-made pendant (mini collages, painted, beaded, stamped etc), I’d love to see them.
Please feel free to comment here to show your trinkets.

Have fun!

Beaded Shank Button

Beaded Shank Button

Many pieces of jewelry like necklaces or bracelets need some kind of closure. Purses do, too, journals perhaps. Maybe you crochet an iPod cozy that should be closable.
You can use pre-made closures (which I mostly don’t like), but you can make a self-made shank button match just as you like.
For my bracelet bracelet *Little Black Dress* with the beaded spiral bead I made such a shank button and it worked out really fine.


Links:
Beaded Shank Button (Tubular Herringbone/Ndebele)

Here at unikatissima:
Beaded Spiral Beads

Bead and Wire Wall Vase

Bead and Wire Window Vase

Inspired by two wonderful items, the Bead & Wire Heart at The Bead Bugle and the Bead Godesses from Ronda Kivett at the Autumn 2003 Issue of ARTitude Zine I did deliberately my vase from the photo.
I feel that I was a little too cautious, but I like it already.
Next time I want to get nearer to those shining examples I had.


Links:
Bead & Wire Heart at The Bead Bugle
Bead Godesses from Ronda Kivett at the Autumn 2003 Issue of ARTitude Zine


Bead Picots

Bead Picots

Bead picots are a beautiful way to give you work a neat border.
I was therefore glad to find this tutorial on how to make bead picots tutorial on how to make bead picots.
On the photo you see a freeform bead embroidered pin I made; I worked the bead picots all around the pin.
I also made once a little book (given away without taking a photo ;-(), where I used the bead picots to border the paper pages – it look great, too.
Next time I’ll make an Artist Book, I will use bead picots on the paper, as well as on the next crochet purse I will make (but no one knows when this will be ;-)), perhaps even the next greeting card I’ll create and who knows what ideas I’ll get by then ;-)


Links:
Bead Picot Instructions
The original site doesn’t exist any more and is now available through webarchive: Bead Picot Instructions

Here at unikatissima:
Freeform Bead Embroidery
Artist Book

Coin Ring

Coin Ring

Browsing craftster I found one day the thread about coin rings.
Somewhere in the thread is also a link to a tutorial on how to make your own coin ring (with many explaining pictures).
I can’t image that I will ever do this, but I find it interesting enough to present it here.

Perhaps someone wants to make their weddings rings this way? ;-))


Links:
craftster: ‘coin rings! i’m an addict!!!’

Tutorial on how to make a coin ring

Freeform Peyote

Freeform Peyote

As I said before I really love freeform work.
Another wonderful freeform technique is Freeform Peyote.
To give you an idea of the variety of pieces of art, see those results of the Google image search ‘Freeform Peyote’.
Stunning, aren’t they?

First I had the problem that I really didn’t know where to begin.
Up until the day I found a tutorial on how to make a freeform peyote bracelet.
After I’ve seen how easy it is, I worked several pieces with this technique. The photo shows close-up of three of them.
If you like to see more of them, take a look at the judaica, many mezuzot are made in freeform peyote technique.


Links:
Tutorial on how to make a freeform peyote bracelet

Results of the Google image search ‘Freeform Peyote’

Peyote stitch:
About.com: Beadwork: A website with lots of tutorials about beadwork
Basic Beading Stitch Tutorials

Perlenhobby.de: A website with lots of (german) tutorials about beadwork: click on
‘Anleitungen’ in the sidebar left and there select one of the Peyote tutorials
Wikipedia: Mezuza (english)Mesusa (deutsch)

Wire Bracelet

Wire Bracelet

Inspired by the tutorial on how to make wire beads I created a wire bracelet (I couldn’t get enough of all this wrapping of wire ;-)).
I although didn’t use any special tool but a simple steel kebab skewer I found somewhere in my kitchen ;-)
Because my wire seemed quite boring to me, I strung some green seed beads on it but they are barely visible.


Links:
Jewelry Making Techniques by WigJig: a colossal website for Jewelry Making and Wire Design
Tutorial on how to make wire beads

Beaded Spiral Beads

Beaded Spiralbeads

I once found in internet photos from some spiral beads beaded from seed beads. Because I really liked them, I figured out how to bead spiralbeads.
The instruction is in German, but I drew explaining pictures that (I hope ;-)) say it all.
You begin in the middle. First you increase the circumference of the bead in the first 3 rows, then in rows 4 and 5 you work straight to create the sides of the bead and from row 6 on you decrease in the same way you increased before.
I then created the necklace *Summer, Sun and Spots* and the bracelet *Little Black Dress* with such spiral beads.
The beaded strings for the necklace where made in tubular peyote stitch (here an English instruction). After having finished them, I sewed them on.
The bracelet ‘strings’ where made in flat Herringbone weave (here an English instruction).


Links:
Beaded Spiral Beads (in German)

Spiral Beads Necklace *Summer, Sun and Spots* (in German)
Spiral Beads Bracelet *Little Black Dress* (in German)

More instructions on:
Tubular Peyote Stitch (English)
Tubular Peyote Stitch (German): click ‘Anleitungen’ in left navigation bar, select ‘Schlauch-Peyote’

Flat Herringbone/Ndebele Weave (English)
Flat Herringbone/Ndebele Weave (German): click ‘Anleitungen’ in left navigation bar, select ‘Flaches Ndebele’

Paper Beads

Paper Beads

I always loved paper beads, but never knew what to do with them. Then one day I created an artist book (more to follow in a later entry) and – eureka! – I found a use for those paper beads: I wanted to use them on the fibers embellishing the spine of my book (see photo). For those beads I used an advertisement flyer from a furniture dealer with lots of sofas in matching colours. They just had the right size for the beads ;-)
To make the beads I used those instructions on how to make paper and fabric beads.
It can also be used to make the fabric beads I mentioned before.
Later on I found an entry at craftster: A bowl made out of paper beads! I stood there in awe!
But I think that I never will make such a bowl – it’s all a question of having or not having patience ;-)


Links:
Instructions on how to make paper and fabric beads

craftster.org: A website with sooo many craft ideas, inspirations and tutorials
A bowl made out of paper beads

Here at unikatissima:
Making Fabric Beads