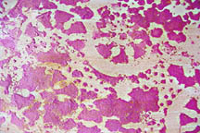
I found a wonderful simple technique for beautiful backgrounds: a tutorial on how to stencil with paper doilies.
Isn’t it great?
At my next shopping i must look for paper doilies ;-))
Links:
Paper Doilies Stencils
…compilation of tutorials
I found a wonderful simple technique for beautiful backgrounds: a tutorial on how to stencil with paper doilies.
Isn’t it great?
At my next shopping i must look for paper doilies ;-))
Links:
Paper Doilies Stencils
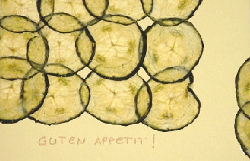
Once I found a tutorial on how to make paper from vegetables, but I don’t find back the tutorial (it was at ARD-Buffet, but it seems to be too long ago).
On the photo you see a card made with cucumber paper for a friend for the end of fast.
How to make cucumber paper:
Repeat steps 2 – 5 until the tissue paper stays nearly dry.
Lay between new sheets of tissue paper and between several layers of old newspapers and put some weight on it.
About once a day you must replace the moist tissue paper and newspapers by dry ones.
After 2 – 3 days your cucumber paper is ready for use.
Cucumber seems to be one of the easiest vegetables to be used for paper. You can also use other vegetables, but I haven’t tried them and can’t say, how thick the slices must be and how long it takes.
The paper is real paper: You can write on it, you can cut it and so forth.
Although I like it, I always considered paper weaving a bit dull. Then I saw Paperweaving Plus (scroll down until ‘Paperweaving Plus’) and found the results fascinating.
I liked especially the not-only-paper-weave which I have to try as soon as possible.
Links:
Paperweaving Plus (scroll down until ‘Paperweaving Plus’)
Weave paper stripes into a sheet of paper (English) (With explaining pictuers)
If you also think, that paper weaving is a little dull, take a look at the flickr results for ‘paper weaving’

I knew about those moldable foam stamps, but I never realized how versatile they are and what great stamps you can make from them. You can even combine them into stunning collages.
I’m speechless again ;-))
On the photo you see my attempt at stamping a clothespins pattern. Because I don’t have no moldable stamp, I used my kneaded eraser. I think this is a great background for a card.

I like the so-called ‘Shabby Chic’ and tried some of the ‘Rough Your Papers Up’-Techniques. They make great backgrounds.
For the piece on the photo I took a gift wrap and sanded it very lightly (although it looks as if I worked hard on it ;-)). The scratches where spotless white, which was much to much contrast, but after I rubbed some ochre coloured chalk in, I like it much better.
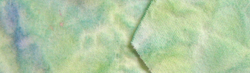
As I found the tutorial on how to dye fabric with acryl colours I was thrilled, because I think that this way I can colour my fabric just the way I want.
I tried it immediately, but I have to work on it some more (and I will! ;-))
In a second entry Debra showed what she did with the paper towels she used to clean her workspace: isn’t it stunning?
Links:
Hand-dyed Fabric Trims
Dyed Paper Towels for Paper and Fabric Arts

I find making collages fascinating.
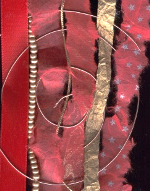
One interesting technique to glue your items to the base is the so-called beeswax collage (for links to tutorials see Links below). It gives a warm colour to the collage and if polished a nice shine too.
On the photo you can see my first (and up until now last) attempt to do this. I collaged pieces of different newspapers (Chinese, Arabic, Corean) and self-made papers and than embroidered the spiral by hand.
Links:
At ARTchix Studio: Beeswax Collage: the link isn’t available no more.
At art-e-zine: Beeswax Collage
Google search results for ‘beeswax collage’
Google image search results for ‘beeswax collage’

I love to imitate things, so I had to check immediately the tutorial on how to make faux silk for cards.
On the photo you see my results: I took one of my self carved eraser stamps, coloured it with a marker and stamped on tissue paper (the left flower). Then, just to see what happens, I stamped two more times. The photo isn’t so good, but the pale stamps look elegant. On the third I didn’t smooth the paper to allow for more crinkles.
I will use this technique more often.
Links:
Faux Silk
unikatissima’s Eraser Stamps how-to
unikatissima’s Stamping With Markers how-to

Once I found a tutorial on how to make your own repeating pattern and found it a revelation!
I tried it immediately ;-) and it worked perfect!
On the topmost picture you see my self-made repeating pattern, on the other pictures you see what I made from it.
The whole pattern was designed on my computer, but I’ve made another one on paper which was also a success.
By the way: this Papaya Shikai Maki was designed the same way ;-))


Links:
Make your own Repeating Patterns (English) (with explaining pictures)

As I mentioned before, I don’t often stamp. Therefore I found the tutorial on how to make stamps with an inkjet printer very interesting.
I haven’t tried it yet and possibly I never will, because printer ink is also expensive, but who knows? Because I really want to ‘stamp’ the image on the photo and I’m sure that I wont carve it from an eraser ;-)
Links:
Craft Chi: Inkjet Transfer Stamping
Here at unikatissima:
Eraser Stamps