Letter stencils

Letter stencils

Rosie showed her beautiful carved stamps and mentioned that she wants to carve letters too.
I prefer to use letter stencils, because I can use them in such a flexible way.
On the first photo you see a page from an artist book of mine yet to be finished. It has the theme ‘Colour’ and I stenciled the word ‘Pink’. On the other photo beneath you can see the stencil.

This is how I did it:
You’ll need:

  • Plain paper
  • Different fonts on your computer
  • Clear tape
  • Sharp knife, like an Xacto knife

What to do:

  1. Print the word you’re interested in in the requested size on paper.
    Note: You can use just one font, but I found different fonts for every letter more appealing.
    Note: Best are big fonts because they are easier to cut out.
  2. Put some clear tape on the print.
  3. Cut the letters carefully.
    Note: The tape makes the paper sturdier, so that the cutting is a little easier.
  4. Stencil your word wherever you want (paper, cardboard, fabric, glass, wood etc.).
    Note: I painted with a marker on the clear tape round the letters and smeared them with my fingers onto the paper.
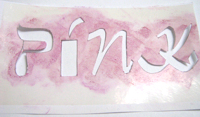
Letter stencils The tape makes the paper not only sturdy, but also quite waterproof, so that you can use it several times with nearly every kind of colours. If necessary you can put tape on both sides of the paper prior to the cutting.

You can find a similar tutorial on instructables.com for making your own freezer paper and your own freezer paper stencil. I guess it is better for making bigger stencils, but I haven’t tried it.


Links:
Rosie’s carved stamps

Eraser Stamps Tutorials
Photo Stamps Tutorial

My Artist Book

Freezer paper and stencil tutorial

Flexagons

Flexagon Flexagon Flexagon Flexagon

Flexagons a quite interesting things: a kind of card with four sides, and you can flip from one side to the other, back and forth.
But to better understand what Flexagons are, how they work and how you can make one for yourself take a look at the Flexagon page.
On the photos you see the four pages of my first (and up until now last) flexagon. (Click on thumbnails to see the photos.)
It doesn’t work so well, because it is to bulky:
I made them from cardboard to make them lasting longer, glued then cotton on to the cardboard, because I thought that fabric would bend better if you flip them over and over and then glued on the pieces of my hand-embroidered and tape-transfered collages on the appropriate places.
Next time I will see to it that they get slender.
But anyhow: I love my flexagon ;-))


Links:
Flexagons

And if you want to embroider your collages:
English Embroidery Stitch DiagramsDeutsche Stickstichbeschreibungen
(see also Paper Crazy Quilt)

If you want to know more about image transfers
Easy Photo Transfers (different techniques)
Image Transfer
Packing Tape Image Transfers
(see also Artist Book)

Here at unikatissima:
Paper Crazy Quilt
Artist Book

Fractal Pop Up

Fractal Pop Up

I already cut different pop ups, and I find this one quite elegant.
I haven’t done it yet, but I surely will one day.

(If you like the fractal repeats, take a look at the previous mentioned Fractal Art.)


Links:
Fractal Cut

Wikipedia: English entry for ‘fractal’Deutscher Eintrag für ‘Fraktal’

Here at unikatissima:
Fractal Art

Inkjet Transfer Stamping

Inkjet Transfer Stamping

As I mentioned before, I don’t often stamp. Therefore I found the tutorial on how to make stamps with an inkjet printer very interesting.

I haven’t tried it yet and possibly I never will, because printer ink is also expensive, but who knows? Because I really want to ‘stamp’ the image on the photo and I’m sure that I wont carve it from an eraser ;-)


Links:
Craft Chi: Inkjet Transfer Stamping

Here at unikatissima:
Eraser Stamps

Zentangles

Zentangles

While surfing I found Zentangles, which is nothing else than doodling.
But when I browsed the galleries I really, really wanted to try it, although I normally don’t feel at my ease with doodling.
My first attempt was ugly, because I tried to ‘create’ something. Then I took a little sheet of paper and started doodling without thinking about.
I was surprised at how beautiful it turned out ;-)


Links:
Zentangles

Eraser Stamps

Eraser Stamps

There are lots of tutorials on how to make stamps from erasers (look at the Google search result for ‘eraser stamp’).
I want to present three of them:

Some hints & tips for eraser-carving
This site shows how beautiful those stamps can be and gives helpful hints.

Kneaded Eraser Stamps
Craft Chi always have ingenious ideas and tutorials and I like the kneaded eraser stamp because it is a technique to create stamps from everything with a textured surface.

Making and Using Stamps with Watercolor
I liked this one because I don’t stamp so often and so I don’t want to spent too much money on ink pads. Using watercolour makes it easy to use different colours nonetheless.

By the way: On the photo you see my first attempts on carving stamps from erasers and although they’re very simple I still like to use them from time to time.


Links:
Google search result for ‘eraser stamp’
Google Suchergebnisse für ‘Radiergummi Stempel’

Some hints & tips for eraser-carving
Craft Chi: Kneaded Eraser Stamps
Making and Using Stamps with Watercolor

Paper Crazy Quilt

Paper Crazy Quilt

I love Crazy Quilts, because it is a kind of Freeform work, but I don’t like sewing. So I began to make my quilts on and with paper.
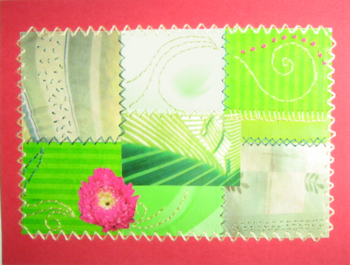
On the photo you see a card I made with this technique.
I didn’t only embroider the seams but I also used some fancy stitches like French Knots e.g. (the red dots on the photo) onto the surfaces.

To make your own Paper Crazy Quilt, find matching papers and cut them into pieces. On the photo I used rectangles, but the typical Crazy Quilt distribution is also beautiful (here you can find some lovely blocks here you can find some lovely blocks).
Glue the collage on thin paper and then begin embroidering (carefully!) as if it was a real Crazy Quilt (here is an online class for Crazy Quilts).
To finish you glue or embroider your Paper Crazy Quilt on cardboard.


Links:
Crazy Quilt blocks
Tutorial moved to: Crazy Quilt blocks

Online class for Crazy Quilts

English Embroidery Stitch Diagrams
Deutsche Stickstichbeschreibungen

French knots (Knötchenstiche) (English)
French knots (Knötchenstiche) (German)

Stitched Flowers

Stitched Flowers

While I was browsing through the projects of STITCH I found Precious Petals. They ‘glue’ the flowers on fabric and then embellish with decorative stitching.
A stunning idea which is still on my to-so list.


Links:

STITCH project: wonderful projects around stitching (how surprising ;-))


Simple Cro-Tat

Simple Cro-Tat

There is a technique called Cro-Tat, which is a technique between Crochet and Tatting: the item it is crocheted, but looks like tatted. For tutorials look beneath the Links.
I don’t have a straight steel crochet hook and so I figured out how to do this in another way.
It is a kind of clothesline crochet: I am crocheting a simple chain that I ‘decorate’ with single crochets.
I once wrote a (German) tutorial on how to make a Mother’s Day card with a Simple Cro-Tat Ornament. It is heavily illustrated ;-)
Anyhow: ‘Luftmasche’ is chain, ‘feste Masche’ is single crochet and ‘Kettmasche’ is slip stitch, the actual row is red, the previously worked rows are in black.


Links:
Tutorial on how to make a Mother’s Day card with a Simple Cro-Tat Ornament (German)
Tutorial on how to make another Simple Cro-Tat Ornament (German) (‘Zusammen häkeln’ means join)

Cro-Tat
Cro-Tat Instructions (English) The link isn’t available no more. Try instead to find an appropriate tutorial in this list of Cro-Tat Instructions.
Cro-Tat Instructions (German)

Here at unikatissima: Clothesline Crochet