Kumihimo Beads

Kumihimo Beads - Kumihimo Perlen

This Thursday’s 2nd challenge Beaded Beauties gave me the opportunity to do something I wanted to do for a long time: making Kumihimo beads.
Kumihimo is a Japanese technique to braid beautiful cords, but then: what do I do with the cord? It’s way too beautiful (and too labour-intensive! ;-)) to be used as a shoelace for instance.
I thought that it would make wonderful beads, but usually the braids are finished by wrapping some string around the braid and such beads would be much too long.


Kumihimo Beads - Kumihimo Perlen Therefore I figured out how to make my own Kumihimo beads.
The technique is far from perfect and I hope that you will try it and give suggestions to enhance the technique.

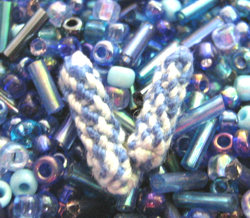
On the first two photos you see Kumihimo beads I made, the blue ones with cotton thread and the black and white ones with acrylic yarn.
All beads were made with 4 light and 4 dark coloured yarns, but I changed the initial positions on my cardboard Kumihimo disk.
You see at the surrounding seed beads how tiny my Kumihimo beads are.
 

Kumihimo Beads - Kumihimo Perlen What to do:
Make your Kumihimo cord. I worked about 20 rounds.
When finished, pull all threads into the bead.

And that’s where the problem lies:
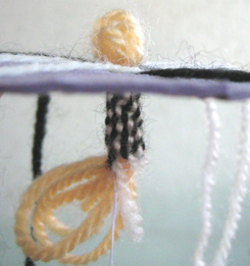
If you make the Kumihimo cord ‘the normal way’ you won’t have enough place into the bead to pull all 16 threads in (8 threads at each side of the bead).
I tried different techniques to ‘reserve’ a place for the thick bunch of threads. The best one I found was making a bundle of 8 threads of the same gauge and using it as ‘filler’, that means, working around them (see third photo).


Kumihimo Beads - Kumihimo Perlen The Kumihimo beads are from fabric and can be stitched however you want. On this photo I surrounded my Kumihimo bead by seed beads and made a kind of Freeform Peyote Pendant.


Links:
This Thursday’s 2nd challenge Beaded Beauties

unikatissima’s Kumihimo How-to
unikatissima’s Freeform Peyote How-to


Beaded Rings and Headbands

Beaded Rings and Headbands

Beading is such a versatile technique and once I found some quick and simple projects: beaded rings and headbands.
The headbands are made in flat netting technique and as daisy chains, the rings are made in brick stitch, which isn’t difficult, too (the site provides links and diagrams who explain/show how to do the different stitches).

I like the flat netting technique, but beaded until now only small glass tubes (see photo).


Links:
Beaded Rings and Headbands (English) (with explaining diagrams)

African Needle Weaving Necklace

African Needleweaving

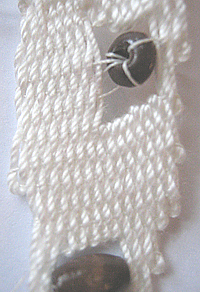
Once a found an instruction on how to work an african necklace using needle weaving (also called ‘pin weaving’). It’s a weaving technique that allows to easily create strange shaped fabrics and to incorporate beads into.
Stunning!
I played around with this technique and thought that it could as well be used for little bags, for bracelets and so forth.
Unfortunately it’s a technique that requires a lot patience – which I don’t have. ;-)
I’d love to hear what you think about!


Links:
African Needle Weaving Necklace

YoYo Pin

YoYo Pin

I like yoyo’s, but only recently I tried to make one. And I find it cute.
It is made from shiny polyester fabric and embellished with a little crocheted flower and some embroidered beads (I hate to have polyester on my skin, but I like it for pins and the like, because it is so shiny).


Links:
Yoyo Projects (with explaining pictures)
How to make a Yoyo (with explaining pictures)

The links don’t work anymore, you can find the information here now:
Yoyo Projects (with explaining pictures)
How to make a Yoyo (with explaining pictures)

Tubular Bead Weave Tension

Tubular Bead Weave Tension

Once I begun to work a beaded amulet bag (which ended as an UFO ;-)). I worked it around a tube and could have done with the instructions on how to get the tension right.
But this wasn’t the main problem, the main problem was that I don’t know what to do with an amulet bag ;-))
I think that the technique to get a perfect tension for tubular weave can be used too for a Peyote ring, but then you must work in rounds, not in rows as the Peyote ring.
I had this idea with the ring just now, so that I haven’t tried it.


Links:
Tubular Bead Weave Tension
see also Suzanne’s Bead Lessons (English)

Instruction on tubular Peyote (German) at Perlenhobby.de: click on ‘Anleitungen’ in the sidebar left and there select ‘Schlauch-Peyote mit gerader Perlenanzahl’ or ‘Schlauch-Peyote mit ungerader Perlenanzahl’

Here at unikatissima:
Beaded Amulet Bag
Peyote Stitch Beaded Ring

Chopsticks into Hairsticks

Chopsticks into Hairsticks

When I saw the tutorial on how to make hairsticks from chopsticks I loved it!
What a great idea. And a beautiful project to practise the Peyote stitch ;-) (for links to learn Peyote see below).
I haven’t done it yet, because hairsticks never keep my hair (it’s too thin ;-( ).
But who knows? ;-)


Links:
Chopsticks into Hairsticks

About.com: Beadwork: A website with lots of tutorials about beadwork
Basic Beading Stitch Tutorials (English)

Perlenhobby.de: A website with lots of (german) tutorials about beadwork: click on
‘Anleitungen’ in the sidebar left and there select one of the Peyote tutorials

Bead Knitting

Bead Knitting

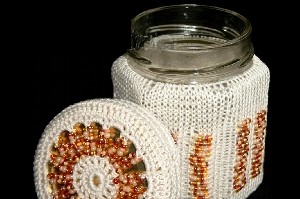
Bead knitting is such an interesting technique I wanted to present here (for links see below). Mostly it seems to be used for elegant little bags. I tried it on a cover for a jar to create a special jar for special sweets ;-)


Links:
Free Introductory Patterns for Bead Knitted Bags

Tips for First Time Bead Knitters
How to Transfer Beads to Knitting Thread (with explaining photos)

If you didn’t buy a hank of beads see also my entry ‘Making a Bead Spinner’

Bead Knitted Amulet Bag

Knitting in Beads and Buttons (simple technique for pony beads and buttons)

Peyote Variations

Peyote Variations

I love the peyote pattern, but sometimes it is nice to make some variations on it.
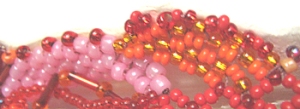
On the photo you see a detail from one of my Freeform Peyote items where the pink beads form a ‘Peyote-1 drop’ pattern, but the orange and gold part is worked in with a combination of ‘Peyote-1 drop’ and ‘Peyote-2 drop’: the golden beads are wider than the golden, so I made a ‘Peyote-1 drop’ for the golden beads and a ‘Peyote-2 drop’ for the orange beads.


Links:
Making Peyote Stitch Samples Part I (with explaining photos and pictures)
Making Peyote Stitch Samples Part II (with explaining photos and pictures)

Peyote stitch:
About.com: Beadwork: A website with lots of tutorials about beadwork
Basic Beading Stitch Tutorials

Perlenhobby.de: A website with lots of (german) tutorials about beadwork: click on
‘Anleitungen’ in the sidebar left and there select one of the Peyote tutorials

Beaded Bottle

Beaded Bottle Beaded Bottle

For some time I worked a lot with beads and the peyote stitch. Then I found a tutorial on how to bead a bottle and was thrilled – not only about the tutorial, but about my own results as well ;-))
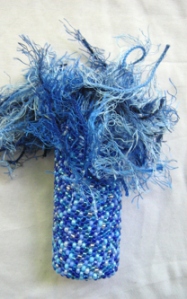
On the photos you can see two of my beaded bottles. I embellished the bottleneck of the blue one with funky fibers, the beading was made with a kind of bead soup* (I only used beads of the same size). The brown-golden one was made with just two sorts of beads, but I added some peyote ruffles at the bottleneck and a wire to use the little bottle as mini vase.


Beaded Bottle The third photo shows the bottom of the blue bottle.
* ‘Bead soup’ is on the whole an assortment of different beads, often with beads of different sizes and shapes. Many beaders use it for Freeform Peyote, but it can be used for many beading purposes. If you want to string the beads, use a bead spinner.


Links:
Tutorial on a Beaded Bottle
Peyote Ruffles

Google search result for ‘bead soup’
Peyote stitch:
About.com: Beadwork: A website with lots of tutorials about beadwork
Basic Beading Stitch Tutorials

Perlenhobby.de: A website with lots of (german) tutorials about beadwork: click on ‘Anleitungen’ in the sidebar left and there select one of the Peyote tutorials

Here at unikatissima:
Freeform Peyote
Making a Bead Spinner

Beaded Shank Button

Beaded Shank Button

Many pieces of jewelry like necklaces or bracelets need some kind of closure. Purses do, too, journals perhaps. Maybe you crochet an iPod cozy that should be closable.
You can use pre-made closures (which I mostly don’t like), but you can make a self-made shank button match just as you like.
For my bracelet bracelet *Little Black Dress* with the beaded spiral bead I made such a shank button and it worked out really fine.


Links:
Beaded Shank Button (Tubular Herringbone/Ndebele)

Here at unikatissima:
Beaded Spiral Beads