Lace doilies really are versatile and I think that making lace doily cards from them is one of my most preferred ideas :)
Links:
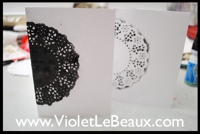
Lace Doily Cards (DIY Lace Greeting Cards)
Here at unikatissima:
Entries containing the word ‘doilies’
…compilation of tutorials
Lace doilies really are versatile and I think that making lace doily cards from them is one of my most preferred ideas :)
Links:
Lace Doily Cards (DIY Lace Greeting Cards)
Here at unikatissima:
Entries containing the word ‘doilies’
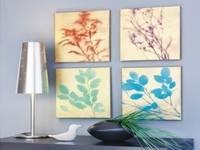
Recently I presented such a kind of wall decoration already, but there wrapped with patterned paper, large-sized photos or fabric.
I find these silhouet leaves pictures almost more beautiful :)
Links:
Wall Decoration with Silhouet Leaves (Іванна Синюк – Алена Животова) (Russian)
via: Sherry Saville via Sherri Anderson
Here at unikatissima:
Styrofoam Wall Art
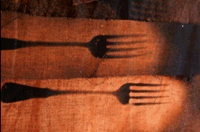
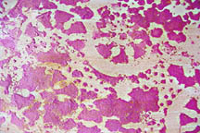
Well, I find these placemats really beautiful :)
Addendum: Hrmpf, the link doesn’t work anymore (thanks, Kalinumba!) and I didn’t find it in webarchive either.
It works in principle like here, but the cutlery has simply been laid down and then the bleach has been sprayed over.
Links:
Project: Bleach Stencil Placemats
Works in principle like here:
Bleach Design Tees with Freezer Paper
(Click photo to enlarge)
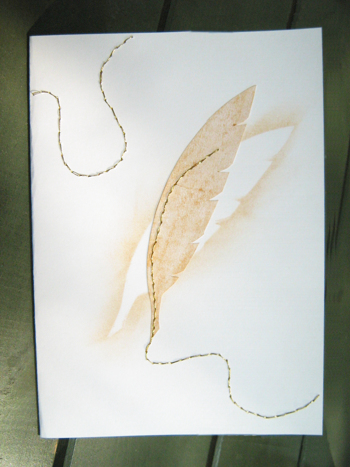
Recently I needed a birthday card and that is the reason why I played around with stencilling again ;-)
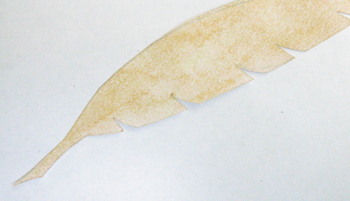
I wanted to have a negativ stencilled feather and sketched and cut therefore a feather.
Here I’ve made my first tests already.
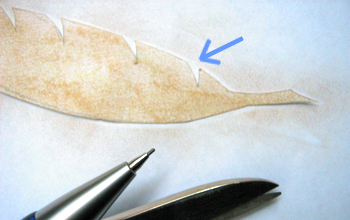
I covered my feather with light brown chalk and smeared the chalk with my fingers outwards.
This way I got white areas around my stencil which made the quill of my feather much too broad for my liking (see arrow).
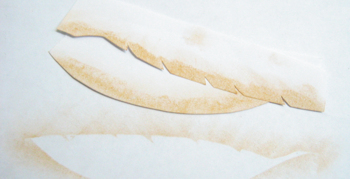
Therefore I cut two half-stencils and used them.
It worked great!
Another advantage of this half-stencil method is the fact, that the really narrow quill of my feather can’t slip or even tear anymore.
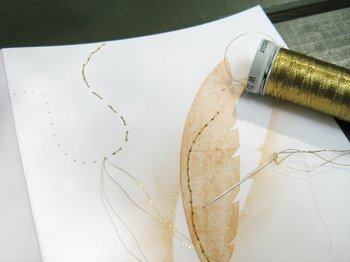
I glued a cut-out feather shifted on my stencilled feather and because I thought that something is missing, I embroidered some lines with golden thread.
I used a running stitch back and forth as I always do.
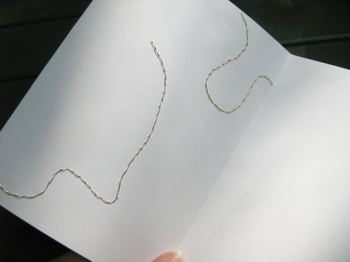
That’s how the inside of the card looks – I left it this way and wrote on the right side of the card.
(Click photo to enlarge)
And that’s how the finished card looks: I liked it ;-) and the adressee liked it, too :)
Admittedly the card looks still a little bumpy here because I fixed the chalk with hair spray. After everything was (really!) dry I put it under a heavy book and afterwards it was beautifully flat again.
Links:
Instruction on how to make the Running Stitch (English)
Instruction on how to make the Running Stitch (Vorstich) (German)
Here at unikatissima:
Entries with the tag ‘stencil’
Entries with the tag ’embroidery’
I found a wonderful simple technique for beautiful backgrounds: a tutorial on how to stencil with paper doilies.
Isn’t it great?
At my next shopping i must look for paper doilies ;-))
Links:
Paper Doilies Stencils

I found an ingenious way to make my own Airbrush tool.
I haven’t tried it yet, but I think of using it with the cut-out letters from my letter stencils.
(The picture is a mock-up, made digitally to show what I am aiming for.)
Links:
Pocket Graffiti Pen (with explaining photos)
Here at unikatissima:
Letter stencils

Rosie showed her beautiful carved stamps and mentioned that she wants to carve letters too.
I prefer to use letter stencils, because I can use them in such a flexible way.
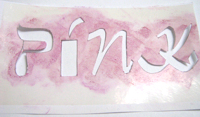
On the first photo you see a page from an artist book of mine yet to be finished. It has the theme ‘Colour’ and I stenciled the word ‘Pink’. On the other photo beneath you can see the stencil.
This is how I did it:
You’ll need:
What to do:
 The tape makes the paper not only sturdy, but also quite waterproof, so that you can use it several times with nearly every kind of colours. If necessary you can put tape on both sides of the paper prior to the cutting.
You can find a similar tutorial on instructables.com for making your own freezer paper and your own freezer paper stencil. I guess it is better for making bigger stencils, but I haven’t tried it.
Links:
Rosie’s carved stamps