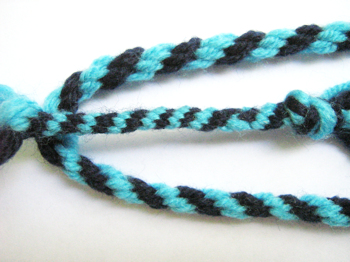
Recently somebody showed me a simple yet beautiful finger loop pattern.
At home I tried it directly again, it is the outer cord (above and below), I braided it first to the left and then to the right.
Then I thought that I worked such a pattern in Kumihimo already, but the one I made worked a little different.
Therefore I transcribed the new finger loop pattern to a Kumihimo pattern (the middle cord on the photo).
The Kumihimo cord became much sturdier because I used quite a heavy weight.
Both are braidung techniques and I reckon that every finger loop pattern can be ‘translated’ to a Kumihimo pattern but surely not the other way round.
Afterwards I did some research and found that ‘my finger loop pattern’ has been described on the pattern page of the Fingerloop Braids Website as ‘A lace bend rounde of 8 bowes — c. 1475’ (viz. it is done with 8 loops in place of 6 loops in my case) – but I never understood the notation ;-))
Here I show you how I made the finger loop cord and the Kumihimo cord, you had perhaps problems with the notation, too ;-)
Finger loop cord
Cut 6 threads of the same length and elasticity and lay them in half to form loops.
Make 3 threads per colour (here dark blue and turquoise).
Knot the open sides together and fix them somewhere to be able to braid with the loops (you can find more detailed instructions in the links of my entry about finger loop).

Take the loops of one colour on the index, middle finger and ring finger of one hand and those of the other colour on the corresponding fingers of the left hand.
Here I took the turquoise loops on the left and the dark blue loops on the right hand.
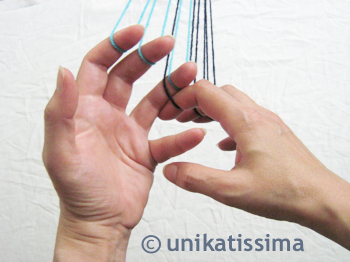
First swap the loops of the right index and the left ring finger.
To do this lay the loop of the right index behind the loop of the left ring finger…
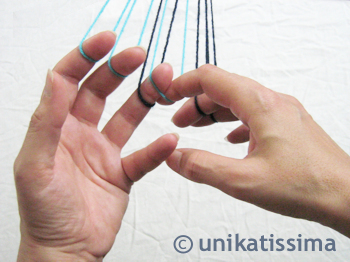
…and take then the loop from the left ring finger on the right index.
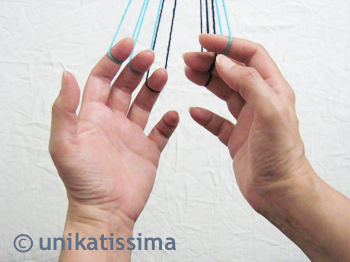
You have now on the left hand two turquoise loops (on the index and the middlefinger) and a dark blue loop (on the ring finger) and on the right hand one turquoise loop (on the index) and two dark blue loops (on the middle and the ring finger).
Note: I didn’t take a photo of it, but after every swap open your arms wide to tighten the braid and make it sturdier.
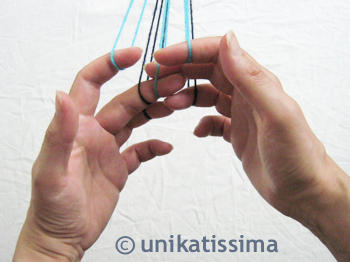
Next swap the loops of both middle fingers in the same way.
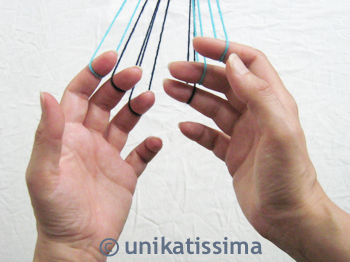
You have now on the left hand one turquoise and two dark blue loops and on the right hand the other way round.
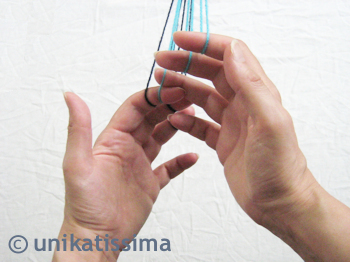
For now the last step is the swap of the loops of the right ring finger and the left index.
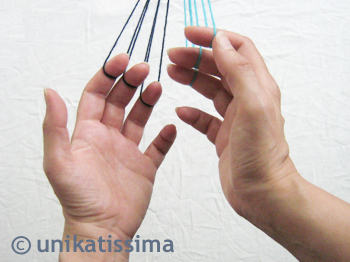
Now you have all three turquoise loops on the right hand and the dark blue loops on the left hand.
That’s been the first half of the steps to do.
Repeat all steps (index right-ring finger left-swap, middle finger-swap, ring finger right-index left-swap) to bring back the turquoise loops to the left hand and the dark blue loops to the right hand, then you have braid a full round.
Repeat the steps until your cord is of desired length.
Kumihimo cord
Cut here too threads of the same length and elasticity, but this time cut 6 threads of one colour (here turquoise) and 6 in another (here dark blue).
I made the cord on my cardboard marudai, but it was no fun at all because you have to re-lay the threads for this pattern to their appropriate places at every braid.
At least by now is the moment to ‘construct’ a marudai (links to self-made marudai in my Kumihimo entry).

Sort your threads as shown in the graphic.
Lay the upper dark blue thread pair between the threads of the lower turquoise thread pair and then lay both turquoise threads where the dark blue ones have been.
Push together the thread pairs to clearly separate them from each other.
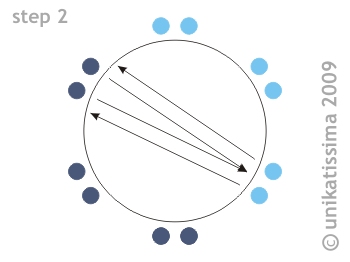
In the second step you do the same with the dark blue thread pair top left and the turquoise thread pair down right.
Here again push together the thread pairs neatly.
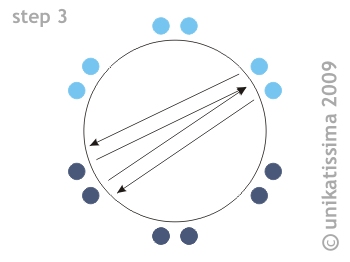
In the third step you do the same with the dark blue thread pair down left and the turquoise thread pair top right.
That was the first half of the steps and here, too, the steps must be repeated to get back to the original colour distribution:

Lay the upper turquoise thread pair between the threads of the lower dark blue thread pair and then lay both dark blue threads where the turquoise ones have been.
Always push together the thread pairs neatly.
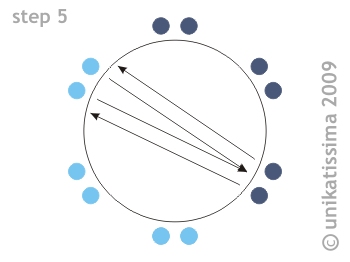
In the fifth step do the same with the turquoise thread pair top left and the dark blue thread pair down right.
Here again push together the thread pairs neatly.

In the last step of this round you do the same with the turquoise thread pair down left and the dark blue thread pair top right.
As always push together the thread pairs neatly.
You have finished the first round now, repeat all six steps until your cord has the desired length.
Have fun with the comparison of the two techniques finger loop and Kumihimo and make some beautiful cords :)
Links:
Marca brandenburgensis anno domini 1260 – that’s where the woman came from who showed me the pattern
Fingerloop Braids Website: Fingerloop Braid Patterns
and there:
the finger loop pattern that I presented here, but with 8 loops (‘A lace bend rounde of 8 bowes — c. 1475’)
Here at unikatissima:
 Finger loop
for more detailed instructions see there the links
 Kumihimo
 for the construction of a self-made marudai see there the links
 my template for a cardboard marudai
On this page:
 Instruction for finger loop cord
 Instruction for Kumihimo cord
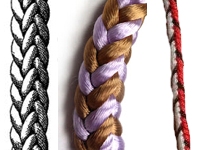
 Picture left: Braid: 8-strand square braid
 Picture center: Kumihimo: Kumihimo tutorial – square braid – firkantfletting
 Picture right: fingerloop: Tutorial: START HERE! 5-loop braids





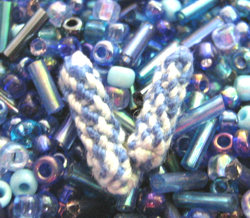
 Therefore I figured out how to make my own Kumihimo beads.
 What to do:
 The Kumihimo beads are from fabric and can be stitched however you want. On this photo I surrounded my Kumihimo bead by seed beads and made a kind of