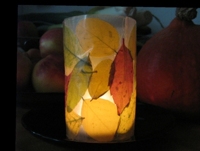
Indian Summer Votive

unikatissima Indian Summer Votive

Recently I had a nice idea, inspired by the nature bracelet and the clip art candles or faux quilt votives, resp.: a quick autum votive.
It became more beautiful than I expected ;-))


That’s what you do:
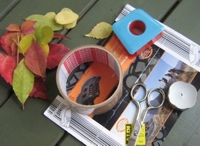
unikatissima Indian Summer Votive

    You need:

  • a tealight
  • some cardboard
  • broad transparent tape
  • colourful leaves
 

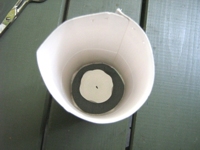
unikatissima Indian Summer Votive Tape the cardboard to a cylinder that has to be wider than the tealight but not especially beautiful.
Important note: my Votive was too narrow with this circumference and became warm very fast. I suggest strongly to make the cylinder wider!
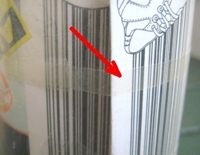
 

unikatissima Indian Summer Votive Put the transparent tape around the cardboard cylinder with the sticky side outside(!).
My tape is about 5 cm broad therefore I put two on top of each other. The arrow shows where they overlap.
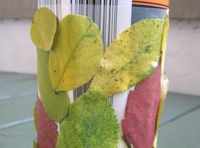
 

unikatissima Indian Summer Votive Now simply tape on colurful leaves. They may even overlap.
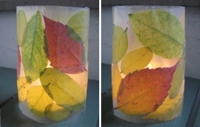
 

unikatissima Indian Summer Votive When you’ve finished you can decide whether you want to wrap everything with another layer of tape – this time sticky side inside ;-), then you simply pull your votive from the cardboard cylinder and put a tealight inside.


Another important note: The votive is very light and can therefore easily be blown into the flame.
When I will make this again, I think that I will put small tape stripes crosswise from side to side and weigh down everything with sand or a little plate.
Or I will work it directly around a glass, I think that’s smarter, because nothing can be blown away then ;-)
So don’t forget: Never leave burning candles unattended!

By the way, the leaves become brown as fast as ‘untreated’, but it is a beautiful decoration for an autumn table anyway.
Addendum: In the comments of the German entry Menoora writes, that leaves apparently keep their colours when gently ironed.
It’s worth a try, isn’t? ;-)

You can make it even more beautiful by taping a layer of packing tape transfers with interesting texts or comic pictures over the leaves :)
How about e.g. with a beautiful layed autumn table and the votives in place of name cards? The names could be designed in the style of the beautiful labels.

Anyway: Have much fun with this!


Links:
Here at unikatissima:
Nature Bracelets
Clip Art Candles
Faux Quilt Votives
Packing Tape Transfers
Beautiful Labels for the Kitchen
Altered Books Simplified

unikatissima Altered Books Simplified

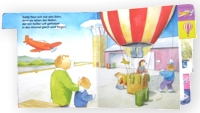
One method to simplify the work on an altered book is to use children’s cardboard books as base. They often have the advantage, too, to have interesting shapes.
Once I began such a book (on the picture you see the original book).


unikatissima Altered Books Simplified
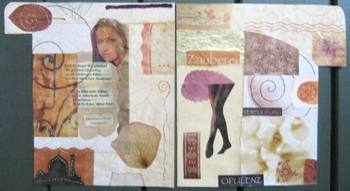
These are the first two pages. I used amongst others (just as for the artist book) self-dyed paper, packing tape transfers, embroidery on paper and dried flowers and leaves.

Because of the embroidery I don’t immediately glue the papers in but I finish the pages first.

The following pages aren’t finished yet – just another UFO (unfinished object) ;-)


Links:
Altered Books Simplified

Here at unikatissima:
Artist-Book
Packing Tape Transfers
Entries with the tags ‘paper’ and ’embroidery’
How to Press Flowers, Leaves and Herbs

Endless Embroidery

unikatissima Endless Embroidery

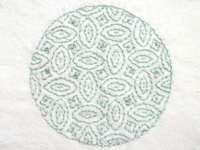
Ok, I must admit that the picture doesn’t look like endless embroidery, but it is: I designed the pattern (see links below) so that you can repeat it endlessly.
Besides the others embroideries I told about I like this so much because you can fill shapes with.
What shapes?
Well, you can sew a simple purse and completely embroider the flap. Or the lid of a round box (the item on the picture was meant to cover a lid). Or a pillow. Or along the neckline of a t-shirt. Or a linen tote.
It doesn’t matter what it is, (at the latest:)) after embroidering it it will be a very special item.


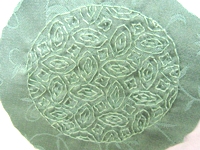
unikatissima Endless Embroidery Although I liked the item on the photo on top I wanted to see how it looks if I decrease the colour contrast of fabric and embroidery.
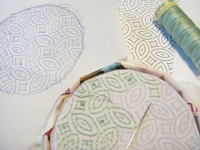
Hm, I like both ;-)


unikatissima Endless Embroidery Here I’m at work: in the foreground you can see my magazine embroidery hoop: it’s still fully functional ;-)
On the left top you see the iron-on copy of the pattern: I bought such an iron-on transfer pencil to trace the pattern and then iron it on the fabric. I even found a tutorial for this.
Because I’m not a good embroiderer and didn’t really trust the washability of the pencil I simply ironed the pattern on the wrong side of the fabric and embroidered it this way – it worked fine. I only had to turn my work often.
And because I made it on impulse I embroidered with sewing thread. It must look much better with embroidery floss.
By the way, the thick dots are French knots, it was fun to embroider them into the little squares.


In the file with the pattern (see links below) you will find the pattern as endless version (simply place side by side in both directions) as well as edging and border.
Now you can embroider all sorts of things to your liking from top to bottom or only partially ;-)

It’s as always: Simply try it out! ;-)

I wish you a lot of fun with it,
Susann


Links:
unikatissima’s endless pattern bulawajo: PDF file (ca. 384 KB)

Google search result for ‘Iron-on Transfer Pencil’
Google search result for ‘Bügelmusterstift’

Iron-on Transfer Pencil Tutorial
via: Iron On Transfer Pencil tutorial

French knots (English)
French knots (German)

Here at unikatissima:
Entries with the tag ’embroidery’
Magazine Embroidery Hoop

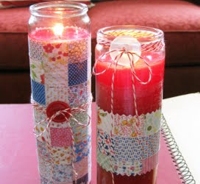
Faux Quilt Votives

Just Something I Made Faux Quilt Votives

I find this idea really great, too: simply scan old quilts, print, sew a little and wrap around a votive ;-)
It’s a little bit as with the Fabric/Paper Place Mat.
And I think that it would look wonderful, too, with a paper Crazy Quilt!

By the way: the paper gets more transparent when you paint it slightly with oil.
It will smell a while, but then the smell disappears ;-)

On the page she also shows how to print the quilt picture onto inkjet T-shirt transfer and embellish leather with it – great!


Links:
Faux Quilt Votives (Faux Vintage Quilt Fun)

Here at unikatissima:
Fabric/Paper Place Mat
Papier Crazy Quilt

Bead Knitting

Bead Knitting

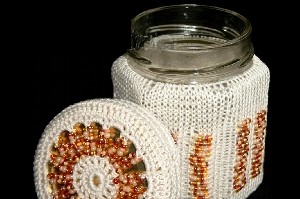
Bead knitting is such an interesting technique I wanted to present here (for links see below). Mostly it seems to be used for elegant little bags. I tried it on a cover for a jar to create a special jar for special sweets ;-)


Links:
Free Introductory Patterns for Bead Knitted Bags

Tips for First Time Bead Knitters
How to Transfer Beads to Knitting Thread (with explaining photos)

If you didn’t buy a hank of beads see also my entry ‘Making a Bead Spinner’

Bead Knitted Amulet Bag

Knitting in Beads and Buttons (simple technique for pony beads and buttons)

Flexagons

Flexagon Flexagon Flexagon Flexagon

Flexagons a quite interesting things: a kind of card with four sides, and you can flip from one side to the other, back and forth.
But to better understand what Flexagons are, how they work and how you can make one for yourself take a look at the Flexagon page.
On the photos you see the four pages of my first (and up until now last) flexagon. (Click on thumbnails to see the photos.)
It doesn’t work so well, because it is to bulky:
I made them from cardboard to make them lasting longer, glued then cotton on to the cardboard, because I thought that fabric would bend better if you flip them over and over and then glued on the pieces of my hand-embroidered and tape-transfered collages on the appropriate places.
Next time I will see to it that they get slender.
But anyhow: I love my flexagon ;-))


Links:
Flexagons

And if you want to embroider your collages:
English Embroidery Stitch DiagramsDeutsche Stickstichbeschreibungen
(see also Paper Crazy Quilt)

If you want to know more about image transfers
Easy Photo Transfers (different techniques)
Image Transfer
Packing Tape Image Transfers
(see also Artist Book)

Here at unikatissima:
Paper Crazy Quilt
Artist Book

Artist Book

Artist-Book

As mentioned before in the entry about paper beads, I once created an artist book.

Step Outside Your Box Saturdays posted this week a challenge about books and I thought it an opportunity to show my artist book ‘blickkontakt’ (which means ‘eye contact’).

I wanted ‘blickkontakt’ to give the viewer many surprises to discover and created therefore several windows and fold-outs.
The pages were created from cardboard and covered in hand-stained papers. Then I stamped, embroidered, tape transfered, sketched, scribbled and glued.


Enjoy the pictures
(Click thumbnails to see photos)

Artist-Book The cover with the round medaillon in its ‘pocket’. Along the spine I let hang the threads with the paper beads.


Artist-Book Still the cover, but this time showing the backside of the round medaillon.


Artist-Book Pages 1 & 2: You see the eye through a round window, the spirals are hand-embroidered, the little altered slide can be put into the lace pocket.


Artist-Book Pages 3 & 4: The images are tape transfered, the flourishes are hand-embroidered.


Artist-Book Pages 5 & 6: I stamped, wove paper, embroidered, crocheted. The dark circle is a free swinging altered bottle cap, the semicircle on the left upper side is a fold-out, where I glued a hand-beaded star.
(Unfortunately the tape transfers gleam so, that you can’t see their motif.)


Artist-Book Pages 7 & 8: I cut two little round windows into the right page.
The raffia forms a little pocket, where I put a transparent tape transfer tag.


Artist-Book Pages 9 & 10: Stamping, tape transfers, embroidered spirals, fold-outs, hand-stained crochet flower and hand-made bead fringe.


Artist-Book The verso with tape transfers, stamps and a ringlet from a fake hairpiece.


I created more artist books, if you like to see them, take a look at Art.


Links:
If you want to create your own (Altered or Artist) Book, you may want to take a look at the following links (the list is far from complete!):

About Altered Books:
What is an altered book?
Definitions

At art-e-zine: Altered Book Workshop

Get Inspirations:
Gallery of Altered Book Artists
Google results of search for ‘Altered Book’
Google image results of search for ‘Altered Book’

Some of the used techniques:
Paper staining
Tea Staining Your Art Journal Pages
Tea Stain Paper

Image Transfer Techniques:
Easy Photo Transfers (different techniques)
Image Transfer
Packing Tape Image Transfers

Here at unikatissima:
Paper Beads