Flexagons

Flexagon Flexagon Flexagon Flexagon

Flexagons a quite interesting things: a kind of card with four sides, and you can flip from one side to the other, back and forth.
But to better understand what Flexagons are, how they work and how you can make one for yourself take a look at the Flexagon page.
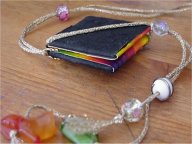
On the photos you see the four pages of my first (and up until now last) flexagon. (Click on thumbnails to see the photos.)
It doesn’t work so well, because it is to bulky:
I made them from cardboard to make them lasting longer, glued then cotton on to the cardboard, because I thought that fabric would bend better if you flip them over and over and then glued on the pieces of my hand-embroidered and tape-transfered collages on the appropriate places.
Next time I will see to it that they get slender.
But anyhow: I love my flexagon ;-))


Links:
Flexagons

And if you want to embroider your collages:
English Embroidery Stitch DiagramsDeutsche Stickstichbeschreibungen
(see also Paper Crazy Quilt)

If you want to know more about image transfers
Easy Photo Transfers (different techniques)
Image Transfer
Packing Tape Image Transfers
(see also Artist Book)

Here at unikatissima:
Paper Crazy Quilt
Artist Book

Fractal Pop Up

Fractal Pop Up

I already cut different pop ups, and I find this one quite elegant.
I haven’t done it yet, but I surely will one day.

(If you like the fractal repeats, take a look at the previous mentioned Fractal Art.)


Links:
Fractal Cut

Wikipedia: English entry for ‘fractal’Deutscher Eintrag für ‘Fraktal’

Here at unikatissima:
Fractal Art

Light Bulb Window Vase

Light Bulb Window Vase

I really liked the idea of making a little window vase out of a recycled light bulb (for tutorials see Links below).
And I had to try it myself ;-))
On the photo you see my first attempt. I wrapped it with paper maché and have not yet formed a wire to hold it. And as I made the photo, I had no flower either ;-)
So I took one of my crocheted flowers and – voilà ;-)


Links:
Light Bulb Window Vase

instructables: Light Bulb Vase

Jacob’s Ladder

Jacobs Ladder

Once a friend gave me a couple of photos of her grandchild to make something special with them.
I thought about it and then remembered the Jacob’s Ladder (the children’s toy).
A little research in internet showed me, that there are tutorials but they all refer to the wood-and-ribbon version (for links see below the Links).
So I figured myself out how to do it with photos.
On the animated picture you can see that it worked.
I wrote a tutorial to download (PDF, appr. 230 KB).
You may used it as you wish, but if you do, please give credit.

Addendum: Later I found several paper Jacob’s ladders, I added the links below.


Links:
Make a Jacob’s Ladder from your photos (PDF, ~230 KB)

Tutorials on how to make a Jacob’s Ladder from wood and ribbons:

instructables: A Traditional Jacob’s Ladder

Jacob’s Ladder (English)
Jacob’s Ladder (German)

Tutorials for Paper Jacob’s ladders:
Invisible Jacob’s Ladder Technique Class (English)
Jacob’s Ladder Christmas Card & Gift Card Holder (English)
Mini-Scrapbook – Jacob’s Ladder (English)
Jacob’s Ladder Tutorial (English)

Inkjet Transfer Stamping

Inkjet Transfer Stamping

As I mentioned before, I don’t often stamp. Therefore I found the tutorial on how to make stamps with an inkjet printer very interesting.

I haven’t tried it yet and possibly I never will, because printer ink is also expensive, but who knows? Because I really want to ‘stamp’ the image on the photo and I’m sure that I wont carve it from an eraser ;-)


Links:
Craft Chi: Inkjet Transfer Stamping

Here at unikatissima:
Eraser Stamps

Zentangles

Zentangles

While surfing I found Zentangles, which is nothing else than doodling.
But when I browsed the galleries I really, really wanted to try it, although I normally don’t feel at my ease with doodling.
My first attempt was ugly, because I tried to ‘create’ something. Then I took a little sheet of paper and started doodling without thinking about.
I was surprised at how beautiful it turned out ;-)


Links:
Zentangles

Artist Book

Artist-Book

As mentioned before in the entry about paper beads, I once created an artist book.

Step Outside Your Box Saturdays posted this week a challenge about books and I thought it an opportunity to show my artist book ‘blickkontakt’ (which means ‘eye contact’).

I wanted ‘blickkontakt’ to give the viewer many surprises to discover and created therefore several windows and fold-outs.
The pages were created from cardboard and covered in hand-stained papers. Then I stamped, embroidered, tape transfered, sketched, scribbled and glued.


Enjoy the pictures
(Click thumbnails to see photos)

Artist-Book The cover with the round medaillon in its ‘pocket’. Along the spine I let hang the threads with the paper beads.


Artist-Book Still the cover, but this time showing the backside of the round medaillon.


Artist-Book Pages 1 & 2: You see the eye through a round window, the spirals are hand-embroidered, the little altered slide can be put into the lace pocket.


Artist-Book Pages 3 & 4: The images are tape transfered, the flourishes are hand-embroidered.


Artist-Book Pages 5 & 6: I stamped, wove paper, embroidered, crocheted. The dark circle is a free swinging altered bottle cap, the semicircle on the left upper side is a fold-out, where I glued a hand-beaded star.
(Unfortunately the tape transfers gleam so, that you can’t see their motif.)


Artist-Book Pages 7 & 8: I cut two little round windows into the right page.
The raffia forms a little pocket, where I put a transparent tape transfer tag.


Artist-Book Pages 9 & 10: Stamping, tape transfers, embroidered spirals, fold-outs, hand-stained crochet flower and hand-made bead fringe.


Artist-Book The verso with tape transfers, stamps and a ringlet from a fake hairpiece.


I created more artist books, if you like to see them, take a look at Art.


Links:
If you want to create your own (Altered or Artist) Book, you may want to take a look at the following links (the list is far from complete!):

About Altered Books:
What is an altered book?
Definitions

At art-e-zine: Altered Book Workshop

Get Inspirations:
Gallery of Altered Book Artists
Google results of search for ‘Altered Book’
Google image results of search for ‘Altered Book’

Some of the used techniques:
Paper staining
Tea Staining Your Art Journal Pages
Tea Stain Paper

Image Transfer Techniques:
Easy Photo Transfers (different techniques)
Image Transfer
Packing Tape Image Transfers

Here at unikatissima:
Paper Beads

Eraser Stamps

Eraser Stamps

There are lots of tutorials on how to make stamps from erasers (look at the Google search result for ‘eraser stamp’).
I want to present three of them:

Some hints & tips for eraser-carving
This site shows how beautiful those stamps can be and gives helpful hints.

Kneaded Eraser Stamps
Craft Chi always have ingenious ideas and tutorials and I like the kneaded eraser stamp because it is a technique to create stamps from everything with a textured surface.

Making and Using Stamps with Watercolor
I liked this one because I don’t stamp so often and so I don’t want to spent too much money on ink pads. Using watercolour makes it easy to use different colours nonetheless.

By the way: On the photo you see my first attempts on carving stamps from erasers and although they’re very simple I still like to use them from time to time.


Links:
Google search result for ‘eraser stamp’
Google Suchergebnisse für ‘Radiergummi Stempel’

Some hints & tips for eraser-carving
Craft Chi: Kneaded Eraser Stamps
Making and Using Stamps with Watercolor