Kumihimo Flower Hair Pin

unikatissima Kumihimo Flower Hair Pin

I found a site with a cute Kumihimo flower hair pin that is made from a beautiful Japanese knot.

On the photo you can see my Kumihimo cord which I want to use to make such a Kumihimo flower but the cord isn’t finished, yet.
I think that I will embellish it later with some beads because the single-coloured cord will possibly look bland.


Links:
Kumihimo Flower Hair Pin
The instruction for it has two parts:
Knot tutorial part 1
Knot tutorial part 2

Here at unikatissima:
Entries with the tag ‘kumihimo’
The Treasure Knot

Spaghetti Scrap Scarf

Circe Spaghetti Scrap Scarf With I-cords

Again something to use up your stash: the Spaghetti scrap scarf.

In fact it is nothing else than a lot of I-cords that are connected in different ways.
And I find that it looks great! ;-)
There is another Spaghetti scrap scarf, but you can best see how different they can look when checking the ravelry pattern (unfortunately with registering only).

I have already begun to knit I-cords but unfortunately I find it nothing but boring, so I doubt that I will ever make such a Spaghetti scrap scarf.
But who knows? ;-)


Links:
Spaghetti scrap scarf ‘recipe’ (Qui aime la pasta?) (French)
Another Spaghetti scrap scarf (Encore une écharpe avec des i-cords) (French)

First found at ravelry:
Spaghetti scrap scarf (with i-cords)

Here at unikatissima:
Entries with the tag ‘stash’

Clothesline Knitting or Filled I-cord

unikatissima Clothesline Knitting

Recently I thought about how to make low-priced purse handles. I wanted to make them from the same yarn that I will use for my purse but I didn’t want to have a simple I-cord because I’m always knitting very loose and the cord gets much to flexible for a purse handle.

Then I thought about the Clothesline Crochet and thought that this must be possible with knitting, too.
It is ;-))

Note: If you don’t know how to knit an I-cord you can find instructions in my Actinia entry in the English tutorial under ‘I-cord’.


That’s what you do:
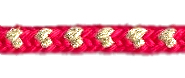
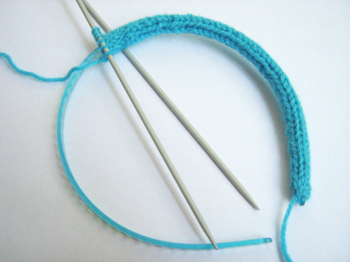
I choose a thick ready-made cord to cover with knitting.
The number of stitches to cast-on depends on the size of the cord, the yarn and the needles (try it!), in this case I used five stitches.


unikatissima Clothesline Knitting
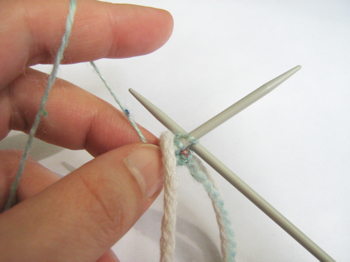
So, cast-on the stitches, lay the inner cord in (see photo) and knit the first stitch over the inner cord.
The inner cord will be trapped in the stitch.


unikatissima Clothesline Knitting
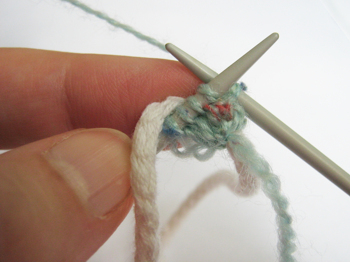
Then knit simply the rest of the stitches, lay the inner cord a little beside (see photo).


unikatissima Clothesline Knitting
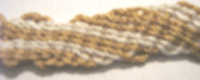
In the next row lay the inner cord again over the left needle to the right of the thread just as in the first photo, knit the first stitch over the inner cord and knit then the other stitches.

Knit in the same way until you reach the desired length.


unikatissima Clothesline Knitting
Somewhere (and I really don’t remember, where) I saw a tutorial where they glued on hairbands to make the purse handles.
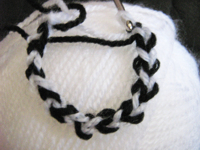
I thought that I should be able to knit around the hairbands just as I knitted the inner cord, but it didn’t work.
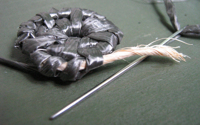
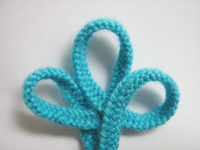
What however worked was knitting an I-cord and threading the hairband into, so that the hairband is covered and I even have threads to sew the handles onto the purse.


Links:
Here at unikatissima:
Tutorial on how to knit an I-cord in the English tutorial in the Actinia entry under ‘I-cord’

Buttoned I-cord Bracelet

unikatissima Buttoned I-cord Bracelet

I found a great instruction on how to make a beaded I-cord.
She knits an I-cord where she works in previously stringed beads.


unikatissima Buttoned I-cord Bracelet 
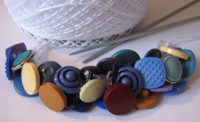
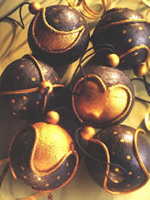
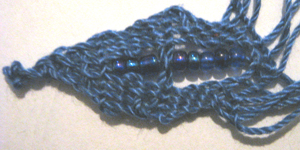
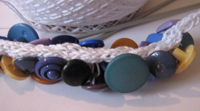
Because I only had seed beads I simply took some of my buttons and must say that I like the result, also.

My I-cord is a little bit uneven, because the heads of my buttons often got in my way, but I like it nevertheless ;-)


Links:
an anti pattern

Kumihimo Cord with Heart Pattern

Paulette Adam Kumihimo Hearts

No, today we won’t use the heart template from the last days ;-))
But we’re talking again about hearts for Valentine’s Day ;-)
This time in combination with Kumihimo: Check out the Kumihimo cord with a heart pattern. Cute, isn’t it?

I didn’t start yet to make this cord, it’s still time until Valentine’s Day ;-)))


Links:
Kumihimo Cord with Heart Pattern

Here at unikatissima:
Entries with the tag ‘Kumihimo’, especially the entry Kumihimo where you can find a template for a cardboard Kumihimo disk

Tablet or Card Weaving

unikatissima Tablet Weave Card Weave

There’s a technique I haven’t tried yet although I have on my list for a very long time, and that’s tablet or card weaving.
It’s a very old technique I learned to know first in Museumsdorf Düppel, the reconstruction of an 800 year old village.
With card weaving you can make soo wonderful straps, similar to Kumihimo (but only similar! ;-)).
I’m at the point ‘already’ where I looked for some instructions (see links below) ;-)


Links:
Basic Tablet Weaving
Cardweaving Made Easy
The original site doesn’t exist any more and is now only available through: Cardweaving Made Easy

Linklist for ‘Tablet weaving’ incl a list of instructions
Google search result for ‘card weaving’
Google image search result for ‘card weaving’

Flinkhands Brettchenweben (German): click through to what you are interested in
Flinkhand’s card weaving beginners tutorial at creadoo (German)
The original site doesn’t exist any more and is now only available through webarchive: Flinkhand’s card weaving beginners tutorial at creadoo (German)
Card weaving tutorial (German)

Wikipedia article: Museumsdorf Düppel (German)

Here at unikatissima: Entries with the tag ‘Kumihimo’

String Decorated Ornaments

crealic String Decorated Ornament

A nice method to create beautiful Christmas tree ornaments (and much more) shows this tutorial on how to make string decorated ornaments (French).

It’s very easy:

  1. You choose the element to be decorated ((foam) sphere, box, paper bag etc.).
  2. Paint the pattern on with PVA glue (if necessary after sketching them with a pen).
  3. Put the string on the glue and fix with pins. The glue dries transparently.
  4. After the glue has dried, take away the pins and paint your ornament (or box or what ever you decorated). You can paint the string in another colour than the element. Additionally you can paint some little decorative patterns to lighten the background.

Best if you check the photos of the instruction, they explain every thing very well.


Links:
String Decorated Ornaments (Décors divers en ficelle) (French)

Ply-split

unikatissima Ply-split

Ply-split is a kind of weaving, but the multi-plied threads are woven through in place of over and under each other (ok, I understand, that this description isn’t very good, best take a look at the links below ;-))
In my entry Freeform Embroidery you can see at the bottom of the photo, too, how ply-split can look.


unikatissima Ply-split
The photos show my attempts at ply-splitting, you can get a muuuch better idea by browsing the Google image search.


unikatissima Ply-split
I once even tried to make a pendant with this technique, but it didn’t really work.
Anyhow I still like the combination of ply-split and beads.


Links:
Linda Hendrickson Tablet Weaving and Ply-Split Braiding: scroll down to ‘Ply-split braiding’
On the same site you can find articles about ply-splitting: click in the left navigational bar on ‘Links’, then click on ‘Ply-splitting’, then click on ‘Articles’, then you find 3 articles from Weaver’s

Ply-Splitting at weavershand: links to galleries, instructions and websites of ply-split artists

Gallery of star ornaments

Instruction: Ply-split darning Bookmark: click in the left navigational bar on ‘Ply split braiding’, then click on ‘Begin Braiding 2d Ply Split’

Instruction for a ply-split scarf as PDF (ca. 156 KB) – it looks to me that one have to have some experience with ply-splitting

Instruction for a beautiful snake – it looks to me that one have to have some experience with ply-splitting

Google image search result for ‘ply-split’

Coil a Basket

unikatissima Basket Coiling.jpg

I find another interesting technique basket coiling, where a long thread from (nearly ;-)) any material is to be wound around a curled up thread (also from nearly any material).
It is similar to the clothesline crochet that I presented before, but the thread is to be wound, not crocheted.
On the photo you see my first attempt: I wound plastic raffia around package string.
Actually it should have become a basket, but then I lost my patience ;-)

I followed two tutorials that I find very good, not least because they are heavily illustrated: Pine Needle Baskets (there is also a second part (for the new links see the links below) (and How to coil a basket. In a second entry: More coiling fun… she presents pendants made with the same technique – and which are muuuch more faster;-))


Links:
Pine Needle Baskets – part I
Pine Needle Baskets – part II
The original site doesn’t exist any more and is now available through webarchive (I’m not sure whether some of the illustrations have disappeared?!):
Pine Needle Baskets – part I
Pine Needle Baskets – part II
or here:
Pine Needle Baskets – part I
Pine Needle Baskets – part II

How to coil a basket
More coiling fun…

Here at unikatissima:
Clothesline crochet