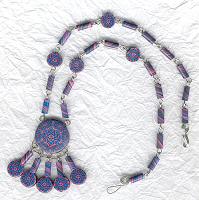
I don’t only like the geometric polymer clay pendant, but also the way the beads are connected.
Links:
Karen’s Geometric Pendant Necklace
Connecting the beads (Karen’s Geometric Pendant Necklace)
…compilation of tutorials
I don’t only like the geometric polymer clay pendant, but also the way the beads are connected.
Links:
Karen’s Geometric Pendant Necklace
Connecting the beads (Karen’s Geometric Pendant Necklace)
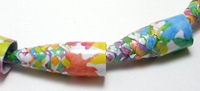
Aren’t these wonderful paper beads? They are part of a necklace.
She has muuuch more paper jewelry, each item more beautiful than the next.
If you want to make your own paper beads simply check the links below.
Links:
Paper beads necklace ‘Watercolor leaves necklace’
More (paper) jewelry (ljlh*designs’ photostream)
Here at unikatissima:
Entries containing the words ‘paper’ and ‘bead’
Making Paper Beads
Paper Beads
Paper Bead Bracelet
Paper Beads Roller
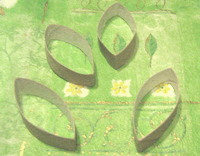
The gift tags on the photo aren’t ready yet: I simply can’t decide with which yarn I should wrap them.
But I find the idea really great: flatten the cardboard tube, cut it in strips and wrap the pieces with yarn.
I think that it could look beautiful, too, when wrapped in a piece of beautiful polymer clay and worn as necklace, earring or pin.
Hm.
When reading the instructions for the gift tags I had to think somehow at the surprise ball gifts ;-)
But she had other ideas, too, about what to make with these paper shapes, namely a cute tealight and an interesting lamp decoration.
I presented before entries about recycled cardboard tubes here in this blog, namely the beaded amulet bag, the plaster photo holder and the knitting loom from a plastic bottle.
But there the cardboard tube was ‘only’ a tool.
Links:
recycling project no. 19 – yarn gift tag
recycle project no. 12 – tealight decoration
recycle project no. 16 – hurricane cover
Here at unikatissima:
Surprise Ball Gifts
Beaded Amulet Bag
Plaster Photo Holder
Knitting Loom from Plastic Bottle
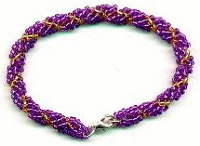
Actually it’s time to bead me a nice necklace, e.g. this spiral chain.
At least I find that I should ;-)
She says that it is an easy stitch that is worked quickly.
Once I tried the stitch and I find that she’s right.
Only I gave the necklace away and took (of course!) no photo before.
Well, I have to make it again, this time for me ;-)
Links:
Spiral Rope Chain

Recently I told that there were times when I didn’t know how to make good photos.
Now I learned that curious ground squirrels must be taken in regard when taking photos with delayed-action shutter release ;-)))
Links:
Photo enthusiasts go nuts for squirrel’s holiday snap
Wikipedia entry for ‘ground squirrel’
Here at unikatissima:
Taking Photos from Jewelry
Skinner Blend Beads Necklace
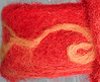
I found a good tutorial again, this time about how to make a needle felted bracelet.
I put it directly on my list, because I think it is great as a base that can be embellished e.g. with bead embroidered Paisleys or bead picots but also with ‘just-embroidery’ like the cross stitch heart, the freeform embroidery or the Embroidery Crust.
Additionally you can make matching earrings and a pendant for a necklace.
Links:
Needle Felted Loop Bracelet
Here at unikatissima:
 Bead embroidered Paisleys
Bead Picots
Freeform Bead Embroidery
Entries with the tag ’embroidery’
Cross Stitch Heart
Freeform Embroidery
Embroidery Crust
Ages ago I found a tutorial on how to coil friendship bracelets and found it stunning.
Unfortenately this tutorial doesn’t exist any more and I haven’t found no similar, therefore I’m writing it myself.
That’s what to do:
 Cut three threads à 180 cm (ca. 2 yards).
 Braid a piece of appr. 3 cm (ca. 1,2 inches) on the half of the threads and lay as loop.
You have now six working threads hanging from the loop.
 Select a thread and coil around the other five.
Pay attention to lay the coils near each other to hide the underlying threads.
Select afterwards a thread of another colour and coil again.
 This is how the coil could look like after having finished it.
 You can create another beautiful pattern by coiling two different coloured threads around the remaining threads.
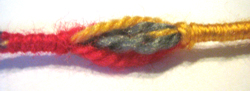
 Additionally you can lay two more threads of the same colour apart and after coiling you can lay them crosswise around the coil.
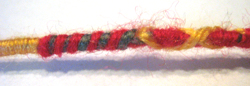 This is how the double coil and the cross pattern could look like.
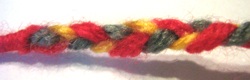 Once I made a simple braid (at the end).
 At another part I didn’t do anything at all but simply let lie the six threads near each other.
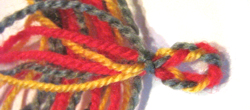
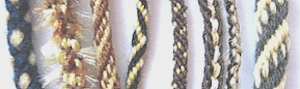
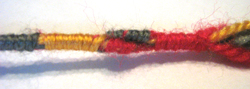 Furthermore you can divide the threads and make two coils side by side in place of one coil (here in red and grey).
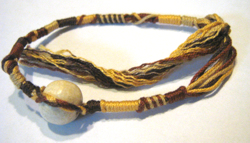
 This is the friendship bracelet I coiled for the tutorial
I even put a bead on the friendship bracelet on the first photo .
Needless to say that you can make other items in place of friendship bracelets, like necklaces, key chains and key rings and much more.
Have fun!
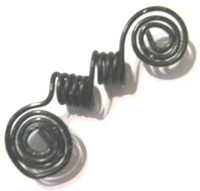
When stringing bead jewelry you sometimes need spacer bars to keep beads or strings of your jewelry items apart. You can buy them as a matter of course, but I like much better making the needed spacer bars myself.
On the photo you see a first attempt.
Both middle spirals are meant to pass strings of a necklace through, the outer spirals are ‘nothing but’ decoration.
Not bad for a start, isn’t? ;-))
Links:
Making Your Own Spacer Bars

Once I took a class for Kumihimo braiding – that is a japanese technique for braiding cords.
I really enjoyed the class and the work with the marudai, but I can’t afford to buy one. And although I found a tutorial on how to make your own marudai I prefer now to work with a cardboard disk. I braided for hours during train journeys. I can’t do this with a marudai ;-)
I didn’t find many instructions on how to make kumihimo cords in internet (see those I found below), so I will present my own.
On the photo you see my cardboard marudai and a braid I’m working on. I changed the pattern several times to get a more interesting appearance.
What you need:
(click or scroll to go to the instructions below)
What you do:
(Click on pictures to enlarge)
Fold the threads in half and knot all together at the fold.
You have now 8 threads, connected to each other at one side.
 Wedge the threads into the cuts as seen in pic. 1.
The knot is in the middle.
Cling your little weight to the knot of the threads. It provides a certain tension on the threads.

 Braid: Move the threads as seen in the pics 2 and 3 to the desired length.
After four moves you must have a ‘real’ cross again, otherwise you made a mistake.
But don’t worry, after a little practise you will see which thread should be moved next.
With 100 cm/39 inches you’re using quite short threads, but they tend to entangle anyhow. Therefore you must pull them free at every round. When the treads become longer, see to it to use some (self-made) bobbins.
The finished braid is a lot shorter than the threads, but I don’t know no factor.
Have fun
(and check the links to find more patterns)

 I worked a lot of cords with different yarns in matching colours, included funky yarns and strands of beads and simply braided them together to get a big necklace:
 And then I worked several braids with sewing yarn in matching colours, included metallic threads. Every braid has another braiding pattern. They are supposed to be a necklace, but up until know I haven’t finished it yet.
 Cardboard marudai template (click picture to enlarge)
Links:
Wikipedia: English entry for ‘Marudai’
Wikipedia: English entry for ‘Kumihimo’ – German entry for ‘Kumihimo’
Self-made Marudai and bobbins:
Tutorial on how to make your own marudai
At Gabriela Marková’s Kumihimo blog:
Check the entries labelled with ‘Equipment’
Kumihimo braids:
Check Gabriela Marková’s Kumihimo blog
An instruction for a Kumihimo braid with 12 threads (with diagrams)
An instruction for a Kumihimo braid with 8 threads (German) (PDF-file) (with diagrams)
An instruction for a Kumihimo braid with 16 threads (German) (PDF-file) (with diagrams)
Diagrams for Kumihimo software, can be used as pattern (with diagrams)
See also how different your braid looks when changing the order of the threads or of moves (with diagrams)
An interesting pattern (with diagrams)
A pattern with 16 threads (with diagrams)
An instruction similar to mine (English) (PDF-file) (with diagrams)
An instruction for a Kumihimo braid with 12 threads (English) (with diagrams)
An instruction for a Kumihimo braid with 16 threads (English) (with diagrams)
An instruction for a Kumihimo braid with 8 threads (English) (with diagrams)
Linklists about Kumihimo:
Squidoo
Shelly Gillmann’s Kumihimo Links