Plaster Photo Holder

Plaster Photo Holder

I saw this Tealight Photo Holder. I found the idea stunning, but I didn’t like the look of it: for me it looks like a cut-open tealight ;-)
But then an idea stroke: How easy to make this from plaster!
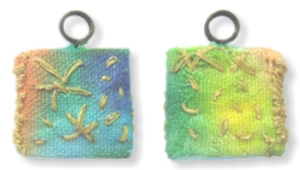
On the photo you see my plaster photo holder in action ;-)


And here is how I did it:

Plaster Photo Holder
img 1: Take a toilet paper tube and cut in rings about 4-5 cm height (appr. 1.5 – 2 inches). I did this with the sharp knife on the photo.


Plaster Photo Holder
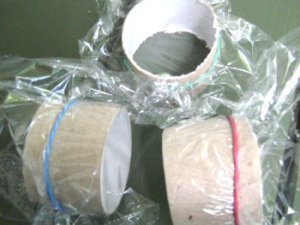
img 2: Wrap foil around, but let one side open. Fix the foil with elastic.


Plaster Photo Holder
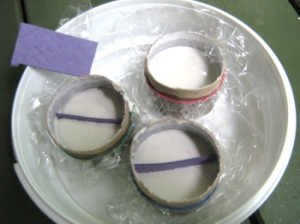
img 3: Fill the forms with plaster to a height of about 2,5 cm (about 1 inch). When full, insert a previously cut piece of cardboard as separator.

Let harden (about an hour).


Plaster Photo Holder
img 4: When the plaster went hard, but everything is still wet, tear apart the cardboard tube and break the ‘plaster coin’ where the separator cardboard stuck.


Plaster Photo Holder Plaster Photo Holder
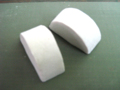
img 5: Rub the cardboard rests away.
If your photoholder piece is uneven, now is the moment to fix it: Simply scratch away what you don’t like with the back of an old knife.

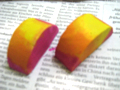
img 6: You can embellish them in so many ways.
I painted them immediately with watercolours, but you can also wait until thoroughly dry.


Plaster Photo Holder
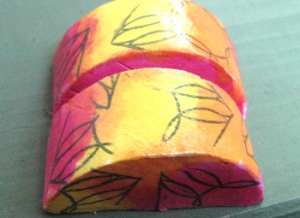
img 7: When dried I stamped them and varnished them with medium gel.
Have fun!


Links:
Tealight Photo Holder
via Photojojo

Pendant-to-be-embellished

Pendant to be embellished
One day I wanted to have a pendant-to-be-embellished and decided to create it myself.
On the photo you see both sides of a charm of about 1,5 cm (appr. 0.6 inches) which I embellished with self-dyed fabric and some metallic yarn embroidery.
The embellishment isn’t quite what I dreamed of, but the core pendant worked well.

This is how I did it:
You need:

  • some cardboard (the thickness of the middle piece must be about the same as the wire)
  • some wire
  • glue

Pendant to be embellished img 1: Cut 3 equal pieces of your cardboard.


Pendant to be embellished img 2: Wrap the wire round a dowel to form the eye. Then turn a couple of times to form the peg and then form a bigger eye which will be hidden in the pendant.
Note: I prefer the hidden part of the wire to be an eye because then the wire can’t be dragged out by accident.


Pendant to be embellished img 3: Take the cardboard piece which will sit in the middle and trace your hanger.


Pendant to be embellished img 4: Cut out the place you will need for the hanger.


Pendant to be embellished img 5: Glue the hanger and the middle cardboard pieces onto one outer cardboard piece.
Note: I glue on also the cardboard piece in the eye to prevent having a hollow.


Pendant to be embellished 
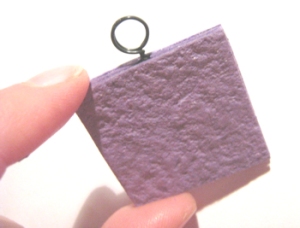
img 6: Glue the other outer cardboard piece onto. Your pendant-to-be-embellished is finished and you may begin with the embellishments.
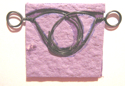
 

Pendant to be embellished Pendant to be embellished
img 7 & 8: This is a solution for a 2-eyed pendant.


There are so many ways to embellish your self-made pendant (mini collages, painted, beaded, stamped etc), I’d love to see them.
Please feel free to comment here to show your trinkets.

Have fun!

Crochet Spiral

Crochet Spiral

Sometimes you want to crochet not only a spiral, but a multicoloured spiral (beautiful in Freeform Needlework!).
I once found even two tutorials for crochet spirals, but the links don’t work anymore (I put them to the Links below in case you like to try them).
But because I didn’t found no more instructions I wrote a tutorial myself based on the previously found tutorials:

You will need 3 skeins of yarn in matching gauges.

Work in spirals, though NEVER JOIN!

st = stitch
sc = single crochet

1st row: work 6 sc on magic ring
2nd row: work 2 sc in each st = double each st = 12 st
work the 1st 4 st in colour A, the 2nd 4 st in colour B and the 3rd 4 st in colour C
3rd row: work * 1 sc, 2 sc in next st *, repeat from * to * = double each 2nd st = 18 st
work the 1st 6 st in colour A, the 2nd 6 st in colour B and the 3rd 6 st in colour C
4th row: work * 1 sc, 1 sc, 2 sc in next st *, repeat from * to * = double each 3rd st = 24 st
work the 1st 8 st in colour A, the 2nd 8 st in colour B and the 3rd 8 st in colour C
cont.


(Click picture to enlarge)
Crochet Spiral Hints:

  • At the colour change pull the loop of the ‘old’ colour into a large loop that you lay aside until you pick it up for the next round (see detail photo with loops).
  • The spiral gets hexagonal when worked this way. If you want to avoid this, move the place where you work two stitches in one stitch a little around (see photo above).


(Click picture to enlarge)
Crochet Spiral


Links:
Both links didn’t work when I tried them:
Crochet Spiral
Crochet Spiral


Magic ring
(Google results)
The Magic Adjustable Ring: A Better Way to Begin Crochet in the Round: very good illustrated instruction
Häkeln lernen: Der Fadenring (German)

Here at unikatissima:
Freeform Needlework

Broomstick Lace Scarf

Broomstick Lace Scarf

After I have found tutorials on how to make Broomstick Lace I wanted to try it (for tutorials see Links below).
I like lacy scarves. So I made a scarf from it.


Broomstick Lace Scarf
That is how I did it:
Material:

  • Yarn (I used acrylic yarn)
  • Matching crochet hook
  • Dowel / Ruler / Cardboard tube (as you can see I used a cardboard tube)
 

Instructions:
Row 1: Chain as much as you want the scarf to be long (I chained 240). It must be a multiple of 4.
Row 2: Crochet every chain with one Broomstick Lace loop.
Row 3: Take four Broomstick Lace loops and crochet 1 sc (single crochet), 1 hdc (half double crochet), 1 dc (double crochet) and 1 sc (single crochet) around the four strands.
Do this with all groups of four Broomstick Lace loops until the end.
Finish this side and begin again at the other side of your first chain to work the second half of your scarf.


Links:
Broomstick Lace Tutorial (with explaining photos)
Broomstick Lace Tutorial (with explaining videos)

Bead and Wire Wall Vase

Bead and Wire Window Vase

Inspired by two wonderful items, the Bead & Wire Heart at The Bead Bugle and the Bead Godesses from Ronda Kivett at the Autumn 2003 Issue of ARTitude Zine I did deliberately my vase from the photo.
I feel that I was a little too cautious, but I like it already.
Next time I want to get nearer to those shining examples I had.


Links:
Bead & Wire Heart at The Bead Bugle
Bead Godesses from Ronda Kivett at the Autumn 2003 Issue of ARTitude Zine


Jacob’s Ladder

Jacobs Ladder

Once a friend gave me a couple of photos of her grandchild to make something special with them.
I thought about it and then remembered the Jacob’s Ladder (the children’s toy).
A little research in internet showed me, that there are tutorials but they all refer to the wood-and-ribbon version (for links see below the Links).
So I figured myself out how to do it with photos.
On the animated picture you can see that it worked.
I wrote a tutorial to download (PDF, appr. 230 KB).
You may used it as you wish, but if you do, please give credit.

Addendum: Later I found several paper Jacob’s ladders, I added the links below.


Links:
Make a Jacob’s Ladder from your photos (PDF, ~230 KB)

Tutorials on how to make a Jacob’s Ladder from wood and ribbons:

instructables: A Traditional Jacob’s Ladder

Jacob’s Ladder (English)
Jacob’s Ladder (German)

Tutorials for Paper Jacob’s ladders:
Invisible Jacob’s Ladder Technique Class (English)
Jacob’s Ladder Christmas Card & Gift Card Holder (English)
Mini-Scrapbook – Jacob’s Ladder (English)
Jacob’s Ladder Tutorial (English)

Freeform Embroidery

Freeform Embroidery - Freeform Sticken

On the photo you see my idea of Freeform Embroidery which was highly inspired by ‘Rock Pool’ and ‘Laying It On The Line’.

I used a piece of old (but clean! ;-)) bedsheet as base. First I laid some worsted and funky yarns on it which I fixed with couching stitches (at the top of the photo). Then I stitched some french knots (light yellow on the photo). Below is my first attempt at ply-split braiding which I fixed with some couching stitches too.

It is one of my many UFOs (‘unfinished objects’), but one day I will come back to it ;-)


Links:
Inspirations: ‘Rock Pool’ / ‘Laying It On The Line’

English Embroidery Stitch Diagrams
Deutsche Stickstichbeschreibungen

Couching stitches (English)
Couching stitches (German)

French knots (English)
French knots (German)

Ply-split Braiding: a (very) short description and resources
PDF Ply-split tutorials by Peter Collingwood (scroll down)

Artist Book

Artist-Book

As mentioned before in the entry about paper beads, I once created an artist book.

Step Outside Your Box Saturdays posted this week a challenge about books and I thought it an opportunity to show my artist book ‘blickkontakt’ (which means ‘eye contact’).

I wanted ‘blickkontakt’ to give the viewer many surprises to discover and created therefore several windows and fold-outs.
The pages were created from cardboard and covered in hand-stained papers. Then I stamped, embroidered, tape transfered, sketched, scribbled and glued.


Enjoy the pictures
(Click thumbnails to see photos)

Artist-Book The cover with the round medaillon in its ‘pocket’. Along the spine I let hang the threads with the paper beads.


Artist-Book Still the cover, but this time showing the backside of the round medaillon.


Artist-Book Pages 1 & 2: You see the eye through a round window, the spirals are hand-embroidered, the little altered slide can be put into the lace pocket.


Artist-Book Pages 3 & 4: The images are tape transfered, the flourishes are hand-embroidered.


Artist-Book Pages 5 & 6: I stamped, wove paper, embroidered, crocheted. The dark circle is a free swinging altered bottle cap, the semicircle on the left upper side is a fold-out, where I glued a hand-beaded star.
(Unfortunately the tape transfers gleam so, that you can’t see their motif.)


Artist-Book Pages 7 & 8: I cut two little round windows into the right page.
The raffia forms a little pocket, where I put a transparent tape transfer tag.


Artist-Book Pages 9 & 10: Stamping, tape transfers, embroidered spirals, fold-outs, hand-stained crochet flower and hand-made bead fringe.


Artist-Book The verso with tape transfers, stamps and a ringlet from a fake hairpiece.


I created more artist books, if you like to see them, take a look at Art.


Links:
If you want to create your own (Altered or Artist) Book, you may want to take a look at the following links (the list is far from complete!):

About Altered Books:
What is an altered book?
Definitions

At art-e-zine: Altered Book Workshop

Get Inspirations:
Gallery of Altered Book Artists
Google results of search for ‘Altered Book’
Google image results of search for ‘Altered Book’

Some of the used techniques:
Paper staining
Tea Staining Your Art Journal Pages
Tea Stain Paper

Image Transfer Techniques:
Easy Photo Transfers (different techniques)
Image Transfer
Packing Tape Image Transfers

Here at unikatissima:
Paper Beads

Paper Crazy Quilt

Paper Crazy Quilt

I love Crazy Quilts, because it is a kind of Freeform work, but I don’t like sewing. So I began to make my quilts on and with paper.
On the photo you see a card I made with this technique.
I didn’t only embroider the seams but I also used some fancy stitches like French Knots e.g. (the red dots on the photo) onto the surfaces.

To make your own Paper Crazy Quilt, find matching papers and cut them into pieces. On the photo I used rectangles, but the typical Crazy Quilt distribution is also beautiful (here you can find some lovely blocks here you can find some lovely blocks).
Glue the collage on thin paper and then begin embroidering (carefully!) as if it was a real Crazy Quilt (here is an online class for Crazy Quilts).
To finish you glue or embroider your Paper Crazy Quilt on cardboard.


Links:
Crazy Quilt blocks
Tutorial moved to: Crazy Quilt blocks

Online class for Crazy Quilts

English Embroidery Stitch Diagrams
Deutsche Stickstichbeschreibungen

French knots (Knötchenstiche) (English)
French knots (Knötchenstiche) (German)

Simple Cro-Tat

Simple Cro-Tat

There is a technique called Cro-Tat, which is a technique between Crochet and Tatting: the item it is crocheted, but looks like tatted. For tutorials look beneath the Links.
I don’t have a straight steel crochet hook and so I figured out how to do this in another way.
It is a kind of clothesline crochet: I am crocheting a simple chain that I ‘decorate’ with single crochets.
I once wrote a (German) tutorial on how to make a Mother’s Day card with a Simple Cro-Tat Ornament. It is heavily illustrated ;-)
Anyhow: ‘Luftmasche’ is chain, ‘feste Masche’ is single crochet and ‘Kettmasche’ is slip stitch, the actual row is red, the previously worked rows are in black.


Links:
Tutorial on how to make a Mother’s Day card with a Simple Cro-Tat Ornament (German)
Tutorial on how to make another Simple Cro-Tat Ornament (German) (‘Zusammen häkeln’ means join)

Cro-Tat
Cro-Tat Instructions (English) The link isn’t available no more. Try instead to find an appropriate tutorial in this list of Cro-Tat Instructions.
Cro-Tat Instructions (German)

Here at unikatissima: Clothesline Crochet