Butterfly Loom

Butterfly Loom

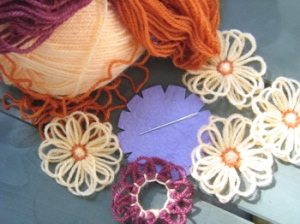
At the website of Knitting-and.com where I found the Crazy Daisies I also found the Butterfly Loom.
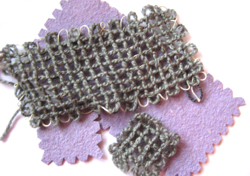
As always I didn’t want to buy something without knowing if I will use it ever again and cut my butterfly loom in different sizes from cardboard as you can see on the photo.
It worked out very well, but although I’m always coming back to different kinds of weave I think I’d never be patient enough to actually create something with this technique. It’s a pity.
;-)


Links:
Knitting-and.com: Butterfly Loom

via Knitting-and.com at The Butterfly Loom:
Patterns for the Butterfly Loom
Joining Butterfly Loom Motifs

You can also find a description, faq’s and a gallery of items made with their Butterfly Loom

Here at unikatissima:
Crazy Daisies

Knotted Fabric Buttons and Beads

Knotted Fabric Buttons and Beads

I mentioned previously crocheted buttons, beaded beads, paper beads and fabric beads.
Another way to make your own buttons and/or beads is knotting fabric.

On the photo you see my first attempt on this technique: I admit that I still have to work on it ;-))
It is tiny (about 0,5 cm / 0.2 inches) and was made from a very light fabric that frayed heavily. I thought that this could look interesting, instead it looks unfinished.
Back to the drawing board ;-)


Links:
Knotted Fabric Buttons and Beads

At unikatissima’s:
Crocheted buttons
Beaded beads
Paper beads
Fabric beads

Leftover Needlework

Leftover Needlework

I have a lot of yarn and thread rests, some of them quite short and I had no idea, what to do with them (except Freeform needlework as a matter of course ;-)).
And then one day I found an article about the ‘Magic ball’ an article about the ‘Magic ball’ and decided that this is it ;-)
In the bottom line it’s nothing else then taking your short threads and knotting them together (with a weaver’s knot e.g.) to get a long enough thread to knit or crochet or what ever you want to do.
On the photo you see three tests I did: On the item above I simply knotted different strings into a long thread and crocheted. It were quite short strings.
For the item below left I took two skeins of yarn, one green and one rose. I knitted with two threads and knotted them so, that I began working with 2 greens, then a green and a rose, then 2 rose, a green and a rose again and back to 2 greens. That way I got a kind of blend between the two colours.
The item below right is made in the same way, but with one light green and one dark green.

I’m sure that I will get back to this technique again.


Links:
Make your own magic using knotted yarn leftovers: the link isn’t available no more.

At unikatissima’s:
Freeform Needlework
Weaver’s Knot

Crazy Daisies

Crazy Daisies - Wickelblumen

While searching for something else I found a lot of instructions and tips about Crazy Daisies and had to try them immediately ;-)

As you can see on the photo, my attempt on winding daisies on my own daisy loom worked out very well.
I cut the loom (the purple item on the photo) from thick cardboard. I think that the ice cream lid loom is better, because plastic won’t loose its shape so easily, but for just a couple flowers cardboard is fine.
At my first flowers I just made a very simple backstich center, but even so I find those little flowers stunning ;-)
The dark red flower is a daisy with an open center, but I made it in a different way: I didn’t wind the thread to the other side of my selfmade cardboard loom but to another notch (always the fourth notch in place of the sixth, I think. I didn’t write it down, because I don’t like it so much).
I’m planning to make something like the shrug with a lot of flowers and a simple crochet edging.
Eventually. ;-)


Links:
(all in English, but with explaining pictures and photos)
Instructions and tips about Crazy Daisies

For example:
Round ice cream lid daisy loom
Instructions on how to wind daisies
How to make a backstich center daisy
How to make a open center daisy
Simple crochet edging

Stole, Shrug, Handbag and Three Different Shapes on the Crazy Daisy Winder (from 1945)

Detangling Yarns

Detangling Yarns

The original title of this tutorial is ‘Knitting from both ends without going mad’ which is very to the point ;-)
I mostly work with the yarn end that sits in the skein to prevent the skein to roll all over, but then often the yarn entangles so much, that I nearly can’t work anymore.
This tutorial was really a relief ;-)


Links:
Knitting from both ends without going mad (with explaining photos)

Freeform Embroidery

Freeform Embroidery - Freeform Sticken

On the photo you see my idea of Freeform Embroidery which was highly inspired by ‘Rock Pool’ and ‘Laying It On The Line’.

I used a piece of old (but clean! ;-)) bedsheet as base. First I laid some worsted and funky yarns on it which I fixed with couching stitches (at the top of the photo). Then I stitched some french knots (light yellow on the photo). Below is my first attempt at ply-split braiding which I fixed with some couching stitches too.

It is one of my many UFOs (‘unfinished objects’), but one day I will come back to it ;-)


Links:
Inspirations: ‘Rock Pool’ / ‘Laying It On The Line’

English Embroidery Stitch Diagrams
Deutsche Stickstichbeschreibungen

Couching stitches (English)
Couching stitches (German)

French knots (English)
French knots (German)

Ply-split Braiding: a (very) short description and resources
PDF Ply-split tutorials by Peter Collingwood (scroll down)

Friendship Bracelet

Friendship Bracelet

I once braid a Friendship Bracelet, but in just one colour. The ones at Heather’s Friendship Bracelets are so beautiful because of the different colour patterns she presents.

I haven’t done them yet, but they are on my to-do list (together with a gazillion of other things to try ;-))


Links:
Heather’s Friendship Bracelets
Note: even though there’s written something about a move I could stilll reach the links
Friendship Bracelet – first pattern of first set

Paper Crazy Quilt

Paper Crazy Quilt

I love Crazy Quilts, because it is a kind of Freeform work, but I don’t like sewing. So I began to make my quilts on and with paper.
On the photo you see a card I made with this technique.
I didn’t only embroider the seams but I also used some fancy stitches like French Knots e.g. (the red dots on the photo) onto the surfaces.

To make your own Paper Crazy Quilt, find matching papers and cut them into pieces. On the photo I used rectangles, but the typical Crazy Quilt distribution is also beautiful (here you can find some lovely blocks here you can find some lovely blocks).
Glue the collage on thin paper and then begin embroidering (carefully!) as if it was a real Crazy Quilt (here is an online class for Crazy Quilts).
To finish you glue or embroider your Paper Crazy Quilt on cardboard.


Links:
Crazy Quilt blocks
Tutorial moved to: Crazy Quilt blocks

Online class for Crazy Quilts

English Embroidery Stitch Diagrams
Deutsche Stickstichbeschreibungen

French knots (Knötchenstiche) (English)
French knots (Knötchenstiche) (German)

Designing a Celtic Knot

Designing a Celtic Knot

No, this is no April Fool’s joke ;-)
With this instruction you can construct your very own Celtic knot, a pattern I used to find too complicated to design of my own.
The image shows a Celtic knot I created some time ago, but I still like it.
I have nearly forgotten about this technique, but now that I rediscovered it, I have several ideas how to use it more often.


Links:
Designing a Celtic Knot
The original site doesn’t exist any more and is now only available through webarchive: Designing a Celtic Knot (Constructing a Celtic Knot)