Stencilled Card

unikatissima Stencilled Card

(Click photo to enlarge)
Recently I needed a birthday card and that is the reason why I played around with stencilling again ;-)


unikatissima Stencilled Card
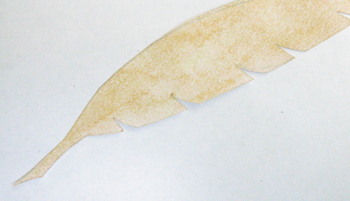
I wanted to have a negativ stencilled feather and sketched and cut therefore a feather.
Here I’ve made my first tests already.


unikatissima Stencilled Card
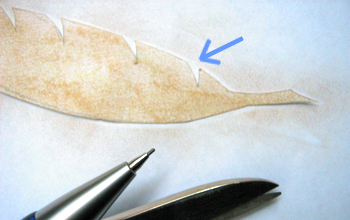
I covered my feather with light brown chalk and smeared the chalk with my fingers outwards.
This way I got white areas around my stencil which made the quill of my feather much too broad for my liking (see arrow).


unikatissima Stencilled Card
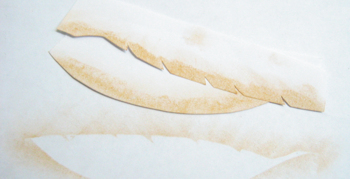
Therefore I cut two half-stencils and used them.
It worked great!
Another advantage of this half-stencil method is the fact, that the really narrow quill of my feather can’t slip or even tear anymore.


unikatissima Stencilled Card
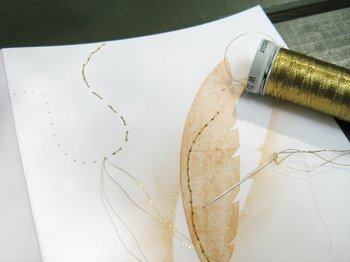
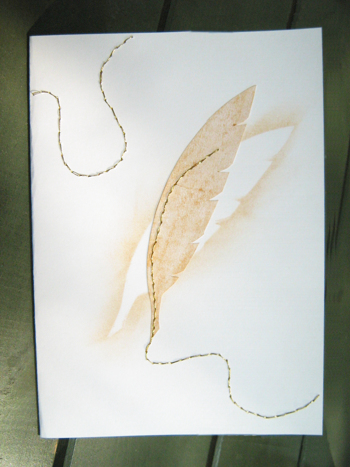
I glued a cut-out feather shifted on my stencilled feather and because I thought that something is missing, I embroidered some lines with golden thread.
I used a running stitch back and forth as I always do.


unikatissima Stencilled Card
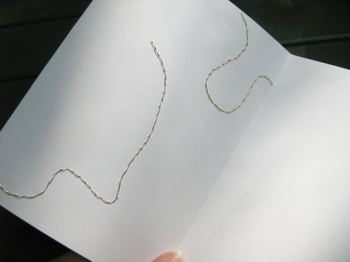
That’s how the inside of the card looks – I left it this way and wrote on the right side of the card.


unikatissima Stencilled Card (Click photo to enlarge)
And that’s how the finished card looks: I liked it ;-) and the adressee liked it, too :)

Admittedly the card looks still a little bumpy here because I fixed the chalk with hair spray. After everything was (really!) dry I put it under a heavy book and afterwards it was beautifully flat again.


Links:
Instruction on how to make the Running Stitch (English)
Instruction on how to make the Running Stitch (Vorstich) (German)

Here at unikatissima:
Entries with the tag ‘stencil’
Entries with the tag ’embroidery’

Fabric Scrap Scarf

craftstylish Fabric Scrap Scarf

Again a scarf from scraps ;-)
But this time it’s not only about scraps nor scarves: It’s about this technique, where you arrange fabric pieces and/or yarns on water-soluble sheet, where you make it ‘unslippable’ by spraying it with fabric glue where necessary, where you cover it with water-soluble sheet again and then sew more or less wildly in all directions to connect all elements with each other.
After rinsing it (thoroughly!) you get a more or less delicate fabric that you can use as scarf like on the photo, but you can also make a top top top or a one-of-a-kind vest one-of-a-kind vest poncho from.

There is even a book that shows how you can mix this technique with felting.

I really must do this once ;-)


Links:

Here at unikatissima:


Making Paper Beads

unikatissima Doodled Paper Beads

After I’ve made my paper beads roller that I presented yesterday I played around with paper beads a little more.

I prefer the tube beads anyway (marginally ;-)) and after having seen the paper bead designer I thought: ‘Yes, a little bit of colour is enough, you can’t see the rest anyway.’

So I quickly made me some doodle paper beads ;-)

And that’s what you do:


unikatissima Doodled Paper Beads
First I took two sheets of plain printer paper and simply doodled at one side with a blue ballpoint pen.


unikatissima Doodled Paper Beads
Then I cut the sheets in strips of the same width…


unikatissima Doodled Paper Beads
… and rolled my paper strips with my nifty paper bead roller in a wonderful short time.


unikatissima Doodled Paper Beads
Of course the hole of the bead is split into two holes, too, because my bead roller consists of two halves.


unikatissima Doodled Paper Beads
I ‘stirred’ the hole again with a toothpick so that only one big hole remained.


unikatissima Doodled Paper Beads
Somehow I didn’t want to use the glue excess as varnish for the beads, so I used a simple glue stick and covered the beads afterwards with medium gel. Here you can see them drying.
My potted palm got special leave on my balcony for it ;-)


unikatissima Doodled Paper Beads
Although I find my doodled paper beads beautiful I thought that I would look boring if I string only them, therefore I made some additional easy Peyote beads.


unikatissima Doodled Paper Beads
Looks good, doesn’t it? ;-)
I wasn’t sure yet what I would do with my beads on this photo.


unikatissima Doodled Paper Beads
It became a bracelet in the end. I simply strung the beads on an elastic and hid the knot in a bead.


unikatissima Doodled Paper Beads
And here an ‘action shot’ ;-)
It’s not so easy to take a good photo of your own arm ;-))


After I had finished with my doodled paper beads I thought, that this was a great way to make a lot of matching paper beads from advertising flyers.


unikatissima Magazine Paper Beads
So I picked an ad with a photo of bed sheets where I liked the clour scheme.


unikatissima Magazine Paper Beads
Then I measured the circumference of my doodled paper beads with a string and cut strips from the ad a little broader than necessary.


unikatissima Magazine Paper Beads
I glued the strips from the ad at one side of a plain printer paper sheet and cut the resulting papers in (in this case) 1 cm broad strips, because I wanted to have little beads.


unikatissima Magazine Paper Beads
I glued some patches from the rest of my ad on details that I didn’t like, they won’t to be seen on the bead.


unikatissima Magazine Paper Beads
Here my beads are drying on a wire because I cut about 80 paper strips and I don’t have enough toothpicks or plants for the drying process ;-)
This time I used a water-based craft glue that glues fast but dries slowly.
This is great because I could varnish my beads easily with the excess of the glue which made them shine and when my fingers eventually got sticky I could wash the glue easily away with water.


unikatissima Magazine Paper Beads
I have not yet finished, but I find my paper beads beautiful, a little bit like made from Jade.
We will see what they will become :)


Links:
Paper Bead Designer

Peyote Bead (Beaded Bead)

Here at unikatissima:
Paper Beads Roller
Entries containing the words ‘paper’ and ‘bead’

Paper Beads Roller

unikatissima Paper Bead Roller

In a sense I always found paper beads great, but in another sense it always makes (made! ;-)) such a mess, so that I didn’t often made some.
Then I found the paper bead purses (ooooh…). (The link doesn’t work no more, look instead for the Google image search result for ‘paper bead purse’.)
And on the website of the paper bead purse designer I found a video showing how to use a paper beads roller that you can buy at her website (this link doesn’t work neither, but there’s still the video).
Great idea!
She also describes very good how to apply the glue and how to use the glue excess as varnish for the bead.

A little more research found me an instruction on how to build a self-made paper beads roller.
Another great idea! ;-))

I wasn’t sure whether I want to make sooo many paper beads and additionally I thought that I don’t need no crank, so I simply put everything together and the result is my spontaneously made paper beads roller ;-)

And that’s what you do:


unikatissima Paper Bead Roller
Cut your paper strips for the beads (I used a page from a travel brochure) and take two big needles, two toothpicks (they have to be smooth!) or – as I did – two little metal skewers.


unikatissima Paper Bead Roller
Join both needles (toothpicks, skewers…).
It would be enough to wrap some tape around, but I didn’t want to become my skewers sticky after taking away the tape, therefore I wrapped a broad strip of paper around and taped that.


unikatissima Paper Bead Roller
Slip the end of a paper strip between both skewers (if you use triangular ones, slip in the broad end) and begin to wrap on the bead.
On the photo you can see the paper strip that holds together my skewers.


unikatissima Paper Bead Roller
That’s how it looks shortly before you’re finished with wrapping.
You can’t see no glue on this photo because I can’t wrap with one hand and take photos with the other – at least not without dripping glue everywhere ;-)


unikatissima Paper Bead Roller
When your bead is done you can easily remove it.


unikatissima Paper Bead Roller
I was amazed at how fast and easy everything worked and I had much less mess than before ;-)


unikatissima Paper Bead Roller
The hole of the bead is split into two holes because my bead roller consists of two halves.


unikatissima Paper Bead Roller
I then simply ‘stirred’ the hole with a toothpick so that only one big hole remained ;-)
(By the way, the instruction for this bead is scheduled for tomorrow ;-))


Have fun wrapping paper beads! :))
and if you want to try some other bead shapes check out the Paper University.


Links:
Paper Bead Purses
The link doesn’t work no more, look instead for the Google image search result for ‘paper bead purse’.
Paper Beads Roller Video
Self-made Bead Roller (How to use a bead roller) => scroll down to ‘Hand Made Bead Roller’

Different Paper Bead Shapes (Recycled Paper Beads)

Google search result for ‘paper bead howto’
Google image search result for ‘paper bead howto’
Google search result for ‘Papierperle Anleitung’
Google image search result for ‘Papierperle Anleitung’

Here at unikatissima: Entries containing the words ‘paper’ and ‘bead’

Start an Embroidery

unikatissima Start an Embroidery

I just wanted to try ‘real’ embroidery (viz. not on paper ;-)) and had to find out how actually to begin and to end (on paper I simply glue on the threads but I thought that this must be done differently on fabric ;-)).

I found great instructions that helped a lot.

After my first experience with the v-neck of my t-shirt I think that I will embroider more often on fabric ;-)


Links:
Starting and Ending Threads

Here at unikatissima: Entries with the tags ’embroidery’ and ‘paper’

Garden Decorations


After I presented Jewelry for the Garden some time ago and yesterday the Tomato Tube Leaves I want to present today three more garden decorations from joghurt cup lids and acrylic yarn.

 
Instruction for the 1. decoration, the 2. decoration, the 3. decoration


1. decoration

unikatissima Garden Decorations 
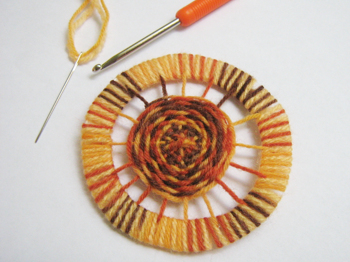
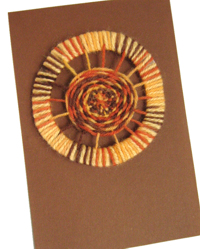
As you can see the ornament can be used for a greeting card as well ;-)


unikatissima Garden Decorations a
I used a transparent joghurt cup lid (from a 500g joghurt cup) and variegated acrylic yarn.
Additionally you will need a darning needle.


unikatissima Garden Decorations a Template Cut a broad rim from the lid and prick 16 holes.
Then weave a spiderweb through the pre-pricked holes.

You can click the thumbnail of the template to download the enlarged template. The template is about 10 cm (appr. 4 inches), if your lid size is different you will possibly have to adapt the print size.


unikatissima Garden Decorations a
Weave the spiderweb: always over and under the threads, as long as you like.


unikatissima Garden Decorations a
Subsequently I complemented the yarn with another with a matching colour and wrapped both around the broad plastic rim.
The crochet hook made the work sometimes easier but isn’t necessary.


I glued the ornament onto a card but you can attach it to a wooden stick, e.g. a kebab skewer, too, and put into a flower box or a flower bed.


2. decoration

unikatissima Garden Decorations b 
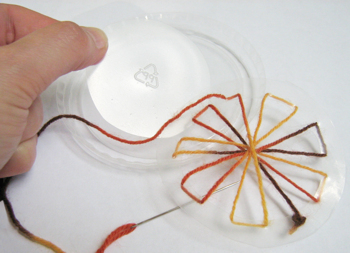
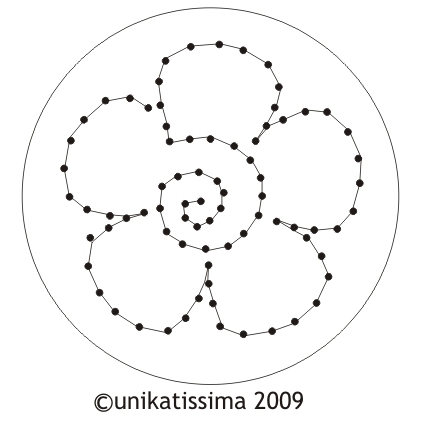
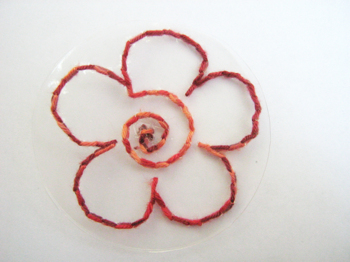
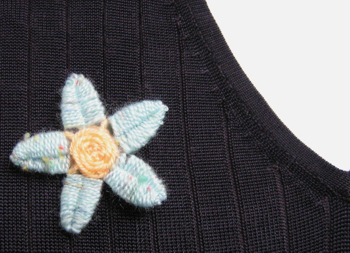
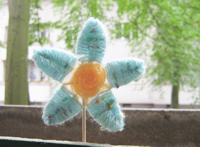
I made this ornament with a lid from the same joghurt and with acrylic yarn, also.


unikatissima Garden Decorations b Template Cut your joghurt cup lid following this template (click the thumbnail of the template to download the enlarged template. The template is about 10 cm (appr. 4 inches), if your lid size is different you will possibly have to adapt the print size.)

You must also cut the black lines in the petals, but they must not reach the edge.


unikatissima Garden Decorations a
Begin ‘in’ a petal and weave both wings of the petal in eights until they are completely covered in yarn (from the center to the left and back to the center, from the center to the right and back to the center, repeat).


unikatissima Garden Decorations a
Then prick a hole in the center of the flower and weave a net (in a contrasting colour) (see photo).


unikatissima Garden Decorations a
Weave the yarn around the threads, always over and under the thread.


unikatissima Garden Decorations a
If you use the ornament as a pin or for a greeting card it is enough to weave only one side of the flower, otherwise you must work on both sides.


3. decoration

unikatissima Garden Decorations c 
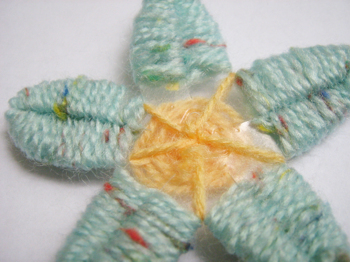
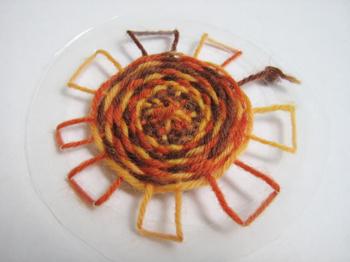
Of course this ornament has been made with a lid from the same joghurt and with acrylic yarn ;-)
This time a darning needle is absolutely necessary.


unikatissima Garden Decorations c Template Cut and prick your joghurt cup lid following this template (click the thumbnail of the template to download the enlarged template. The template is about 10 cm (appr. 4 inches), if your lid size is different you will possibly have to adapt the print size.)


unikatissima Garden Decorations c
Simply embroider the pattern: always in and out and if you like, back again.


Links:
Here at unikatissima:
Jewelry for the Garden
Tomato Tube Leaves

Here on this page:
Instruction for the 1. decoration
Instruction for the 2. decoration
Instruction for the 3. decoration

Clothesline Knitting or Filled I-cord

unikatissima Clothesline Knitting

Recently I thought about how to make low-priced purse handles. I wanted to make them from the same yarn that I will use for my purse but I didn’t want to have a simple I-cord because I’m always knitting very loose and the cord gets much to flexible for a purse handle.

Then I thought about the Clothesline Crochet and thought that this must be possible with knitting, too.
It is ;-))

Note: If you don’t know how to knit an I-cord you can find instructions in my Actinia entry in the English tutorial under ‘I-cord’.


That’s what you do:
I choose a thick ready-made cord to cover with knitting.
The number of stitches to cast-on depends on the size of the cord, the yarn and the needles (try it!), in this case I used five stitches.


unikatissima Clothesline Knitting
So, cast-on the stitches, lay the inner cord in (see photo) and knit the first stitch over the inner cord.
The inner cord will be trapped in the stitch.


unikatissima Clothesline Knitting
Then knit simply the rest of the stitches, lay the inner cord a little beside (see photo).


unikatissima Clothesline Knitting
In the next row lay the inner cord again over the left needle to the right of the thread just as in the first photo, knit the first stitch over the inner cord and knit then the other stitches.

Knit in the same way until you reach the desired length.


unikatissima Clothesline Knitting
Somewhere (and I really don’t remember, where) I saw a tutorial where they glued on hairbands to make the purse handles.
I thought that I should be able to knit around the hairbands just as I knitted the inner cord, but it didn’t work.
What however worked was knitting an I-cord and threading the hairband into, so that the hairband is covered and I even have threads to sew the handles onto the purse.


Links:
Here at unikatissima:
Tutorial on how to knit an I-cord in the English tutorial in the Actinia entry under ‘I-cord’

Water Balloon Luminaries

candletech Water Balloon Luminaries

Aren’t those beautiful?
When finding the instruction on how to make water balloon luminaries I was thrilled.
It looks so easy (I haven’t tested it yet) and it’s worth to read the comments, too, to get the experience and more ideas:

  • several comments tell about their experience with this technique: some had problems with popping balloons while dipping them into the wax and hot wax got everywhere, so it seems that one has to be very careful;
  • somebody said that they saw poured sand at the bottom to prevent overheating/melting, somebody else suggested to put some water in the luminary for the same reason;
  • I’ve seen mentioned somewhere to cast some plaster of paris on the bottom for the same reason;
  • as Carol said for the geometric cut paper table lamp you can use battery operated tea lights;
  • suggestions were given to put something between the layers, like leaves and somebody else told their erperience with this;
  • I’ve seen somewhere that somebody glued (somehow?) the top layer of paper napkins on such wax luminaries;
  • someone wanted to make parts of the luminary opaque which didn’t work, but somebody else suggested to use different coloured wax for the layers with a dark colour as outer layer and then carefully carve out a pattern through the outer layers;
  • one comment even suggests to do a similar technique with chocolate syrup in place of wax to get chocolate bowls (hmmm! ;-));
  • and somebody gave a tip on what to use if you don’t have a double boiler.

I’m not quite sure if I want to play around with this, but the temptation is strong ;-))


Links:
Water Balloon Luminaries

Library Pocket Book

unikatissima Library Pockets

I found a tutorial on how to make a wonderful library pocket book.
Though our library doesn’t have such library pockets and I don’t feel like buying them in internet.
That is why I designed some pockets myself. If you like you can download my library pocket template (link see below).
I’m planning to make a book where the pockets are made from patterned paper, the flower paper on the photo e.g.
For that purpose I will print the template, glue the paper so, that it is patterned on both sides and then cut the pockets from the template.
And then I will begin to embellish ;-))


Links:
Library Pocket Book

Here at unikatissima: unikatissima’s Library Pocket Template (PDF – ca. 80 KB)

Scarf and Tie Holder

unikatissima Scarf and Tie Holder

If you have a lot of scarves or ties (and don’t craft with the latter ;-)), you want to keep them tidy.
I found an instruction on how to make a really nice scarf and tie holder (German). You can make it match your home very easily.

The holder on the photo is faked using my preferred gift wrapping paper, because I owe no more than the three scarves and I think that I will ‘craft‘ my ties ;-)

The making of the holder consists mainly of using a narrow plank, painting it white, glueing the clothespins on (e.g. with PVA glue) and then decorating the item with the printed layer of napkins (decoupage). Best if you check their pictures.


Links:
Scarf and Tie Holder (Tücher- und Krawattenhalter) (German)

Here at unikatissima: Entries with the tag ‘tie’